Sewing the panty is not very difficult. With some experience you will make it up in one to two hours.
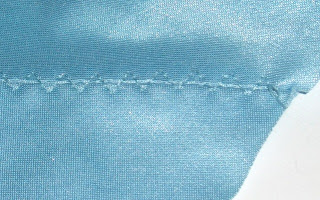
For topstitching a multiple zigzag is used. Don’t make it too short, as this will curl the edge.
Attach the narrow lace with a zigzag stitch to the scalloped edge of the lace, pulling the elastic very lightly (you could also measure it: take 10% off the actual seamline). This will make sure the lace remains in place and no gaps appear when wearing it.

Sew the lace to the center front part using a small zigzag again, the stitch should not be too short.

Turn and topstitch with a multiple stitch zigzag. The front part is now ready.
Attach crotch part and lining to front with a zigzag stitch. Right sides of lycra of front and crotch part together, right side of crotch lining to wrong side of front part.
Trim seam allowance, turn and stitch with (multiple) zigzag.
Now attach back part to crotch, right sides of lycra together, don’t attach lining.
Open the seam and lay the lining over it. Trim the top of the seam allowance of the back part.

Topstitch over the seam with the widest possible multiple zigzag stitch. This is something I figured out for myself, in this way you have a minimum of bulk in the seam. (Another way is cutting the back part and crotch in one piece of fabric, you then just use the multiple zigzag stitch, no seam at all, my fabric was not long enough any more to do that).
Sew front and back together at the sides with a zigzag, topstitch with a multiple zigzag.
Add the lingerie elastic
For that measure your seamlines and take off 20%. In this panty you combine the lengths of the back part and the crotch piece. Cut the elastic with approx 2,5cm/1 inch extra on both sides (I use pins to mark beginning, end and seamlines, and in the picture a fade-away pen to mark the point half way the back part).
Pin the elastic with the softer side up. Stretch the fabric when pinning. You need a lot of pins and in the end it looks like this.
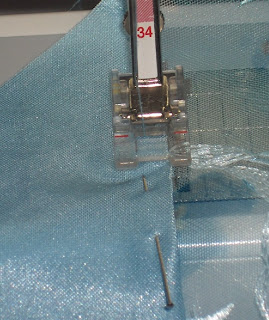
Stitch it with a small zigzag on the fabric, making sure that when you turn the elastic, the edge remains visible. I use a transparent foot for sewing, because I then can see very clearly where I stitch. Remove the pins while sewing.
And here I always do what all my teachers said you should not do: I stretch the elastic so that it lays flat when attaching it. My first teacher wanted me to use many pins and sew over them, which always resulted in ripping out parts of the stitching, because the lycra had come together in the wrong way. And a lot of broken needles!
By now I have made many panties for myself and my daughter and I stretch the elastic BUT NOT THE LYCRA FABRIC. Capital because if you do that, it will “bubble”. But why not stretch the elastic? It must stretch to your body, mustn’t it?
Trim the fabric, turn and topstitch with a multiple zigzag.
Finished.
Please let me know whether you find this helpful or whether I could do anything to improve the tutorial.


Thank you Sigrid, for an excellent tutorial on sewing panties.I have just discovered your blog.
ReplyDeleteVonne :)
Great tutorial and beautiful panty! As far as fit books go, I think Nancy Zeiman's book is well worth it. The pivot and slide FBA is very different than any other method - and much easier. Just remember that no matter what FBA you do, you should increase the dart size too. This book explains clearly and easily how to do both.
ReplyDeleteThe different panties from www.haoyii.com .The lingerie store you can go to shop www.97store.com
ReplyDelete