Sunday, June 26, 2011

Mwah – not enthousiastic

The past week I spent my sewing time with this jacket from Knip Mode March. I liked it mostly from the line drawing, as the pictures don’t show it too clear. Though it’s a good example what a different look you get from using a differnt fabric or when wearing another style clothes with it. It has sleeve vents, single welt pockets and a collar with a corner taken out of it (don’t know how to say this in English).

The fabric I used was from my stash, bought last year in a sale for about the same price as muslin fabric. I skipped the muslin stage for that reason, just wanted to see how an unaltered size 40 would be on me. That size is the correct bust size for me. My experience with Knip Mode is that I don’t have to alter the length above the waist, as they draft for taller women than Burda does.

That assumption was right, but I don’t quite like the result on other points. And strange enough: half way this week when I tried it on I thought it was better.  
The bust dart is not in the right place (too much to the side) which gives strange space at the sides. In the picture this is even exaggerated, as I am standing and DD kept sitting in her chair while she took the pictures.

The sleeves might be a bit longer as well.

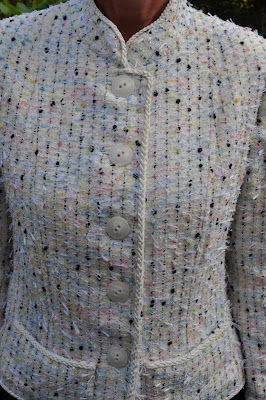
Also the opening in the collar is a bit lower than I thought it would be and around the bust it tends to go outward. I´m inclined to say that a button would be needed higher on the front as well, though there´s no space for it.

I think the issues have to do with my figure more than with the pattern, which was drafted well and was in general not too difficult to sew. For the single welt pockets I referred to Kenneth King´s book Couture techniques and the sleeve vent I used the tutorial I once made myself (see the tab Tutorials above).  The sleeve went in very smoothly and didn’t have too much ease. I added a sleevehead but no shoulder pads.

For me this is another “result not as expected/planned” project, nothing really lost except time, but it confirms the need for a muslin when I make a new jacket pattern. I worked on this jacket almost every evening in the past week, which is a pity if I won’t wear it. A muslin would have cost me only one evening.

Saturday, June 18, 2011

The Chanel style jacket

is finished. After making the muslin end of December, it took me till last week to finish it. I was sidetracked by other projects and life during the past months. The only thing missing is the chain in the hem, which I didn’t have and will add later.

I wrote a full review on PR here. Here are the pictures:

I did give extra thread below the buttons, but could still be a bit more. I really like the waist shaping, a detail I added. The original is very boxy, which is not so good for me.

Looking serious again, and in need of a new haircut very soon.

The special detail of this pattern, the 3-piece sleeve.

The back, think it turned out quite nice.

A glitch in the instructions. In step 82 you are told to attach the facingn with catchstitches, in step 88 you have to fold it out again. Took some unpicking almost invisible stitches. Did not quite like that.

Also in step 89 the instructions omit to tell to attach the lining to the sleeve till the top, while in an earlier step it says start 10 cm lower, which is the correct thing to do. This I saw before sewing, so no harm was done.

Sunday, June 5, 2011

Dress and cardigan

Two weeks ago, after my ling erie set and in my desperate mood that my sewing was not going the way I wanted I went shopping for some notions and came home with two fabrics and two patterns. More or less to console myself and to get a quick start. The Burda pattern I just cut, instead of tracing it, what I usually would do. Though I was not completely taking risks, I made a quick muslin of the upper half of the dress to make sure there was enough space in the bust area and to see how the armhole would be. Burda is very consistent in sizing and this time I took the size 42 for the upper part, tapering down to 46 at the hip area. It was almost right the first time. I took out 1 cm in the back arm hole because it had a little gaping problem and took out half a centimeter of the back shoulder at the side of the arm.  Otherwise I didn’t change anything.

The waist is not completely “fitted”. There is a bit of extra space. Enough accent on my waist as it is now, think that if I fitted it more, the hip area would be too prominent.

I did line the dress and was stupid! I had sewn the zipper and back seam, the shoulder and side seams and then thought: there are some tutorials on lining a sleeveless dress on the internet. Let me check how it’s done. To be remembered of the fact that the order of construction is completely different. So I had to do it different, which involved some hand sewing the lining. Live and learn, I’ll sure remember next time. If you don’t want to be as stupid as I was, check this or this tutorial

Thanks Rose, I used one of your zippers here!

The picture on the envelope and the line drawing.


I can wear this dress with a jacket, I even have two (one black, one grey) that I can wear with this dress. But I also made a cardigan to go with it. It’s a pattern from a new pattern line: It’s Afits. A bit of a strange name to me, I think I read it’s from the German company that also makes the Abacadabra children patterns.

First the pictures from the envelope:


The minimal instructions are in Dutch and in German. For my version of the cardigan the instructions tell you to zigzag or serge the edge or  leave it as it is, because knits don’t ravel. Well, that’s not what I like, so I cut 2 cm extra on the edges, interfaced them them with strips of Pam’s tricot interfacing and topstitched with a double needle. I quite like the result, especially as this only needs a little more than 1.5 meter of fabric.


And to finish off this already picture-heavy post a picture of one of my roses: Félicité and Perpétue. The buds are dark pink, but opened they have  beautiful white, small flowers. I’ve been working in my garden a lot this long weekend, but I also did some sewing. Next post will show some results.

Wednesday, June 1, 2011

Waistband construction

Thank you all who commented on my previous post asking how to change a straight waistband to a shaped waistband. It’s been very, very helpful. This time I used an existing pattern (Vogue 1066, a Badgley Mischka suit) but now also know how to do it from scratch.

I placed the sideseam notch on my pattern pieces and adapted to the length of the pattern. 

The fabric was bought at the Antwerpen fabric market during PR weekend. It’s a bit heavy and has a lot of drape. Also the waistband (which is partially on the bias from being so shaped/curved) tends to stretch a lot. My solution to remove the stretch from the waistband was inspired by a technique in the book "Couture sewing techniques” that I wrote about earlier. It’s not a technique from the book, but only inspired by.


The fusible interfacing that will be ironed to the front band is cut with the center front on the grain. The center back is almost on the bias. I’ve cut another interfacing piece from silk organze, but with the center back on the grain. This I stitched with rows of small stitches to the fusible part of interfacing (on the non fusible side!). Only then I ironed it to the waistband. Almost no stretch in the waistband any more. Both the fusible interfacing and the silk organza were cut without seam allowances.

To complete it, I cut a strip of silk organza straight of grain and sewed that in the upper seam when  sewing front and back waistband together. This I’ve seen before, mostly done with a selvage edge from a lining fabric, which works perfect as well, only I already had the silk organza on my table.


Powerderpuff asked for some pictures to see the difference between a shaped and a straight waistband. Thought that’s a good idea, and since one of my recent disappointments was a pair of trousers with a straight waistband here they are:

The grey is the shaped waistband, the brown to the right straight, with a very firm interfacing. You can see that it gapes.


In the back, my daughter didn’t quite get the message and didn’t see that the waistband is not completely visible, but I think you’ll get the idea. On the right is the gaping of center back in the straight waistband. In the shaped waistband there is a steep angle in my pattern. Somewhat like this:

SNAGHTML42f371f4


Well, I’ve only to hem the trousers and make a buttonhole + attach the button. Should be finished tomorrow.