Sunday, May 31, 2009

Not on the list

Making a list of intended projects if the surest way to not keep to the list. At least, so it seems to be for me.

This long weekend (we have a 3-day weekend here) I intended to sew a bit, the last weeks I didn't get a lot done. And I succeeded. The pants and the black BWOF top only need hemming, so I hope to show pictures of those two projects (that were on my list) tomorrow. This afternoon a made a wrap top.

Recently I bought a simple wrap top that I already intended to copy, and this week I saw a video from DKNY on the many ways to wear wrap tops (thank you Adriana for providing the link), which immediately inspired me to make a top with a longer wrap than I originally planned. I had a good look at the video two or three times to see the details like how long is the back, how long the wrap, any other details that need attention?

I took Jalie 2449 to start with, but any basic T-shirt pattern will do and made it as wide as the fabric, ended up with a bit more than the fabric width in fact.

When I tried it on the weigth of the fabric made the wrap go to the floor, so I cut of 40 cm in the end of the total length.

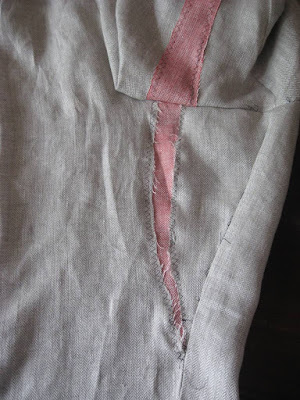
This is the pattern for the top on the fabric. On the left is the original line of the pattern for side seam and armhole/shoulder. I made the shoulder going up a bit to a sort of collar both on the front and the back pattern.


And here the result in various ways of wearing it.

Friday, May 22, 2009

Pants - with piping

It took me some samples on the piping before I had the courage to decide I would make my Vogue 1066 pants with piping. I had two sorts of piping. One a thinner piping, with no separate cord in the middle. The other the more classic bias piping with cord.

The thinner variety was difficult to work with, certainly for me as I do not have experience with piping. I also tried how it would be if I only used topstitching (3rd from above). Didn't like that with the stripes in this case.

Another difficulty for me were the points of the tabs. The pattern shows them as sharp angles, but I couldn't make them work properly. Which made me finally think that I had better make them round. At least easier and with the bias tape with cord it was relatively easy from there.

A picture from the front pinned on my dressform. Hope to finish them this weekend, it's pretty straightforward from now on, I already inserted the zipper.

Inspiration

Just came across this shop Goldyn by following a link on PR. Lots of inspiration for special details.

image   image

image image

No time for me now to knock something off, but worth visiting if you like these kind of details.

In general I'm very quiet at the moment with comments on reviews or blog posts, sorry. My way of time management now: have a quick look, but trying not to spend too much time on the internet by writing comments or joining discussions. Just the way it is for me right now (making an exception for the lingerie sew along I started of course).

Sunday, May 17, 2009

Sewing from my stash

I'm not one with a large stash, but certainly have accumulated more fabric last year than I've sewn. This year I've sewn only 13 items till now, and certainly have been buying more fabric. I'm not counting meters and don't plan to, but I would like to diminish my unused fabrics. I don't like to have a large stash, it doesn't feel good for me. Very personal this, I know that some of you have large fabric collections and love it. It doesn't work for me that way. Certainly fabrics with a print are likely to go out of fashion relatively quick. I do even have a very beautiful fabric with a plaid, that I now think is not "current" any more, while two years ago when I bought the fabric, it certainly was.

Time to make a plan for reduction and try not to buy too much fabric. Below the fabrics I plan to use and some of the patterns I've chosen. Of course subject to change and I'm not putting a timeframe on this. Let's see what I get done till end of June. It's 8 garments: 2 bottoms, 3 knit tops, 2 blouses and 1 vest.

It's not a wardrobe, not everything can be combined, but most of it can, and all things can be combined with other garments in my closet. For fun I'm going to add a list to my sidebar to keep track of progress (or not).

6 of the fabrics, I tend to buy black, navy, white and off-white as basics.
My first set will be based on black.
The pants that I made the muslin for. Tonight I'm writing this post instead of sewing, because I can't decide whether I want to make the piping on it. Perhaps that is just too much with the stripe.
I'll omit the belt loops, that's too much in any case with this fabric, and a belt is not intended with this pattern.
Would a basic blouse pattern be good for such a sheer fabric? Any suggestions for a style for this one?

The Jalie pattern will be used to copy a wrap top I bought recently in turquoise, which proves to be a good buy, great summer look with white pants and camisole. I'd like a black one to combine with other clothes too.
The famous top from the February BWOF, which has such difficult instructions. I haven't read them, but traced the pattern. The instructions KayY gave in her review of this top seem to be very helpful.


And to get some color: a coupon I bought last year, only 1 meter so this will be a sleeveless blouse. Pattern to be decided.

To the left and right fabrics already shown above, the center a white embroidered cotton that doesn't need a complex pattern.

Friday, May 15, 2009

What makes the difference

On special request a picture of my pattern change.

NB: this is the adjustment I made based on my first muslin, not the pair of pants with the diagonal wrinkles!

In the first muslin a bit more 'body space' was needed, I could see that (thanks Nancy K for the initial comment). The day after my first muslin was made, Threads issue no. 143 was in my mailbox. In this is an article "Improve the bottom line" for "those of us who have been blessed (or cursed) with a prominent derrière" (quote from the article). As it seemed exactly what I needed, I started with the change described, which in the end gave me too  much bodyspace, as you can see in the way I had to take out space from the second muslin. The only thing I really needed was the extra space on the inseam leg. In my picture that's the red line. The grey line is the original pattern line.

This was the article which gave me the idea of adding the extra space in this way, to answer Designdreamers question. I've made more bodyspace until now as in the next picture, but above seems to work well with this pattern.

Unfortunately it seems there won't be a lot of sewing time next week, my plans certainly exceed the amount of time I have. I hope to get a few things done this weekend.

Wednesday, May 13, 2009

Quick fix

Sometimes you have a problem like the pants fitting that I posted about yesterday that keeps going on in your mind. That was the case for me with these pants. When I read the comments this morning I was very grateful for all your suggestions and encouragements. I realized that I had better go back to my first muslin , which was not so bad. I just had to make a change right away and this is the result. It's better then the first muslin, don't you think?


And this is all I did to change it:

I made a cut in the back pattern from the crotch to approximately 20 cm down and shifted the center a bit outward. On the leg in the top of the picture I did sew the extra piece  of fabric on the outside of the pants, oops, but the change is similar on both legs. I'm more confident now to sew the final version.

Tuesday, May 12, 2009

Better than RTW, but

My pair of Vogue pants is better than anything I can buy in the shops, but it still has issues in the back. The holy grail of pants fitting, sigh.

I did change the pattern, made another muslin and thought I had the fit issues solved.

This is a picture after my daughter pinned the back. I did sew the altered line, and it seemed good. Then I decided to make a pair without all the nice details first, as I need a few basic pants for summer. And the result is a bit disappointing in the back. I hate those lines and the crotch seamline isn't good either (and I did change that like Nancy K suggested).

Why is it that the muslin seems right, and the final garment is not as expected? I want my next pair (on which I plan to do all the detailed work with piping) to be good!

Wednesday, May 6, 2009

Sewing muslins

I've done some quick muslins the past evenings, and this is the result: vest no. 116 from the BWOF 2008 February issue and the pants from Vogue 1066 (the Badgley Mischka suit).

Belinda commented to make a muslin when I first told I was planning this pair of pants, as even on the model on the envelope you could see these pants are not wide. I was planning to do a muslin, but thanks to her comment I did not flatter myself with a size smaller than indicated on the envelope for my size (which I often do with Vogue). I took my hip measurement and made no alterations, to see how it would be. To my great surprise, these pants seemed to fit. Not the waist of course, but I know how to change for my waist. When I first tried it, still without waistband at the time, it was looking good.

The only thing I did in the below muslin is adding a dart in the front (looking strange because it's two layers, also the pocket facing) and making the dart in the back wider. The waistband is adapted accordingly. No other changes! Looking pretty good in my opinion. Perhaps I should add 1 cm in the center back, but that's all.

And don't look at the strange bulging pockets, I did not use tape to stabilise, it's only a muslin.

The vest is not so good, I did a fba but there's to much fabric above the bust and the dart is too high. I must do the fba in a different way and try again. Also in the back there should be a tiny bit more space at the hip.

And I have one more muslin cut out, the Marfy shorts from this years catalogue. I absolutely love these, and though I don't often wear shorts, I think these could be very nice for summer in a nice fabric. More on that one later.

image

Sunday, May 3, 2009

Lingerie sew along

Still interested in a lingerie sew along? I know there was a panty sew along on Pattern review recently, and quite a few ladies sewing bra's too, so this might be a little (too) late. But if you're interested in joining the sew along I announced about a month ago, please send me an e-mail (isedl at yahoo dot com) with your name and your e-mail address (I need that to invite you to the blog). If you have a blog yourself that you want to link to in the side bar of the lingerie sew along blog, please add the link too.

The sew along (do you write it with or without hyphen?) will last till the end of July. I will not be strict on the number of participants, as I thought before. Everyone who has an interest in sewing lingerie, both experienced and inexperienced, are invited to join. The goal of a sew along is to share experience and learn from each other.

Looking forward to hear from a lot of you.


ETA: To those who showed interest, I sent out invitations to the blog, but not all of you seem to receive them. Please check your spam mailbox.

May 25: ETA: when you have commented on this and have not received an invitation, please send me your e-mail address. Without e-mail address I can't send you an invitation or contact you.

Linen is beautiful, but...

it's wrinkling. As you can see in the pictures and I only ironed it shortly before putting it on for pictures. Should do it again, but not now, so apologies for the wrinkles. After a lovely week in England (in which I met Melissa from Fehr trade, which was so nice, thanks Melissa), this was the first thing on my sewing to-do list. It was not finished the week before our holiday.

I like the result, when I put it on for fitting, my son came in and said "great skirt mom", which is a great compliment from a 13 year old boy.

It's not the best thing I've made, the waistband could be a bit better shaped. Not too bad, I'll wear a shirt over it most probably, but I skipped the shaped waistband and made a straight one. Shouldn't have done that, shaped waistbands are much better on me.

The design lines in the back are not clearly to be seen, but I think the vertical lines are not really necessary in this style. The emphasis is on the front, and as you can see in the picture of the back, the right side is pulled to the front, because of the way the pleats are made. Only a minor detail. I think I'll wear this skirt quite a few times this summer.