Friday, May 30, 2008

Read patterns

Lindsay T has an amusing story of "reading patterns" in her student days and a nice poll on her blog about which sewing resource you use most. Her post inspired me to write this.

It was a difficult choice for me between online resources and sewing books (I voted online resources).

I did learn a lot from the sewing books I bought the last two years ( and these I bought mostly by recommendations of other bloggers), and from the 25 year old Burda book that still regularly helps me out. But as those of you who read my blog for some time already know, I'm quite fond of all resources that can be found on the internet on blogs or websites like Threads magazine. This magazine is a wealth of information too, I bought 4 older issues this week on E-bay, amongst which the issue on the construction of a Chanel jacket.

Pattern reading is something I do when I use a Vogue or Butterick pattern (which is not so very often), usually to see whether there is something special to learn. Last year I wrote a post on how much I learned from those patterns when I got to know them in the 80's. Here in the Netherlands those patterns were hardly sold at the time, and very expensive. (They still are very expensive, the price for a Vogue pattern is 15-19 euro, which is US $23-29, for less than that I can buy 2 BWOF magazines with a lot of patterns in each issue, luckily the Butterick coat pattern was in a half price sale this month).

There's not so much reading in a BWOF or Knip mode instruction. I mostly don't read them and do rely on "the part of the brain where sewing information is stored" (as Lindsay called it so nicely), but when I get stuck or just want to know if there is a better way, I rely on the books and tutorials on the internet.
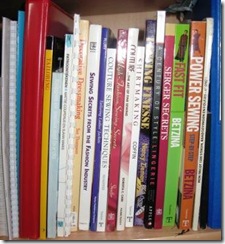
boek

This is a picture of my small collection of sewing books, and as a picture can not be made of the internet information, I just give a reference to my site with links to tutorials (to advertise it a bit, the main work on it is done).

Tuesday, May 27, 2008

Knock off top - second muslin

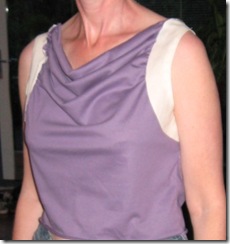
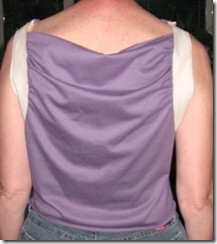
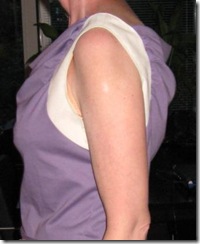
I finished my second muslin for my knock off top. My first muslin you can see in this post.

Knockoff 001 Knockoff 004
Knockoff 003  

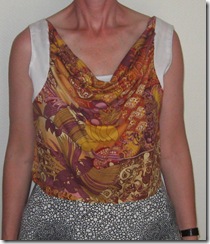
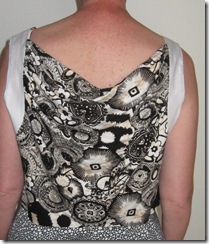
This time I used a cotton knit, which had less drape than the first fabric for the muslin, which you can see clearly. And I sewed one seam on the front to the outside. Well, it's only a muslin.

I took out a bit too much width in the top of the back and could take out a bit more in the lower back. The most important change is the space I took out in the lower part of the front, this is an improvement to fit. With a fabric that has more drape, a centimeter or two added at bust level and a bit added to the back I think I can make it from a good fabric. Now to find a good knit with a lot of drape!

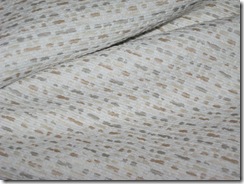
Speaking of fabrics. Today I received my fabric from Textile Studio Patterns, which is the prize I won for the jacket in the  Knock off contest on Pattern Review in March. Its a beautiful fabric. Marsha (of Textile Studio Patterns) doesn't say too much with this description: "Bundles of tan, latte & gray threads are randomly woven through a soft white boucle ground. Simply stunning!"

My daughter said: "That's a cool fabric mum, and those colors are beautiful". Those of you with teenage daughters know that is a huge compliment.

(And let me add that it's nothing to do with Marsha that I received this fabric end of May! It took me a long time to decide which fabric I wanted, and then asked her to delay sending it till after my holidays).

Knockoff 006

Saturday, May 24, 2008

This and that

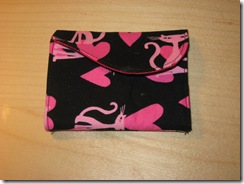
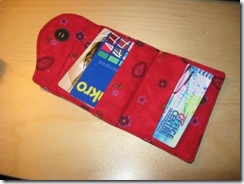
When my daughter saw the Amy Butler free pattern for a business card keeper she wanted to try it, but as all sizes were in inches, and the instructions too difficult for her, she asked me to do it (it's an ideal pattern for cards of credit-card size, not only business cards). Having finished my blouse (pictures still to be taken) and not in the mood to start something else yesterday evening, I said yes.

This is the result.

Side pocket 017 Side pocket 016

Part of the fabric is cut in the wrong direction, as my perception of what the direction of the parts was, wasn't correct. The instructions are very different from what I'm used to, and require careful reading.
I must say that I quit the project yesterday halfway, as it didn't make sense to me any more. Cause must have been Friday night after a few days of very hard work, and I was very, very tired. These instructions must be read carefully and line by line, and I marked the lines that I finished.

What I don't like is being told each time that I have to backstitch each end of the seam. It distracts from the instructions. Just tell at the beginning and only tell when you don't have to do it (which in this pattern is never). But with careful reading it's a good pattern.

At least good to try the instructions for an Amy Butler pattern, as I have two bag patterns in my stash that I want to try sometime.

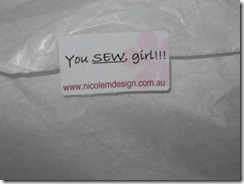
Speaking of bag patterns: this week my package from Australia arrived for the Purse frame bag (that Connie won the PR contest with).

I love the label that was used.

This will be the next bag I'll make. Hopefully in June. Instructions seem to be good as I browsed through them , the print is a bit small, which confirmed my gradual need for reading glasses, :(

Side pocket 019

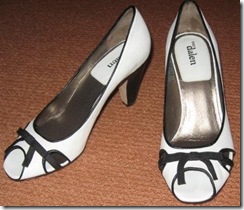
And in the comments on my dress a few of you here and in the PR review noticed my shoes. Let me for once show a picture of a new pair of shoes. I like them, though the heels are a bit high.

Side pocket 020

Regarding the closet-cleaning Melissa asked what I do with the clothes I sewed myself. I'm ruthless, just do them away. When I really like something though I don't wear it any more, I leave it in my closet, otherwise it will go to goodwill.

And on a completely non-sewing note, but on blogging. I always had problems with the layout of my posts. On my new notebook computer Windows Livewriter was pre-installed. I like the features it has and am particularly fond of the possibilities of using tables, which I use to align text and pictures. Adding pictures is easy too.
As always with these kind of programs: some things could be better, but for me it's much,much better than writing my posts in Blogger itself, or in notepad first. It speeds up my writing of posts (did you notice?). It's a free program that can be used on a Windows computer with XP or Vista.

Parting shot on the this and that post is a picture from a flower in my garden. One of my favorites is Astrantia (don't know the English common name) in each variety. Astrantia

How to sew a side pocket with topstitching

In my Knip dress I made a side pocket, mostly by the instructions of my old Burda sewing book. I topstitched it, which was not included in the instructions. As I like this way of working, I'll show you how I did this (instructions for right side of garment, change directions for left side)


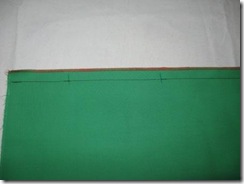
Side pocket 005 Sew the side seam, make large stitches between the points for the opening and make a few backstitches  at the start en end of the opening.
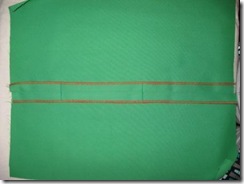
Side pocket 006 Press the seam open
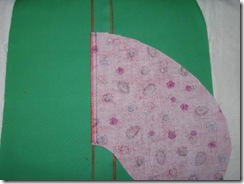
Side pocket 007 Sew the pocket parts to the sides half a centimeter from the edge.
On the left side the lining fabric, on the right side the garment fabric (if you want a difference, for example with thick fabric)
Side pocket 009 Press the lining pocket at the seamline towards the garment.
Clip the seam on the right side with a diagonal cut, this prevents loose threads.
Side pocket 010 Turn to the right side, you can now topstitch the pocket. Either from top to bottom, or like I did with a bar-tack on top and end of the opening.
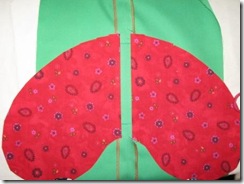
Side pocket 011 On the wrong side of the garment, lay the pockets right sides together, and stitch. I usually use a conventional zigzag to finish the edge of the pocket.

Take the long stitches for the opening of the pocket out.
Side pocket 012 Finished pocket, the pockets are not exactly at the seamline of the garment, which gives a nice finished look.

Friday, May 23, 2008

The Great Coat Sew Along

As many of you will have read on other blogs already, Marji started a blog with a sew along for a wintercoat. The idea is to sew a wintercoat, and plan early, so that it's ready by September.

Butterick 4665 Vogue 8465
image image

I'll post a bit on my coat here on my own blog too, so for those following the TGCSA-blog too, it's mostly a double post.

In the sew-along May is the period for gathering materials, for me it's the decision of what to make. I'm one of those who have to buy the materials for the coat, so deciding on which coat to make is the first thing for me.

I'm not an experienced seamstress when it comes to coats. I made my first coat in many many years (a Marfy pattern) last year, and in the end didn't wear it that much at all. Main problem is that the slit in the back and the position of the last button on that coat give a bit strange opening when walking in it. So this time I want a coat that I'll wear.

Looking for a pattern for a winter coat now very much reminded me of Carolyn's post of this week about a magazine that in the May issue had Fall fashion as a feature. I'm so glad I can at last leave the house now without thinking of a coat. And then I'm browsing magazines and internet for a wintercoat!

My choices: BWOF did have a few coats that I like, but they were all in the plus-size range and I don't want to start with downsizing a pattern.

I have Vogue 8465 and today ordered Butterick 4665. For the Vogue pattern I see the same problem as Shannon described: the neckline is so open, how do you wear this? For both I consider the short version.

What do you all think?

Tuesday, May 20, 2008

What am I working on?

The knock off top is on hold till next weekend. I made the lining and the fit is better, but now is clear that the drape is not as good as I thought. Patsijean kindly sent me some helpful information, and I will redraw the pattern.

Last week I went through my closet, took out all clothes and had a good look at them: which are old, out of style, not as I like them to be etc. The result was a lot of bags that go to goodwill, and a clear sight of what was left and what was missing. One thing was very clear: almost no blouses with short sleeves left, and there is no clear style of things I wear, nor a definite colour scheme. Too many "lonely items". A blouse that has no matching skirt any more, a skirt without matching top... I hope to define my colourscheme better next week, as I will go with a friend to a workshop to define your colours. I'm very curious to learn what those are, and very decided to make a better wardrobe, both in style and colour. Not within a month, mind you, but in the next year or so (you see, I learned from my failed commitment to the PR wardrobe contest, no commitment to a timeframe!)

V2634

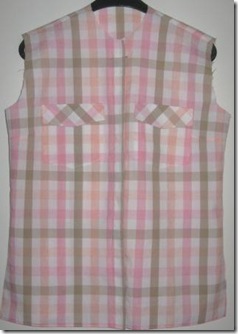
Earlier this spring I bought fabric for a blouse, that could be combined with my tan or white linen trousers, a pink skirt (to be made) and a white skirt (in my closet, made by me). I decided to use Vogue 2634 for that, one of my few TNT patterns. It's the only pattern that I now make for the 4th time.

Blouse fase 1

The fabric is a plaid, so obviously it took some time to cut. And after I cut the fabric I realised that after all my careful marking I might have to do some adjustment to align the plaid. Mostly I work with patterns without seam allowance, and I do not add those to the pattern. When I mark lines or notches on those patterns, I do mark the seamline. With Vogue of course the seam allowance is included, so to match accurately I  should have marked on the seamline, not the cutting line. It was not so bad, only in the shoulders I had to tweak a bit.


The plaid of course is a bit off at the side of the dart. you won't notice if you wear it.


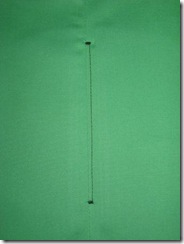
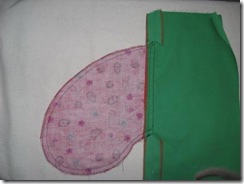
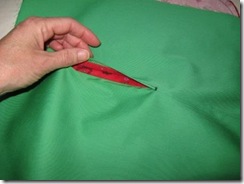
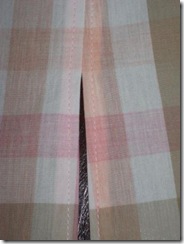
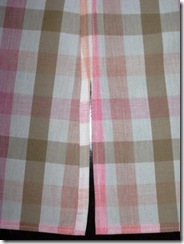
Blouse slit    Inside slit2 The blouse has a slit on the sides, and I wanted it to be finished neatly, and didn't want to serge the seams. A French seam was not possible because of the slit.
I stitched the seam, pressed it open and folded the seam allowance as you would do for a hem. Then I topstiched the seam, up to the armhole. It's not a usual way of working, but it gave a nice result.
   

Friday, May 16, 2008

Tutorials (sorry, again)

A work project was postponed and I had no sewing mojo (too hot the last couple of days, but raining now). I invested some time in setting up a new blog! It's still under construction, but if you're interested in tutorials, please visit the Sewing tutorials blog. As you can read there I gather sewing links on that blog. Try the embellishment category for how it's going to look.

From now on I will take a bit of time daily (inspired by Paula's 30 minute a day project) to add the links that are now in my sidebar.

Thursday, May 15, 2008

For vintage lovers


Looking at the BWOF site I saw a link to a slideshow of pictures from a 1966 issue.
Very feminine, lovely patterns.
This is one example of many.

Wednesday, May 14, 2008

Knip dress finished


I finally finished the Knip dress, happy with the result, but not so much with the pattern.
You can read the full review here.

Comments and questions

I'm really grateful for the reactions and suggestions to my last post about the cowl-neck knock off shirt.
Caity asked what a cowl stay is. In this post I showed a t-shirt with a cowl neck and cowl stay. I never heard of this solution before I bought Claire Shaeffer's book High fashion sewing secrets last year either. But it worked great in that shirt. I agree fully with Patsijean that this is a must-have book. And Patsijean, I would very much appreciate if you could scan a few pages. It will help me decide whether I will buy this book. I'm gradually increasing my sewing library and as I'm in the Netherlands no opportunity to find such books in a library.

Jenny, I would like to receive pictures of your rtw top. If not for this top, I'm always curious how rtw clothes are made.

My e-mail adress you can find in the side bar (isedl at yahoo dot com)

The tie will not give enough support (as Lisa suggested), it gives the impression that it does, but there's too much drape lower on the top that will distort the fit if not kept in place properly.

Nancy W, I think that the facing as you describe is more or less the same I used in my blue t-shirt I referred to earlier in this post, and what I'm thinking of too for this top.

Helen's suggestion of using a light weight knit as lining fabric appeals to me very much. I must find some and try it on the muslin.

To be continued...

Some last questions not on the top that I had not yet answered:
The book my daughter was reading (trying not to look like a tourist in the train to London, but betrayed by her mother taking a picture!) was indeed a ShopAholic book. This was the first time she tried one in English, and she has almost finished it. I'm her walking dictionary (she calls me that) for the words she really didn't understand, like sonographer or obstetrician but in general she can follow the story. I'm no judge, it's not my type of book.

Prutsprinses asked how I did the bilingual feature. I have made a pdf file on how I did that in Blogger, if you're interested send me a message with your e-mail adress, then I will send you that.

BTW: I already told in my last post in Dutch that I'm not continuing the bilingual feature. The arm/shoulder problems are still there (holiday didn't help much). I like to blog and won't bother you with my problems any further, but it just took too much time to keep the bilingual feature if I want to post regularly.

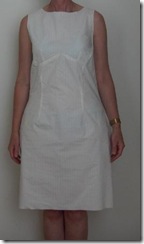
Now I'm going to sew the buttons to my dress and decide on the length of the skirt. I didn't post about this project, but hope to finish my review today.

Monday, May 12, 2008

Knock off muslin

front

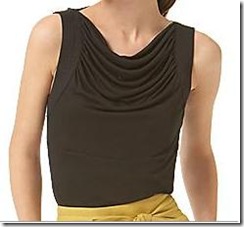
Before my holidays I showed you this top I want to knock off. Here you can find the original on www.eluxury.com. The tie and arm-opening bands are topstitched. Thinking about what was the main issue to make this top I found that a pattern was needed with a close fitting arm opening. The cowl in front and back could be made the front pattern piece wider and longer. I decided to use this Vogue pattern, that I made last year.

  Vogue1809DKNY   DKNY dress side 2    Anne Klein muslin front

(I only wore the dress for the first time yesterday, as the weather was never good enough after I made it).

As you can see this dress has a close fitting arm opening.

Here is what I did to the pattern.

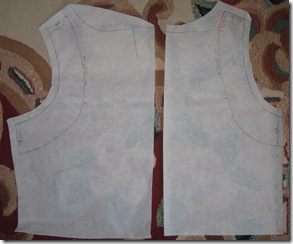
IMG_2522 For the front pattern I closed the dart in the armhole and ignored the dart in the front, thus already creating extra space in the front.
After drawing the armhole part in the back I went down 4 cm for the tie space and drew a horizontal line.
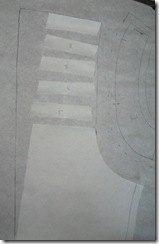
IMG_2524 Here you can see what I did to make the draping.
I cut the pattern piece in several pieces above the point where the gathers start and laid them apart. Also I made the width on top wider. The bottom width remains the same.
The same change was made for the front.
IMG_2597 Muslin front
IMG_2598 Muslin back

The general idea is good, but it needs a cowl stay, as the drape is not perfect now, the armhole tends to be distorted by the weigth of the drape. This is what I already had in mind, so that's no surprise to me.
Of course I'll make it longer too, and I'll add some self facing fabric on the top of the cowl/drape pattern pieces.

I'm curious how they manage to keep front and back well draped in the original, anyone an idea about that? Will they have used a cowl stay?
Any other suggestions on pattern and muslin are always highly appreciated.

Saturday, May 10, 2008

Back from the UK

English Nederlands

Blossom snow 2

I'm back from a very enjoyable stay in the south of England. We rented a cottage near Sevenoaks in Kent and saw a lot of places, beautiful gardens, made nice walks in the beautiful countryside and spent two days in London. We saw two musicals (Blood brothers and Les Mísérables) which certainly for our children was a very special event. What can I say, it's very refreshing to be away for two weeks in May. Thanks to special holidays here in the Netherlands and ascension day being so early, our children had two weeks off from school, so we decided to use those weeks.

No internet access at all in those weeks, which is good too (reminds you the world goes on without it) but I did miss you all. Good to be back.

If you want to see a few impressions from my holiday, I've uploaded a few pictures here. Just family holiday pictures, nothing special, but I've included pictures of my family. My husband and son are of course very important to me, but they never are the subject of my sewing adventures, so usually they are not mentioned here. So here a chance to "meet" them. I wanted to make this a private album with a password to be told here, but it doesn't work the way I thought it would, and kept the album public. I'll remove it after some time.

As I mentioned in a post before my holidays, I took my sewing machine with me and managed to do a few things. Made a few panties to go with the bra's I made recently to complete the sets, nearly finished the Knip dress (but forgot to bring extra fabric for pockets).
I'm not satisfied with the sleeves and are going to alter them.

And I made progress with the muslin for the top I showed you.

I'll be posting more about those projects this week. For now I'm going to enjoy the beautiful weather here and attend to my garden (it exploded with green in two weeks!). I got a lot of inspiration in England too!

And of course I have to catch up on reading mails and blogs. Thank you all for your congratulations on my 1st year of blogging and all the nice comments on my blog. Looking forward to the 2nd year.

Terug uit het heerlijke Engeland waar we genoten hebben. Maar ik moet helaas constateren dat het met mijn arm/schouder niet goed gaat en dat twee weken niet achter de computer tegen verwachting in niet heeft geholpen. Voor het bijhouden van mijn weblog betekent dat helaas dat ik besloten heb dit voorlopig alleen in het Engels te doen. Ik vind het bijhouden van een weblog heel erg leuk en vond het leuk om het in twee talen te doen, maar het kost me simpelweg teveel tijd om het verhaal in twee talen te schrijven en te zorgen dat het technisch allemaal goed werkt. Ik vertrouw erop dat jullie het geheel wel kunnen volgen in het Engels, maar mocht dit toch een probleem zijn en wil je ergens in het Nederlands uitleg over, stuur me dan gewoon een mail. Ik zal wel proberen vanaf nu de "tutorials" in twee talen te blijven maken.