Saturday, May 24, 2014

Susan Khalje online class

image
About two weeks ago Susan Khalje released her first video class on her own website. This first class is for a cocktail dress, made from a pattern that you receive with the class. I was offered this class for free (lucky, lucky me and a big Thank you to Susan Khalje!) and as I had loved the couture dress class at Craftsy and having heard so many good stories from those who have attended a class in person, I certainly accepted the offer. Even though I don’t really have a need for a cocktail dress in the near future I was sure it would be a great experience (best thing apart from taking lessons from Susan Khalje in person).
I have not yet watched the complete course, but would like to share a my impressions on the course so far .
The class is about making a dress with couture techniques. Susan Khalje’s pattern shows 3 variations of the dress on the envelope. In the class she shows you the construction of the one shoulder dress. I like it, but would never make it, as it prompts the difficulty of the bra underneath for me. So I will make either view B or C when I start on this project. One of the things missing on the website is a clear picture of the dress (and its variations) prior to buying the class. I would also like to see views B and C made up.
DSC01347
That said you can of course use another pattern, the techniques covered are not specifically for this dress only. You’ll learn a lot that is useful in other projects too.
The course is detailed and clearly presented. It works from the muslin to the completed dress. There are detailed instructions for working with lace, how to work around the beads  (the lace Susan Khalje uses has lots of beads), how to finish, how to line and the little details that make it perfect.
A screenshot example of the subjects covered in the muslin chapter:
image
Contrasting thread is used in the video, which helps seeing it well and making it clear.
 image 
The pattern itself comes in sizes 4- 24, and because you will muslin it and have it fitted before you cut it from the final fashion fabric, it will be made to fit perfectly.
The pattern is printed on tissue paper. VERY important is that there are no seam allowances included. I love that, as I’ve written before I tend to cut off seam allowances when they are included or mark the seam lines anyhow. I have always liked to work with the actual seam line, mostly because that’s the way I learned it. European patterns always came (and usually come) without seam allowances.
The envelope and the pattern itself are not giving a lot of information. There is a size chart on the back in imperial values only. I’m very metric and have difficulty visualing every inch measurement that’s more than 4 inches (which is 10 centimeters), so it would have been helpful to have those too). Online conversion charts came to the rescue…
DSC01348 
The course is not interactive like Craftsy courses are. I don’t think that is a problem as Susan Khalje presents the techniques well. When you buy the class you have 3 year access to the online videos. I don’t know the reasons why it’s limited but consider a class you take in person: when you leave the class you can’t go back and ask/see again wha’t’s done either. Making a lot of notes might be a good idea. And 3 years is quite a time to watch and watch again.
As it’s been some time since I watched Susan’s Craftsy class I’m not sure about all the differences. The initial steps of making the muslin are more or less the same, but the construction of this dress with lace is completely different. This morning I watched that part and it was great!
To me this is a great addition to the online resources about sewing high end (couture) garments and I’m looking forward to the other classes Susan Khalje is going to offer. There will be one or two that I will buy. It definitely is a great way to learn from a fantastic teacher when you’re (like me) too far away to take classes in person and want to take your sewing to a higher level.
Actually sewing this dress will be later in the year, I’m sewing up a storm (sewing mojo very much alive at the moment). Hope to show you 3 (!) summer dresses very soon.
Have a lovely weekend!

Friday, May 16, 2014

Skirt detail and two tops


Thank you all for your kind comments on the skirt, it was a fun project to do. Special thanks to Anita from StudioFaro. She offered help if needed for my next attempt at the Double Drape Tee. I’m not making one very soon as I really have a huge to-do/to-sew list, but the offer is much appreciated.

AllisonC asked whether the ruffles were hemmed or double: they are hemmed with a narrow hem. It was difficult to see on the original but it is a narrow hem there too.

image

Vivienz asked whether I planned more of these and I might, it was an easy, relatively fast to make project and it would be nice to have it in a darker color. But you know how it goes: one day the mind is set to do something, the other day the fancy strikes to do something completely different.

I won’t bother you with my list as I’m notoriously not keeping to them (see the above). On it are nine garments I would like to make pretty soon, two of them are lingerie sets for my daughter and myself. And yesterday I managed to make two items of the list. Easy, quick projects, sewn in “production line”. It’s an old tnt Ottobre t-shirt pattern, for which I lowered the neckline.

The first fabric was bought at one of the fabric markets that are held here, the other was bought in Paris last month. As you can see even on the dressform pictures, the drape is different. The fabric from Paris has more drape. It shrank a lot in the laundry, I bought 1.5 meters, after washing it only 1.25 meter was left. These are casual shirts. I really need some as a few others are worn so much that they have to be thrown away because the fabric shows the wearing.


Out of nine planned projects, seven still to be made. Next project in next post.

Happy weekend all, I’m going to do a 5K run on Sunday (a ladies run). Luckily the weather has improved.

Sunday, May 11, 2014

Knock off skirt

It’s a weekend here with storm and lots of rain. Perfect excuse to sew. In my want to sew list was this skirt:

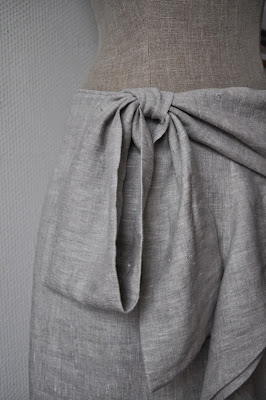
A Marni skirt shown at Net-a-porter. It’s no longer at their site, the screenshot is from some time in March. The description of the fabric was remarkable: “woven with a touch of breathable linen”. I loved the skirt but apart from not fitting in rtw pencil skirts the price tag of $1,100 did not speak in its favor either.
Some details in screenshots:

My version. Based on a pencil skirt pattern I drafted. Very happy with that, no alterations at all to the basic shape of the skirt. 
I now see that the knot with bow was intended a bit more to the center, but it’s fine as it is. The color of the fabric is not showing very well in the pictures. It is a tan/grey/white mixture but looks rather dull here, especially in the photos I’m wearing the skirt. Of course different proportions, I’m not as thin as the model.


Skirt details:


This is the way I cut the ruffles in the front. I could only find one picture on the internet showing how I did this, so I use that because I forgot to make a picture during construction myself.
image
The fabric (pure linen) is from my stash and will have cost 20 euro at the most. Quite a bargain compared to the original.
I love the result, now hoping to have weather soon to wear it.

Saturday, May 10, 2014

Double drape tee

At the moment I’m working on pattern drafting, as you may have read in earlier posts. Following this interest I recently discovered the blog Well Suited by Studio Faro. I have mentioned this too.

I’m quite intrigued by some of the pattern drafts Anita is publishing. Some are quite complicated but the Double Drape Tee did not look that difficult, so good for a first try. I did use a Jalie t-shirt pattern as a base, not having done my own knit block yet. I could have drawn a basic sloper with no ease I presume, but well, this was around. Not a good idea, see the end of the story.

This is how I worked it out.

The front pattern of the shirt was cut as a complete pattern, as the top is not symmetric, no cutting on the fold possible. Especially at the top you can see a lot of drafting lines. I realized that my initial lines were too high and I had to use the lowest point of the neckline. The Jalie pattern is for a t-shirt pattern with a high neckline, so making a line higher than the lowest point of it would not feel comfortable (I don’t like the feeling of a turtle neck for example) and even more important, not what is intended with this style.

The next step was tracing the top part because of the overlapping parts.

I’ve cut the lines to the edge, leaving only a little point closed (I removed the seam allowancse).

Then I slashed the main body part and traced this to be the front pattern.

The front pattern completed. Looks a lot like the draft from Studio Faro, doesn’t it?

I pinned in on my dressform. Now I had to think on how to finish the neckline. I decided on a one fold binding.

The result on me doesn’t look as good, but the idea of the pattern works. The Jalie pattern is too small in the sleeves and looks like the shoulder on my left side is not good either. Also a little tweaking is in order on the diagonal line, but that would have been an easy fix.

For me this is mainly a “proof of concept”, working on pattern drafting techniques. It would have been nice if it had been a wearable garment but I’m not that sorry it isn’t. The main reason it does not work for me is the base I started with. Lesson learned.
I like the style and might try it again (some day) with another fabric. As I don’t like my necklines so high I would draft it lower as well.

Thursday, May 8, 2014

Been away, sewing Merckwaerdigh BHS10


This pattern is among my favorite patterns to use. It’s in my collection since before I started doing reviews on PatternReview and started my blog. Which means that’s over 7 years, since I started my blog in April 2007! I had my bloversary last week. It passed by unnoticed, even by me, because I was on holiday with my family in beautiful Tuscany.
DSC_0185 DSC_1301 DSC_1283   DSC_1271
No fabric shopping this time, I saw one fabric shop but it looked so expensive that I walked out quickly. My Italian is non-existent too, which is even more difficult.
So this time it’s only a picture of this shop window display.
 DSC_0172
On my return I made this bra for my daughter, who requested I make her some new ones. She likes padded bras and made her a bra with bought padded cups before which she likes very much. Little problem: I had only bought one pair at the time to try them and no cups in my stash. Being a Sunday there was no way to buy them at that moment. Pattern BHS10 to the rescue, which uses padding but not the preformed cups in view E. All notions for that I had in my stash.

I made size 75B based on the measurements on the Merckwaerdigh charts, in rtw she usually wears a C cup. The fit of the cups is good, but I shortened the band considerably, based on the band of her favorite bras, while the pattern instructions don’t call for shortening for the B cup line.
The lace is not firm, therefor I used an extra layer of interfacing to get a more firm band. The edge of the band is the scallop edge of the lace and then I use the picot elastic with the picot on the inside.


My daughter likes this version and I’m already making a second one in pink. I’m missing a few notions, so finishing that will have to wait till after a visit to my favorite store for lingerie notions next week.