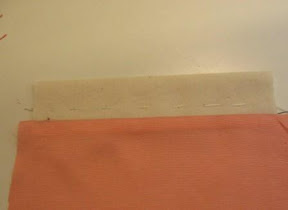
Saturday, November 29, 2008

All's well that ends well


Vogue 1063 in my second version. As I told you, my jacket of 100 errors. But the endresult is quite good, so I'm very happy with this. I made bound buttonholes showing the other side of the fabric. This fabric has two " right"  sides, so I thought it was nice to make the buttonholes like this.

I comtemplated doing the upper collar like that too, but decided against it. I have enough of the fabric left to make a skirt, so perhaps I'll use the black/red irregular stripes side for that.

In a post of September I told you about the differences between the sleeve drawing of Vogue 1063 and 1064. For this jacket I changed the sleeve and made the pattern like the 1064  sleeve. I did change the pattern further by adding a hem allowance of 5 cm (2 inches), and make my own lining pattern. Pfff, I'll think about that a second time when doing that for a pattern that has seam allowances included.  I'm more used to working with patterns without seam allowances, and because of that I made a mistake there too.

To the sleeve I added sleeve heads in the way described by Els of the sewing diva's. I interfaced the front and back of the jacket as I did with my summer jacket.

I'm finished with this pattern. It's a nice result, but two is quite enough. Can I make anyone in Europe happy with this pattern (size 14-20)? (Apologies to the US ladies, but I think you can get your vogue patterns a lot cheaper than in Europe, so I'll limit it to European readers this time.)

Wednesday, November 26, 2008

New technique again

I'm certainly not planning to be a daily blogger, but I want to share this progress with you. This is my jacket of 100 errors as I refer to it. It's Vogue 1063 and I was not too happy with the first version. There were several reasons for that, but one was the lining method I used in that jacket. So I started another version, but used a combination of tailoring techniques and finishing it with a rtw lining method: bagging a lining.

As said in an earlier post, this is something I've never done before. I read about it for the first time (2 years ago) in the book Power Sewing by Sandra Betzina, which was one of the first sewing books I bought in the English language (and  still consider it as one of the best books I bought on sewing. It gave me so much inspiration for making my skills better) . After reading about several methods (Kathleen Fasanella's tutorial on the internet and the method described in "Jackets for real people"), I decided to use the method Sandra Betzina described.  The main difference (if I understood it right) with Kathleen's method is ... Here stood some text in which I was wrong, as Kathleen made clear to me. I was not aware of another method described by her and used a tutorial that was written for a very specific series of jackets that were not her design. She prefers a reference to the tutorial you can find here. But I didn't know this "nameless tutorials series" untill tonight. Sorry Kathleen.
Let me say that NancyK was right in her comment. She said: "Once you bag the lining you'll wonder what you were waiting for." And it's true, not difficult at all, and I will certainly use this method on future jackets.

There are no pictures of the construction of this jacket, and final pictures of me wearing the jacket will be made in the coming days.

Now to decide what to sew next. So many ideas, and just don't know what to start with.

Tuesday, November 25, 2008

Welt pocket

On Pattern Review there is a contest currently "Try a new technique", managed by NancyK. As I'm in a definitely in a no-sewing commitments phase right now, I'm not participating. But I read a bit on this thread and seeing that welt pockets are regarded as difficult. On another thread on the message board Kathleen Fasanella's method of making welt pockets was mentioned.

I don't regard welt pockets as extremely difficult, as with a lot of things it just requires precise work. But I never tried Kathleens method, and it was on my to-try list. And that's what I did. The first sample is on the upper half of the picture. The welt is interfaced, the fabric is not, which makes quite a difference.

On the second sample you can see that the fabric is interfaced (the flash of the camera made it visible). It's imperative for good results, even on this cotton fabric, let alone on a fabric that ravels more easily. As you probably know, you cut to the exact corners of the welt and fold back.

In my second sample the right corner is not completely straight, I should have taken out a stitch, but it's a sample so I didn't.

All in all, I found this method extremely easy, the first one was made in about 40 minutes from start to finish, the second didn't take me half an hour. Certainly a method to try if you want to make welt pockets.

Instructions on Kathleen Fasannella's blog here and here. (and I've noticed that I didn't include this tutorial on the tutorials blog, clearly an omission that I'm correcting right away and soon I must add more entries there)

Monday, November 24, 2008

Two projects finished

Last week I finished the blouse for DD and my pants. For both I wrote a short review at Pattern Review.

The blouse for DD, she wore it today and managed to get a stain on it right away. So it's soaking in water right now. No chance for pictures on her (nothing to do with the stain btw). 

The pants pattern in general fitted as I thought it would. As my waist is two sizes smaller than my hip size, I trace the size that I need for my hips. With BWOF that is consistent size 44, (oh how I would like that it would come down to 42, but alas, the fitness programm does help, but not too much). Next step is make the dart in the back deeper, or add a second dart in the back. I also make a dart in the front (which is seldom there to start with).

The final alteration is making the crotch seam deaper, and adding the space that I took away there to the side seam. Which looks like this in a pattern.

In construction I sew the center back seam as a last step (after the waistband is sewed on), which gives me the last possibility of finetuning the fit.

With these pants I basted all with the longest straight stitch on my machine and fitted. All seemed perfectly alright, till the pictures were taken by DD: wrinkles/folds in the back. I think it might be the fabric, and of course the camera just takes a picture while standing still. I'm accepting this (must accept this), and I wore the pants yesterday and they felt good.

It's nice to have both projects finished. First in the line of completion will be the lining for the Vogue jacket I showed earlier. Then I might try my hand at another knock-off. I've seen so much inspiration for tops. I'll keep you posted.

Sunday, November 16, 2008

A single welt in back of pants

After the front pocket, the back pocket gave me some trouble too. I made the first one and had to do the topstitching around the welt (as seen in RTW ) in two passes. Not easy to work and I thought of doing it another way.

In the past I've found many tutorials on (welt) pockets, but not this particular one. I decided to make the opening first and adding the welt later. Inspired by the method that Ann shows (which she described in an article in Threads too, and I've found the same technique described by Claire Shaeffer) .

As I was making a sample, I made pictures so that I could share it with you.

Notice my new sewing foot in the fourth picture,  it is open in the front so that you can see exactly what you do. I already know it's worth every euro I paid for it.

The red is the wrong side of the fabric, the location of the welt has a lightweight fusible interfacing.
To the right the welt itself and the inner pocket (a lining fabric).
The opening is marked on the interfacing, exactly the height the welt will have.
Sew the inner pocket to the welt and press down.
Pin silk organza on the front of you fabric, making sure that there is enough fabric around the opening.
From the back, sew the marking line. Make small stitches in the corner and keep the needle down while pivoting.

Cut the opening, slashing to the corners exactly (but of course not through the stitching)
Press the opening
Pin the welt to the opening (other way round then I did in this sample, you'll want the seam pointing to the wrong side)
Pinned  to make sure everything is in place, basting might be better in a real garment.
Topstitch the edges. I use the blind seam foot for that.
Here you can see the opening of the welt.
The welt is topstitched all around. The little white strip you see is my table underneath.
Cover with the pocket facing.
 
Open the top so that you see the seam allowance from the opening.
Stitch the seam allowance to the pocket facing.
This stitching doesn't need to be too secure, as the seam allowance itself is already secured by the topstitching.
Sew the pocket all around. It's now ready to serge the edges (not in the picture).
The finished look on the inside
The finished pocket in my project.

Friday, November 14, 2008

Pants - front pocket

IMG_4175

The pocket in the front is ready. I started with Ann's instructions for the Vogue pants. But somewhere I  was lost (the reason is most probably me, not the instructions by Ann), and I went on following my own sewing sense. When I was ready I was not satisfied by the result. Uneven and the topstitching in one corner was 1 stitch off.

Time for the seam ripper, I'm not one for sewing without mistakes. And I couldn't let go of this and go on.

So, an hour later, this is the pocket. It's in the same location as the first one, I unpicked all. This is how it should be, I'm satisfied with the result, so I basted it in place for further construction.

I used lightweight fusible interfacing where the welt is sewn. And because I cut the welt on the bias, I interfaced the welt to prevent stretching.

IMG_4176 IMG_4177

Wednesday, November 12, 2008

Pants and UFO

05-2006-108Today I took a day off. This is difficult for me, as I basically work from home. Work is never far away, and in the past months often extended till late at night. Long ago I intended not to work on Wednesdays, that day would be for me: sewing, visiting a friend, shopping etc. I'm trying to get those free Wednesdays back (at least for the moment).

So today I found a lot of sewing time, with nobody in the house you can do a lot.

In the first picture the result for my search of a basic pattern to start another pair of pants. This is the pattern that I'll use: BWOF 05-2006-108. The waistband is shaped and it's not too wide in the upper leg. I changed the pattern to bootleg by adding space at the bottom. The pocket flap will be changed to a welt as in the Vogue pattern, and I'll add welt pockets in the back. Thanks Summerset for reminding me of the extra attention black welts will give, and you said it so subtle, but this is indeed not what I want.

The pants are cut and they are ready for marking. No muslin as I have faith in BWOF patterns and my standard alteration. But I did cut generous seam allowances.

01-2008-106 And do you think you've seen this blouse before? Yes, it's the same one Cidell is making. When she showed the picture on her blog, it reminded me, as I said in a comment on her post, that I promised to make that one for DD. I made the pleats long ago. See this post how I did them. In that post I said I would cut the blouse, but somehow that never happened. DD reminded me regularly of this blouse and today I made it. It needs hemming and buttons sewed on, and a good pressing, then it's finished. On DD's question how I came to do it now I answerd truthfully that I was reminded again by another blogger. She said it was incredible that I needed the post of someone on the other side of the world to really get it started. She was right, but it worked.

Monday, November 10, 2008

Inspiration for pants

ETA: I'm not going to make the actual Vogue pattern, I don't have it but am going to change a pattern to achieve that look.

I need some more pants, as I live in them during the winter. I'd like to buy one or two, but that is a mission impossible. From experience I know that searching for rtw pants is HIGHLY frustrating for me. It takes hours to shop and try on, and nothing fits, so I go home empty handed. In the same time it takes I can sew a basic pair that does fit (without too much details that is).

But as I said in my last post, I like the RTW details, so I went snoop shopping on the internet. Granted, takes time too, but no frustration. Though there are some shops with models where I think that almost everyone without anorexia would be frustrated. Who would ever fit in their pants and still eat normal? I'm diverting.

A general observation: the style is wide or skinny. The last is out of the question for me, if not for the way I'm build, then my age doesn't suit skinny styles. But I like wide pants, they suit me well.

In the bottom left corner a Vogue pattern I like, boot-legged and with welt pocket details. It suggests being a bit low on the hips, though I've browsed Pattern Review for the reviews, and think that might not be too much. But the details can easily be added to another pattern.

The waist band details are nice, I particularly like the small welt pocket and the wide waist band in the middle, the picture with the blue blouse.

Cuffs are a trend too, not too sure I'm going to make them.

And the last picture: welt pockets in the back. I used them in my black pair of pants, and love those. These will certainly be part of my next pair of pants, that will be black/white fabric that looks a bit like the picture on the right with the cuff.

I might do the welts in black, or would that give too much contrast?

Sunday, November 9, 2008

Black pants

The black pair of pants are finished. As you all probably know, black is very difficult to photograph. The pictures DD took only show the general image, the details are completely lost. Making the image lighter didn't help. Next time I must make sure the picture is made during the daylight hours, that may be better.

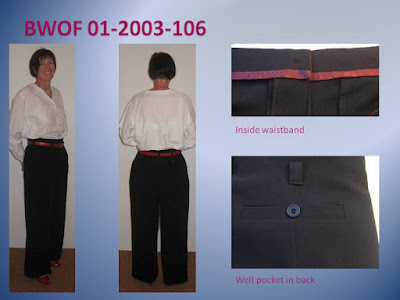
The detail pictures I took earlier are better, so this is what it looks like. Personally I love the combination with the red belt and shoes. The blouse is too wide rtw one. Since buying this I think fashion has changed to closer fitting blouses, or my perception of a good fitting blouse has changed. Two good white blouses needed ironing, and I was just lazy.

I didn't finish the waist as described in the pattern (see picture in previous post), but closed the pleat to the top. This time I made the back welt pockets, and though not perfect, they are fine. Never use those pockets, but I like the look of a rtw detail.

The waistband was finished with a bit of the red lining I will use for my next jacket, that you can see in the picture below. It's the new version of the Vogue jacket, and I've been working on this on and of for weeks now. The start was in my bad sewing weeks, and I made some serious mistakes, including cutting the wrong back pattern piece. This resulted in buying more of the fabric, and the supplier had only just over a yard left! Lucky me.

I want to "bag the lining" and are just postponing that step, it's a first for me, and having trouble to test the waters (as I believe the expression is).

Sunday, November 2, 2008

Doing easy pieces

Hi, it didn't take as long as I thought to feel better. Thank you all so much for your nice comments and some kind emails I received, it felt good to know you understood. I did sew a bit and must say that the week before I stopped blogging and the first week after I only made very stupid mistakes. We all do that from time to time, but this was clearly due to not paying attention and wanting to do things too quickly, because I "had to sew".

The workload is back to normal, I started fitness again seriously and in general feel much more at ease. I can tell you my family is very happy about that. DD told me that I didn't cook properly anymore, no experiments with new recipes, just the things we know too well all the time.... And always working.

Good, this was a pretty serious warning of being on the way being overworked, and I decided that I won't have that. Took some time off in the school holiday of my children, made a nice walk with DH and told myself work is important, but should come second, not first.

This weekend I took some serious sewing time again, starting with easy pieces. This Jalie 2566 twinset is the result.


I have a lot of fabric with black in my stash, and try to make some coordinating pieces. There is a new SWAP contest started at Stitchers Guild, and on Pattern Review there's the Endless combinations contest, but I won't enter any of these. I like the concept, but will just sew what I like and not commit myself. I already feel bad about not finishing my coat in the Great Coat Sew Along.

I'm in need of a few good pair of pants, and this will be the next one, in black. I made it before (before writing reviews or blogging), and worn the pants till last year, when I had to throw it away because it was old and worn. But it was one of my favorites. Time for a replacement.

<