Tuesday, February 25, 2014

Sleeves

Two commenters have asked for a post on the fitting of this jacket. I’ll come back on that soon. For now it’s about construction.

I like to break up a complicated project as the jacket in manageable pieces. Sunday I didn’t have a lot of time and I added only the horizontal piping in the sleeve. Tonight was planned for inserting the sleeve zippers Shams did a great post on how she did it and I read it thoroughly before starting. It was quite similar to what I had in mind, but it doesn’t hurt to get it confirmed. I’m not sure yet whether I’ll add the gusset, sewing is done for tonight, I’ll decide tomorrow.

Originally I planned to to a vertical piping as well till the start of the zipper but have decided against it. I had pinned it and then thought it was giving too much bulk. I did not want to take the risk and omitted it. Don’t think it will matter in the end result.

The zippers I bought in NY too , they are Riri zippers. There is no choice in zippers where I live, it was such a jaw dropping experience when I first saw a shop (Pacific trim) full of all kind of zippers on my first visit a few years back. They are made to measure too, while you wait or shop around a little. Great service. I bought one very long zipper and they made it into one long and 4 short zippers.

Here’s the series of photos of my construction.

Measuring the length of the zipper, like Shams I decided I wanted the pull of the zipper not below the hemline of the sleeve.

Then I measured the width I wanted exposed and chalk-marked these measurments on a piece of silk organza.

Pinned the silk organza to the right side of the fabric at the seam line

Stitched NOT on the seamline and to the corner with very small stitches. The small stitches prevent any gaping/fraying of fabric in the corner. Not really an issue in this felted wool, but also the organza must not ravel.

Clipped and turned, than basted.

Under and upper sleeve stitched together.

And finally the zipper sewn into the ‘window’

Saturday, February 22, 2014

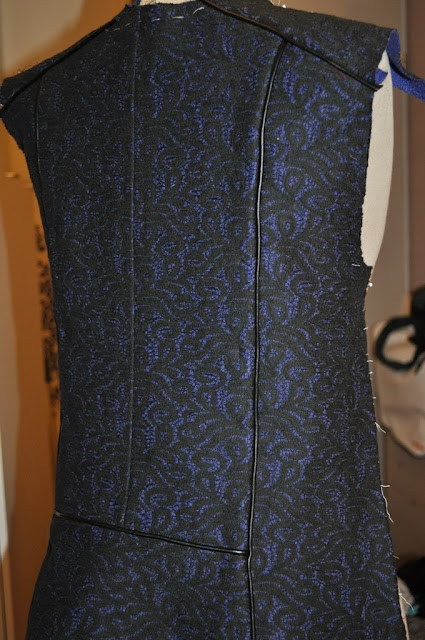
Jacket back and a quick t-shirt

Most of the work on the back is done. One side still needs catch stitching of the seams. This fabric is a bit thick so it’s also about reducing bulk and keeping the seams flat. The flash light makes the piping shine a bit more than in real life. I’m beginning to feel this jacket might take as many hours as the classic Chanel jacket….

In between I made this cowl neck top. It’s the Day to night top from Maria Denmark. I made this top twice last year, don’t remember blogging about it. It’s an easy top to make. It took me about an hour and a half, including adding the sleeves from the Birgitte top. Both are good basics. I haven’t made the Birgitte top yet, I like the wider neckline of that one. A cowl neck is always good in my eyes. These patterns are pdf patterns, quick delivery. I still am not sold on the format of the pdf patterns. I still would prefer to have the printed pattern, or at least the option to have it as a printed pattern. For these relatively non complicated tops I didn’t mind.

Friday, February 21, 2014

A quick update

SewMaris (who’s starting a sew along vor the Ziggi jacket soon) asked in a comment which size of the jacket I ordered. I bought a size 12 by bust measurement. The size 12 in StyleArc size chart gives a bust measurement that is 2 cm smaller than my actual bust measurement. It was fine for the Marie and Marni jacket, on the Marni jacket I did an FBA. For this jacket it was far too wide in the back, though total bust circumference was fine. A common problem for me, as you’ve seen my muslins in the past few months that really is a problem challenging area for me. StyleArc patterns are in one size (like the Italian Marfy). My body has 3 different sizes comparing bust, waist and hips. On multisize patterns it’s easier to grade between sizes.

I’m getting there though (thanks to the sewing teacher). This is the jacket provisionally sewn with long stitches, sleeves not pressed.

It will be taken apart again as it has to be interfaced, zippers inserted etc. Step by step I will get there (doing some easy things in between). I’ll be posting about the steps taken.

Monday, February 17, 2014

A last winter project?

First I would like to welcome my new followers. I’ve seen quite a lot new followers this week, through Bloglovin there are now 962 followers and 513 through Google/blogger. To me that’s a huge number and I appreciate all of you reading my blog. I had seen that I passed the 900 number of followers but now I’m close to a 1000. A lot of the new ones will have come here through Carolyn, who mentioned my blog in her favorite 10 sewing blogs. Thank you Carolyn, as I said in a comment on your blog post, I’m honoured to be in your top 10. Check out her post, I know most of the blogs she mentioned and follow them already. As I haven’t had much time in the past year or so to explore new blogs, I don’t really have new ones to share. There are a few blogs gone in these years that I miss, from ladies with extraordinary talent and creativity (thinking especially of LauraLo, Birgitte and Summerset).

And what am I working on? My moto cycle style jacket saga hasn’t come to an end yet. After having seen Sandra’s review on PR I was convinced the StyleArc Ziggi jacket was the pattern I needed. It looked more shaped than other patterns I made a muslin for.

My fabric, I have shown it before, a felted wool with a lace top layer. Quite warm so I think this will be my last real winter project. We had a very mild winter here, not a day with real frost and no snow at all! Quite a difference from a lot of places elsewhere in the world! The first spring bulbs are flowering here.

This was the unaltered muslin, sewn right from the envelope. Not good.It’s much too wide in the back and shouders and also the front is too wide at the waist. Again! After this I tried to change it and was not satisfied. Which made me decide I need professional help with fitting and I’ve signed up for a few sewing lessons, with the main focus on fit.

I had my first lesson last week and it was a positive experience to have a professional helping me with this. I do not have photos of the fitting she did,

you will have to wait for the jacket I’m working on. To be on the safe side and also because my fabric is a bit thick, I have cut wider seam allowances. Marking the seam lines on this fabric is an extra challenge. I usually do trace the seam lines with carbon paper, but it didn’t stick to the fabric. Then I basted the lines. Still the lines from the carbon paper were disappearing very easily while basing it and I had to put the paper pattern on it again to see where the seamline was.  The following experiment was with long machine stitches. Very clear but I’m afraid I can’t get all the stitches out without damaging the lace.

Then I decided to trim the seam allowances and mark with chalk. It looks like this holds better.
I will construct the jacket to check the fit once more. Hopefully the real construction can start after that. I plan to use piping as an accent. This is going to be a very time consuming project.

Thursday, February 6, 2014

A pencil skirt with two StyleArc tops

Basically this is a very easy skirt pattern. It has a high waist and a vent at the back. I made my sewing life a bit more difficult by using a new (to me) lining technique. This technique is described in a Threads article in the issue of August/September 2010 and has been on my (mental) “to try” list. I could have sworn it was published 1.5 to 2 years ago. I was hugely surprised it was from 2010.

Not my best pictures, it’s been a while since I used the self timer, must get the hang of it again.

Here it’s combined with the Marie jacket, actually the combination I’m wearing today. Bunny, I don’t know whether you can see it from the photos but indeed I’m not a petite. At 1.74 I’m 6 centimeters taller than the length BurdaStyle drafts for by default for example.

And with the Marni jacket. This was the combination I planned. The colors are not very good in the photo, but also otherwise I prefer the combination with the black above. Think it’s the combination of a wool with a ponte top that somehow is not right, or the style giving too much accent on my hips. Not exactly sure what is “wrong” but it’s just not combining as I thought it would. I’ve worn this peplum jacket on a pair of narrow pants which felt better.

I was asked in a comment how I attach the facing of the collar: I make a few hand stitches in the neckline seam to attach the facing to the body.

Some construction details for the skirt:

Petersham ribbon ironed in shape and attached to the facing of the skirt to prevent any stretch.

HongKong finish on the facing.

Excuse the wrinkles, I was wearing the skirt and then thought of making the photos. The lining is a sort of “bagging” technique where the lining is sewn to the hem and then turned up. You can only use this technique if you’re sure you don’t need to alter the side seams. After the waistband or waistband facing in my case is sewn, all seams are hidden.

The lining needed special redrafting around the vent area and for adding space of movement. It was all in the Threads article. It’s clever and very comfortable in wearing. It took me the better part of two evenings to draft and sew the lining to the skirt. I worked by the directions and using the default seam allowances mentioned. Next time I would properly mark all lines with basting thread, it would have made it easier to be accurate. That’s me probably, always preferring to work with the actual seam lines.

Sunday, February 2, 2014

StyleArc – Claudia pants

Work deadlines kept me from blogging the past few weeks. Too many hours at the computer already to do more than read the occasional blog post or review from others.
An important deadline was on January 31 and I must say I felt enormously relieved after the deadline was met, my customer was happy and I had a work-free weekend ahead of me.

On Friday night I started (and almost finished) StyleArc’s Claudia pants, intended for a woven stretch fabric.  Having read a lot of positive reviews on the fit of their pants patterns, have a few in my stash but never got round to making them, this was the moment to make this pattern, being too tired to do anything requiring more mental attention. I also need a few basic bottom garments. It’s been ages since I made pants.

The review on Pattern Review is here.

The fabric came from my stash and has a little bit of stretch, not a lot. In the photos below you will see these pants as I will never wear them. They are intended (for me) to be worn with a longer top. For review purposes these are better I think.

A few  wrinkles show in the back, they are different each time and result from the way I stand mainly. Also I’m a little tired of fitting and perhaps over-fitting. I do realize these are stretch pants, there is also the issue of ease of wearing etc. and compared to rtw these are so much better that I can live with it.

What did I change to this pattern? Almost nothing! I did take in an extra centimeter from the front seam at the waist and made one of the back darts a bit deeper. Other than that no changes. Which is better than any other pattern I’ve sewn before. To be sure I added extra width at hip height, but took that off again.

On the inside I serged the waistband on the side as well instead of folding it, reducing the bulk that way.

The top of the darts were trimmed for the same reason.

And the waistband edgestitched before turning and topstitching.

This is an easy pattern to make. StyleArc placed it in the category Medium/Challenging. I can’t see what is challenging about this pattern. Is an invisible zip challenging?

The instructions are a step by step description with a few drawings to clarify. If you’ve average sewing experience you won’t need these instructions, but there is one little thing that might confuse beginners: the drawing below suggests the side seams to be sewn completely, but you have to keep the left side open for the zipper. The written instructions are correct, the drawing isn’t. Very minor detail, but as only beginner sewers will probably use the instructions, the drawings should be correct.

I’ve worn these pants today and they are very, very comfortable. I’ll be sewing one or two more this week! It’s also easy to omit the front seam if you don’t want that. It’s only joining the two pattern pieces at the seam line. For me, after my little change in the waist, that will mean a dart at the front, which I don’t mind.

It’s a very good pattern and I’m definitely one of StyleArc’s fans by now. I wore my Marni and Marie jackets a few times in the past three weeks, this one is a success too.

There’s more to catch up to: Barb pants and the skirt from the fabric I’ve shown in my previous post. To be continued…