Sunday, August 26, 2012

TNT

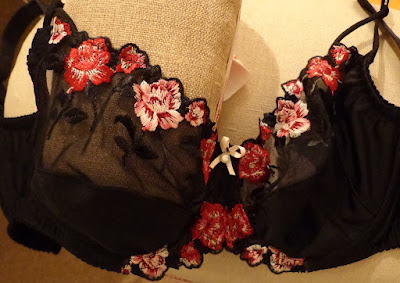
One of the few tnt patterns I have: the Sewy Rebecca bra with some adaptions for my fit and comfort. I’ve shown quite a few versions on this blog already and this is the last addition to the lingerie drawer:
  

No pictures this time to show it when i’t’s worn. Too much hassle (time) editing the pictures. Perhaps I should try to find a dressform to show bra’s. You’ll get the idea anyhow.
The lace was a very kind gift from Pauline. Once again thank you! She made a set with this lace too, which you can see here.
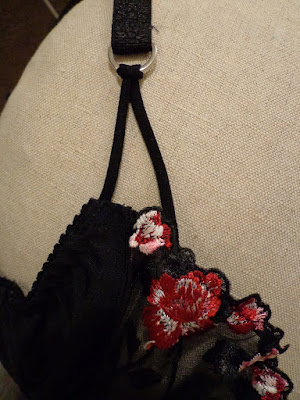
My variation on my pattern was to use the lace in the back and to use thin straps for the last part of the shoulderband.


The black lycra is from Kantje Boord, shoulderstraps, elastic and hook/eye closure are from Merckwaerdigh, a Dutch Ebay store. The owner is very helpful. I was looking for black picot elastic and she didn’t have anything on the site at the time. I wrote to her and she was very helpful in sending pictures of what she had available.  Very nice indeed and I could stock up on some black material without the drive to Amsterdam.

To answer a question from Bunny about the silver rivets in my jeans: they are Pryms, sold here in packages and I attach them with a Prym plier. 

Friday, August 24, 2012

Jeans finished


Last Tuesday I got my machine back and started working on the jeans. The extra width I cut into the sideseams was unnecessary, the little stretch of the denim fabric made quite a difference compared to the muslin. When trying the muslin, I was very surprised I had no back gaposis, like many had written about and which is always a problem with my figure in rtw as well. But when I tried on this just before the waistband was attached, there was too much extra space. So I ended up changing a bit in the back yoke.
The extra wrinkle above the knee disappeared when I had given the extra space in the sice seam, the upper part of the leg was too narrow for me. Perhaps I could have taken a bit of space at the upper thigh? Perhaps in another version.
I won’t add another PR review for this, there are so many reviews already and I’ve nothing new to add, it’s a great pattern.  I followed the very good instructions for the most part, will offset the zipper a bit more next time (it’s a bit close to the center front) and have changed the pocket facing to go center front, like my rtw jeans, which is an easy change. I’ll show some pictures below after the detail pictures of the jeans.


Zipper from stash, not the right color. You won’t see this when wearing it. Also therefor I would like it to have a bit more overlap. The only thing missing is a button. Thought I had some silver colored jeans buttons, but all I had were brass colored ones.

 
Belt loops and front pocket. Next time I will add the little coin pocket as well. The topstitching on the side is as the instructions tell you. It’s the same as in my rtw jeans.
 

Front pocket construction
I cut the front pocket lining extending to center front. It would have been better to add an extra 0.5 centimeter. I often forget and am writing this down mostly for my own benefit Knipogende emoticon
The front pocket facing is sewn on top of the lining (after I serged it first).

The front pocket facing is sewn to the front, then turned and topstitched (topstitching not in the picture).


The lining is placed on the wrong side of the front. The yellow arrows indicate where I would have wanted the extra 0.5 centimeter.
  

I sew pocket lining and facing together with a zigzag stitch. If you would like you could use an extra straigth stitch beside it for extra strength.

Then I serge the bottom of the lining and pocket that are treated as one now.
 

During construction the lining is attached in the facings of the zipper construction. On the side where the zipper is attached
off-center (the first part that you stitch) the extra width would have been helpful. Then I could have sewn the lining together with the first zipper tape. As it was I had to make a tack later on in the process. Not a great worry, but could have been better.

One side on the picture looks shorter than the other side at the center. this is due to the fact that part of the zipper facing on the right side is cut off before sewing the fly shield on. There is less fabric to cover the lining.

It was a nice experience to sew this pair of jeans. I might do it again, it was easier than I expected. And my machine behaved well, you need a machine that can tackle a lot of denim fabric layers. 
For now there is a long list of other projects in the sewing queue though. A jacket muslin is made, two Burda patterns of the August issue are traced, the couture dress that needs to be fitted…. but the next thing to finish is something that is already halfway and I can almost make while sleeping:
DSC00402

Wednesday, August 8, 2012

Perhaps a bit boring project

At least, perhaps boring for my blog readers. But not for me. After two weeks of a lot of other things to do and no sewing mojo (I did a lot of other fun things) I was inspired by the internet sewing community again. I’m about to sew the very famous Jalie jeans. Many, many bloggers have made this already, there are also 130 (!) reviews on Pattern Review for this pattern so I have nothing new to add. But I never made it.

Sewing jeans was a bit down on my “to sew” list. After seeing Nancy K’s muslins and ArtAttack’s review on PR this week, the jeans were back on top of the list. I have almost all that I need for it, even had cut the muslin more than a year ago (a muslin as a UFO!), so yesterday evening I finally did sew the muslin.

Before I did that, I compared the traced pattern with the pattern I traced off a rtw pair that I like, and to my surprise it was not too far off, considering the pattern has 1 cm seam allowances (the paper is the Jalie pattern, the traced plastic sheet the copy of the rtw).  I’m using the high waist version of the pattern, I feel more comfortable in those.


Like a lot of others I’ve changed to straight cut legs, but otherwise I’ve sewn the muslin without alterations. To my very great surprise it was rather good on my not so default figure. A bit too tight, the muslin fabric has no stretch at all, but considering the difference in waist-hip size I’m really happy with how this fits. I’ll change the waistband to a shaped waistband, there is a little pleat at the back above the knee to take care of but most of the other wrinkles will probably/hopefully disappear in my denim with a little stretch. I’ll be cutting some extra fabric in the side seams to be sure.  Not the most charming pictures:

Why did I wait so long? Also the tracing of the rtw was done that long ago. Apart from some other things on my mind there is the fear of sewing jeans. Can I really do that? I hope I can answer that with a yes soon.

Other sewing related things: the muslin for the dress is finished, posting about that later when I have some help with fitting. Muslin cut for a jacket (to go with the jeans, I’m more or less planning a mini-wardrobe). And very bad for me: my Bernina sewing machine broke down Woedend. Brought it to the shop today and won’t be ready till somewhere next week and then I’ll be away for a couple of days. Have to check how my old Elna machine will behave with the denim. If it’s not good I’ll have to wait till the machine is repaired. Perhaps I have to do that anyway so that I can use one machine for regular stitching and one for topstitching. Bad timing to happen when the mojo has returned with so many plans for garments to make.