Monday, March 28, 2016

About t-shirts and hemming with coverstitch

Pictures of the finished skirt have to wait. I want to hem my skirt with “steam a seam” tape but forgot to buy it and as most of my fabrics and notions are in storage, I had none available at all. So I spent my weekend sewing two t-shirts. The pattern is the Ann T-top from StyleArc:

image

I’ve made this pattern several times now and it’s a great basic. After the initial one last year (never blogged about as far as I remember) I removed the gathers in the front by folding up at waist level.

Until recently I used an old Ottobre pattern from 2007 as my base for t-shirts, which is still a great pattern. But, as you can guess, it’s in storage (by accident though).

Black and white top

Blue graphic

The neckline and hems of both t-shirts were finished with a coverstitch.

finished hem

I’ve had a love/hate relationship with my Janome coverstitch for quite a long time, but have become used to it and now it’s taken out and used regularly. For a long time I did not use it properly either and on the inside you could see the edge of the hem stick out above the stitches.  Recently I saw a tip about how to make the finishing on the inside neat. Looks good doesn’t it?

inside hem

What I did was

  • Measure and press the hem at an exact distance (a sewing gauge will help)
  • Baste the hem at the very edge of the hem. I preferred hand basting but the tip I saw used long, straight machine stitches. I found those more difficult to remove afterwards when I made a sample.
    basted hem
  • Stitch while guiding your foot over the basted line
    topstitching
  • Carefully remove the basting thread.

I did this both for the hem of the body as for the sleeves and it works like a charm. It might be a bit more work, but the result is much better.

Sunday, March 20, 2016

Skirt in progress

Just wanted to show you where I got with this skirt. All that’s left to do is the inside waistband, lining and hemming. The fabric is a kind of faux suede you see a lot here at the moment in all kind of colors. My fabric is a greyish brown, I had expected it to be more grey than it actually is. The downside of buying online.

The wrong side of it feels uncomfortable and sticks to your skin. So anti-static lining is necessary. I might will re-do the zipper as I’m not satisfied with it.

DSC_1092  DSC_1095DSC_1098   DSC_1099

Sunday, March 13, 2016

Drafting the skirt

It was good to step back from the draft for a day or so. This is the basic draft in my skirt block. Because there is more width to be covered than in the original pattern, I realized that I had to change the back if I wanted the center back panel more or less as narrow as the original. I had already made the panels a bit wider, but on the back that was not enough.

The dotted line in the back indicate where I started to move out the pattern pieces to create the fullnes in the back. Also a lot of notches to make sure I know which parts belong together.

DSC_1080

This is an original pattern piece for the back.

DSC_1079

Below pictures of how I created this on my pattern:

I traced the top part to the dotted line (in my block these are the pattern pieces marked 5 and 6). On a separate piece of paper I traced the bottom part, have drawn lines in it and spread the four pieces I now had.

DSC_1083


DSC_1084

The corner was curved to get a smooth transition.

DSC_1086

The final pattern piece.

DSC_1088

For the waistband I closed the darts. The back waisband is curved and the length of the darts were not exactly the same any more.

DSC_1080

DSC_1081

Here I trued the lines, adding a bit at the top, taking away a bit from the bottom. To make sure the waistband is even, I checked the line of the center back and the lenght of the lines where the darts were. There was one line I had to adjust a little.

DSC_1082

I’ve cut out the skirt and plan to do some sewing tonight. I’m very excited to see whether this works as I see it in my head.

Thursday, March 10, 2016

Intrigued by a skirt

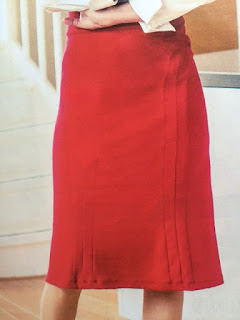
This February the Dutch magazine Knip Mode had a skirt in the pattern collection that I was immediately attracted to.

line drawing

There's only one version in the magazine, hemming is not very well done and as so often there is a difference in the line drawing and the actual pattern. In the line drawing the design lines of the front are straight, in the actual pattern these lines are curved, as can be seen in the photo. I prefer the straight lines.

frontback

I traced the pattern in the size based on my hip measurements. When I checked the circumference I was a little shocked to see so much "negative ease" there was. The skirt is intended to be made from a fabric with stretch, but it would be a lot of stretch for me and my hips are wide enough without stretching fabric over them.
So: back to the drawing board, literally (almost, it was the floor, looking forward to a bit more space).

My creative space, a mess! Original pattern pieces, my skirt block with lines drawn into it. The worst part is not captured in the photo ;).


I plan to make this skirt from a fabric with almost no stretch. The instructions in Knip Mode indicate no zipper because of the fabric with stretch they used.  Even if I would have used that kind of fabric it would not do for me, the difference between hip and waist measurement is too big. So I will add a center back seam and incorporate a zipper. 
I use my skirt block in combination with the original pattern to get a pattern based on my measurements. Not very straightforward, there are still a few decisions to be made in the distribution of the darts but that's for tomorrow. 
I'm not sure whether I'll succeed and whether the style will suit me,  I'm in an experimenting mood. 

pattern