Showing posts with label lingerie. Show all posts

Thursday, July 24, 2025

A bra

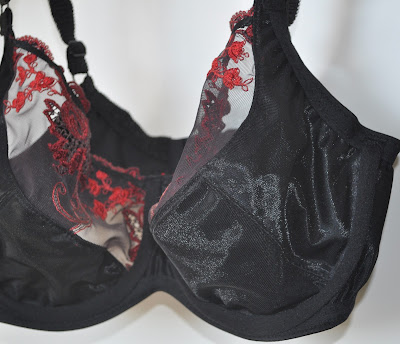
Another make for my daughter. About two years ago  I saw a bra online made in a lovely lace that I thought my daughter would really like. As it wasn’t a rtw bra I looked for the lace and found it. But it was sold by a shop outside my country and shipping costs were so high that I didn’t buy it. I forgot about it until I saw a very similar lace at Suzanne’s lingerie supplies. A shop in my country! So I bought it and made this bra. The lace is not mirrored so it was not possible to make it symmetrical, but it’s okay. 


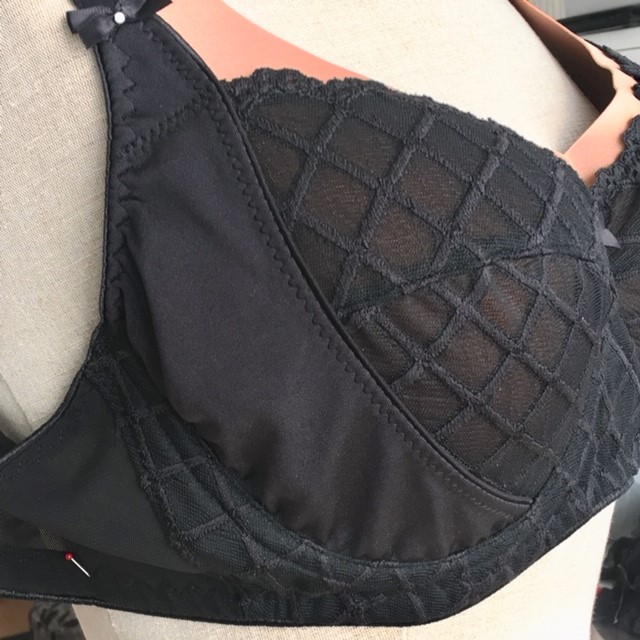
This bra pattern is a copy from a rtw bra. The black one is my first iteration. The cups fit perfectly but the band was a bit too narrow to my daughters liking. Must have been the material. Probably the powernet I used didn’t have the same stretch as the original. So I made the band a bit wider on this new one. Hope it’s good, the bra has yet to be given to her.


It was nice to sew lingerie again, haven’t done that in a long time. My lingerie drawer should get a serious update though.  I bought a new bra pattern for myself months ago and have yet to make it. Perhaps I should get myself work on that. 

Thursday, September 19, 2019

Black beauty bra

I totally forgot I hadn't put a post up on my latest bra. It's the black beauty pattern by Emerald Erin. A bit different by the external "power bar". When seeing the line drawing I had a little doubt, as it looked a bit low on the upper cup. But that's different for my size.

For the size I went with the size 32F at first and made that cup of a remnant and sewed it into a band of a bra that was not good. Then I did the same with the 32FF cup and that promised to be ok. Isn't this a fun look ;)?


I followed the name of the pattern with my choice of fabrics and lace. The lace has been around a long time and somehow I always was reluctant to use it. Good for a trial version of this pattern. 


The pattern has several views and can also be made with foam. I did not use foam (though I might try it at some point). I made the all lace version (view B) and love the result. The instructions are very good. I've followed along, even though I've made many bras before. The only thing that could have been better are the notches/marking of the under cup. An indication of center front and upper/under side would have been good imho. 
The back is different from what I usually make, but after a day of wearing has my approval, the external power bar has a slightly slimming effect (pushing the breasts a bit more inward).

I'm very happy with this bra, there will be more variations (soon  I hope).


Wednesday, September 4, 2019

Sewing lingerie again

Lingerie sewing has been on the backburner for a pretty long time. Somehow I didn't feel inspired and a complete failure with a bra last year didn't help. The bra below was finished last week. It had been cut months ago (March?) and was around in my sewing room since.


I didn't use a pattern, but copied a rtw bra that has a good fit. A good way to start sewing lingerie again, as a lot of the patterns I used before are not the perfect fit any more. So the quest for good fitting bra patterns starts again. I'm in the middle of trying a new pattern (and new to me indie designer) for a bra and I hope to be able to show you the results soon.

I went to the famous Kantje Boord shop in Amsterdam today. The best source for inspiration too. And of course lovely fabrics! My intention was to buy black based lace. Think I've succeeded ;).


Friday, August 11, 2017

This was an easy sew

Reading the comments to my previous post was making me feel better: I’m not the only one making such a mistake. Thank you for taking the time to tell your mistake. Some of you said that reading my post made them feel better too and I can fully understand. In the online world we usually tend to show the successes and less the failures that are an inevitable part of sewing too. It’s something I do as well and I was in doubt about posting about the mistake and glad I did in the end. I was able to save the pants and will finish them this weekend, when my daughter is home again she can try it on to determine the length of elastic in the waist.

In the meantime I needed something to cleanse the palate, so I made a bra from one of the sets of material I bought when I met up with Jane. I’ve used this lace before (in 2013, can’t believe it’s that long ago), but with black lycra. Now a full embroidered lace was available too and lace trim for the shoulderstraps. Makes it quite different. It’s a bit more transparant in real life, the photos were made with a black preformed cup underneath.

Really no surprises in sewing this time.It went smoothly.

P8110048P8110049P8110051P8110045

Saturday, June 3, 2017

Lace bra

It’s been a while since I made a bra and it is more than time to make a few new sets. This is my first bra of what I hope will be at least 3 new sets in the next few weeks. It still lacks a bow as I’ve forgotten to take one with me (being abroad for the moment on a lovely holiday). But I’m ever so happy that the fit is very good, as I’ve been struggling with that recently.
P6010932
It’s made of lace which I underlined with a tule to give it the strength I need. Only the plain part of the band you see is stretching. It’s a kind of powernet.
The pattern is a copy from a rtw bra with adaptions, as I was not happy with the fit of that one any more either.
P6010938
P6010934
The inside. I hope you can see that there are two layers of fabric in the cups too. The tule that I used for the bridge and side of the cup is more sturdy and more white than the other fabrics. It doesn’t worry me as it does not show from the right side.
P6010936
I tried something new with construction and used Vliesofix (similar or the same as bondaweb?) to bond the lace and tule together. I’ve very often used two layers of fabric, using different ways to keep them together but this worked so easy. The two layers could very easily be treated as one during sewing. It’s not visible at all. 
I’m expecting the glue in between will dissolve after a while, which is fine I think, as this is not where the strength comes from.
Parting shot of a view we had during one of our walks. It’s not sewing that is the main activity of this holiday (which is almost over, a few more days).
P5280726

Friday, January 13, 2017

A week of finishing ufo’s

In the last few days I’ve been finishing 3 projects. All started in 2016 and still lingering around for one reason or another.
The first one to show here is a lace bra. My lingerie drawer has been in need for new items for quite a while now and I’ve been trying to get my bra pattern right again. I had a problem with fitting and just couldn’t get it right (obviously my body changed a bit). When I read the blog post How to add volume to your bra cup by Norma Loehr from Orange Lingerie it dawned on me that this could be the answer to the problem. And its was. I had been making my upper cup longer but what I needed more was some extra room in the cup itself.
DSC_0314
I’m ever so pleased that the lace in this bra is quite symmetrical, except for the center front (bridge). I did not want to insert a seam there with this lace.
DSC_0320
The only reason this bra was unfinished for several weeks was the fact that I missed the right colour shoulder strap. Basically it’s a staple colour, but I am short on a few supplies. Around the Christmas period I didn’t get around to going to the shop in Amsterdam and at the beginning of this week I just ordered a few meters of several off-white variations online at Lijfgoed (a Dutch shop, no English text).
DSC_0318
DSC_0322

Edit to add the pattern name: it's the Marlborough bra from Orange Lingerie.

Thursday, June 9, 2016

Scallop edge–applying elastic

In my previous post I showed you how I used a tiny dart to get the scallop edge of lace to match the underband of the bra. Or at least, the main center part of it.

This means that elastic can’t be used as you would normally do, as now you can’t turn the elastic under the edge of the lace.

A picture of how it looks when finished:

DSC_0312

First the elastic is attached to one side panel, the length of the center part is left open and the elastic attached to the other side panel. When turned the elastic is only topstitched at the center front.

The steps in pictures:

The side panel is attached to the front, making sure there’s space for the elastic to attach.

DSC_0302

The inside, the lace panel is underlined with non-stretch tule. The side panel is a double layer. The tule used has some stretch. I use this because my lycra has a lot of stretch and does not give enough support when used as a single layer.

DSC_0303

The picot elastic is attached with a zigzag stitch, meeting the edge with the lace exactly.

DSC_0306

DSC_0307

Measure the length of elastic you need for the center panel and mark the center front and end with a pin. (I used to take off 15-20% of the length of the pattern piece, but nowadays I just stretch the elastic and eyeball it)

Attach the elastic to the other side panel, take care not to turn it over in the center.

Turn the elastic, pin the elastic to the center front, just hiding the picot edge under the lace and topstitch with (triple) zigzag. In this case I would really prefer the triple zigzag as it’s wider and covering more of the width of the elastic. The result is as shown in the first picture. Below you can see that the center front elastic is only sewn with the triple zigzag.

DSC_0310

DSC_0309

Thursday, June 2, 2016

A very tiny dart


DSC_0299

One of the projects I’m working on is a new lingerie set. I wanted the scallop edge of the lace on the bottom edge. However, the bottom edge of the pattern is curved. I have posted how I do this before, but it’s many years ago (blogging for over nine years now!). So not too bad to post about it again.

This is the pattern piece, including seam allowances (a bit irregular as I traced this on sturdier paper for the pictures).

DSC_0292

If you want to use the scallop edge at the bottom, the seam allowance must be removed.

DSC_0293

Position the center front where you want it. I always use a deep point of the scallop. Also keep in mind how the center front will look like when sewn together. At the center it’s deciding where to have a little extra, imagine a straight line till the bottom of the curve of the pattern.

image

I clip the pattern to the edge and leave just a hinge. The right part is then moved down to meet the scallop edge, creating a tiny dart. That dart is marked and sewn, resulting in what you see in the first picture. After the cups and channelling are inserted, the dart will hardly be visible.

DSC_0301

In another post: how to add the elastic to the bottom edge when using this construction.

Wednesday, February 24, 2016

Sewy Isabelle


I apologize if the pictures are not lined properly in this post. I always used LiveWriter for my blog posts but that doesn't seem to work since I migrated to Windows 10 and I don't want to take the time to try to find out what is wrong.

Furthermore I learned that Picasa (my favorite site for online photo-albums) will be discontinued later in the year and will be replaced by Google Photos. I've checked how that works and I'm not happy about that either. No linking to photos like I'm used to (or at least not obvious how to do it).

Absolutely no idea what that will do to the photos on my blog (and that of a lot of  blogs). And I'm not going to re-link all the photos of the past nine years!

Not my lucky tech-day as the Sewy-site seems to be down right now so I can't make a screenshot of the pattern or give a link to it. It's a very nice pattern. Here is my result and I'm ever so happy that it fits beautifully.


Saturday, February 20, 2016

Inside / outside


I love it when a garment is as neat on the inside as it is on the outside.
Case in point: the bra I’m making. I’m trying a new pattern, the Sewy Isabelle that was so very kindly gifted to  me by a blog reader. Thank you again Gina!


I can’t tell you nothing about the fit right now. As those of you who made bras know you can’t judge the fit of a bra untill it’s as good as finished. As it’s a weekend with a lot of rain here, so perfect sewing weather, I hope to finish it tomorrow.

Tuesday, July 28, 2015

A new bra

bra front

It turned out to be very difficult to make good photos of this bra. These are the best shots I madebra side detail

The seam in the lace is hardly visible, don’t you agree?

bra shoulderstrap

I like the result but it was a pita to use this lycra for the bra. In my previous set I used a lycra with less stretch for the bra and this lycra only for the accompanying panties. Should have done that here as well. This lycra is thin and very stretchy. Add to that I had not the usual stable fabric I use to interface the under/side cup and used “old fashioned” tulle and there’s a recipe for difficulties during construction. Wearable, but a few pleats that I’d rather not have when this is on my body.

One panty to finish and then this set is ready.

Sunday, July 26, 2015

An easy project

Making a bra is an easy project for me. I’ve made lots in the past years. I don’t even remember properly when I started making them, but as the lady who took care of my children when they were little (when I was at work), introduced me to it, it’s quite safe to say it must be at least 15 years. And I still like making them. After intense projects or in a period of lacking mojo sewing lingerie is often my next step.

Today I started on another set, all the parts for a bra and two accompanying panties are cut out. The bra is partially done.

band  1

For this bra I wanted the lace, which is only a border lace, to follow the bottom of the band into the side. I made quite a lot of tutorials about sewing but they’re all quite old now, so might be time to update a bit and/or show you what I did.

In the picture below you see the pattern piece for the part that’s beside the cup. It will be joined with the the band for the back (the lycra you see in the picture above).

I folded the lace in an angle and at the botton you see the lace does not complete follow the line of the pattern. From experience I know that’s not a huge problem.

pattern on lace

Before unpinning completely I marked the foldline with water soluble marker.

band marked seam

This is how the pattern piece looks after cutting and unfolding.

band

Pinned the marked lines, right sides together.

band seam pinned

Stitched the seam

band seam sewn

Folded the seam down. When sewing on the elastic the little piece sticking out in the corner will be folded to the back.

 band

(the black lines in the pattern are not completely straight, I followed the light pencil marks to make the photos clearer and did not use a ruler at that point).