Showing posts with label knock off. Show all posts

Wednesday, February 22, 2017

Top finished

The top I drafted is made up in fashion fabric. A remnant piece that I found at the fabric market last year. Did not know the contents but as it was a “Sigrid” fabric (as one of my friends immediately said when I showed the picture in our Whatsapp group) I had to buy it.

It was not complicated to draft and an easy make too. Only the point of the v-neckline requires some thought and I might do it a little different next time. There certainly will be a next time as I like the neckline a lot. The pleat is not something I will repeat too often, but it’s a nice detail.

32952062256_0368f3e099_z

32967275626_95d911a915_z

This was the original inspiration garment.

image

PS: thanks to those who commented on keeping a diary of my allotment plans a few posts ago. I’m experimenting with OneNote and an (old-fashioned?) paper notebook. It crossed my mind to start a blog about it too, but I’m such a beginner. Plus the time it takes. Might change my mind.

Perhaps I’ll do a closing picture occassionally like this, my tomato seedlings and part of the plot (after some work has been done).

IMG_4764

image

Wednesday, February 15, 2017

Drafting (again)

When a pattern you draft does not give the result you want, you may get discouraged and think “why draft, I’ll use and change commercial patterns”. That’s what happens to me, until I realize that I have lots of fitting problems then too or when a garment comes along that I want to copy urgently. That’s what happened when I saw this thread on PatternReview discussing this top (which costs $ 400! I’ll never spend that much on a top):

imageimage

Quite simple looking, yet elegant. Very much a summer top, but also wearable under a jacket. Couldn’t help myself and tried to draft it. This is my muslin, based on my sloper drafted in Suzy Furrer’s Craftsy class.

IMG_4672IMG_4673

In her class on neckline variations Suzy Furrer shows how to draft a funnel neckline and an opera neckline but both in variations that stand away from the neck. I could use the information to draft this neckline hugging version.

My observations:

  • funnel neckline close to the neck
  • curved v-neck
  • 1 to 2 inched seam below lowest point of v-neckline, opening into a small pleat
  • seam in the back neckline
  • center back seam
  • no darts

For my version I chose to have a bust dart: removing all darts in the waist dart is too much on my figure and I think that being full busted that is just fitting better. I did not use a seam in the back neckline.

Hope the next drawings are clear in how I got to this pattern. I use inches in this description as I’m quite used to doing those now, having followed so many of Suzy Furrer’s classes. I use an inch ruler too when I do these markings.

The starting point: sloper draft of the front, shoulder and armhole dart closed and the space “dumped” into the bust dart. (alternative could be a blouse/shirt pattern with not too much ease).

IMG_4703

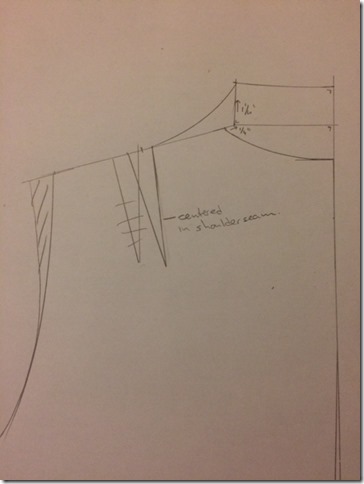
I went 1/4 inch in for the shoulder seam
(for those having done this sloper too: this is the 1/4 inch you remove from the moulage to get extra space around the neckline. I started using this point but it was too wide, so I went back to the original moulage point)

IMG_4704

From that shoulder point 1 1/4 inch up, perpendicular to the center front

Draw the curve, ending around the middle of the shoulder seam.

Decide where you want the v-neckline to end and draw a curved line to that point.

IMG_4705

IMG_4706

I decided to have the center seam 1/2 inch below the bust line. If the pleat would start too high, it would open up which at bust level, not so nice probably. The pleat is 1 inch deep (you could make it less or more, it’s just what I thought would be about right), so the amount of fabric for the pleat is 2 inches. The front can be cut on the fold. As I’m used to I marked the darts as “not using them”.

IMG_4708

As last step I removed 3/4 inch from the shoulder width.

IMG_4709

The back: starting point the sloper again.

IMG_4710

Basically this is the same change: 1/4 inch into the neckline, 1 1/4 inch up, draft the curve and the neckline.

Remove 3/4 inch from the shoulder width and center the back dart again (I prefer to keep this dart too for better fit).
IMG_4711

The final pattern pieces. The orange dotted line is the line for facings. For the back I will remove the dart from the facing by folding it away. Or I could change my mind and make separate facings for neckline and armhole. First to decide which fabric to use for the top.

IMG_4713

NB: I folded out a little bit (about 1/2 inch) from the curved neckline to make sure the neckline doesn’t gape. This is more necessary for fuller busted women if I remember it right.

IMG_4714

Hope this helps some of you interested in drafting in general or this top specifically. It’s my interpretation of doing this. If you do this I do advice to make a muslin as I’m not a teacher and can’t guarantee this works for you too.

Tuesday, July 14, 2015

Blouse with woven strips of fabric – part 6 / finished

Let me first post a reminder of the original top that I was so inspired by.

image

Followed by my version (looking a bit tired and no make-up after a run earlier). I’ll let the pictures do most of the talking.

finished blouse

  Side blouse Front detail blouse side back

As mentioned earlier I used a water soluble layer under the strips. This is just before I cut most of it away. A little anxious moment as I was unsure how the strips would behave without the stabilizer to hold them together. As you can see in the pictures of the blouse on me, they hold well. A word of caution if you use the water soluble fabric: don’t use steam with your iron. I forgot at some point and immediately the layer started to dissolve (I press a lot during sewing and it irritates me to see the (altered) back dart not pressed well).
How it will be after laundry is another matter.Ironing will probably be a difficult task.

construction detail

Thank you all for the for the nice comments. Carmen, it really is a pity sometimes we all don’t live closer to each other, it would be so nice to be able to (get) help with fitting. Thank you for the link on the shoulder slope and I will definitely study it more closely later.

Laura Arhire asked “your shoulder seems to be a bit forward, but the shoulder seam doesn't point to your shoulder cap. Does that affect fit at all”. Yes, my shoulder is a bit forward, though it’s mostly my arm that tilts forward (or is that the same?) It does affect fit and perhaps I should even set in my sleeves a bit more forward. For the moment I’m satisfied with the sleeve in this blouse, but I do see room for improvement.


Sunday, July 12, 2015

Blouse with woven strips of fabric – part 5

Just want to share my progress, I’m so happy with the result of the front. Apart from the strips the placket was a challenge. I did not want the hidden placket till the neckline and figured out how to make a partial one. Might be worth a tutorial at some point. 

front

hidden button placket

Enough time spent in the sewing room this morning, I’m really longing to finish it but with a gathering of friends later today at our house I now have to close the door to it and prepare some food, take a shower and change. The saga of this blouse will be continued soon.

Saturday, July 11, 2015

Blouse with woven strips of fabric – part 4

strips ready

It’s getting serious. I’m working in the fashion fabric. I pinned out a little in the back, resulting in both a better fit in the back and the sleeve fitted better at the same time. I will post a picture of that last muslin phase when I have one ;).

This morning I made the final pattern based on the original pieces and the muslin. Like Holly said in her comment on my last post: it’s not a project to whip up in an afternoon. The strips for the front took me about 2 hours and I took a huge shortcut. Though it’s only a shortcut from what I originally planned, there are no instructions.

I planned to make strips in the conventional way: sew on the wrong side and turn the strip. When thinking about that I already saw a problem in pressing the seam open as I did not want the sewn side on the edge.
After cutting the strips I encountered another “problem”. I wanted all sides of the strips to have the black on the edge (ocd, I know). Difficult to get right. Change of plans then: all the strips were ironed in the way I planned and initially I thought to close them with hand sewing. WHAT??? Hand sewing all these strips? I’m not a great fan of hand sewing and avoid it if I can.

Conclusion: I did not sew them but fused them together, the sewing police may come and fine me. Serged one end and used narrow strips of vliesofix to close the seam. I used vliesofix because I had that available, it works the same as wonder tape but that is not readily available here and can only be ordered online. Vliesofix is sold by lengths and it’s easy to cut narrow strips with a rotary cutter. I’ve used it before to cover padding with the right color lycra.

vliesofix strips serged on wrong side

Wednesday, July 8, 2015

Blouse with woven strips of fabric – part 3


back
Good progress in my opinion. I’ve closed the center back pleat and have sewn the darts as well. Still a little bit too much space as the result of making the body sloper wider. This style of back suits me better than the wide one of the inspiration piece. The main attractive feature is the front(as Vicki commented too’). I’ll make a back that I like better.
For the sleeves I reverted back to Suzy Furrer’s class. The result is so much better now. A little pleat in the back and I will see what happens there when I pin a bit of space out of the back. For those doing Suzy’s classes: it makes a difference how you draft your curves around the square size, the N-T and N-M lines. I had to flatten the upper curve but of course that depends on the pattern you’re making and your figure. Just something to consider when you’’re working on it.
A few tweaks and then I hope to be ready to finalize the pattern.  It’s a fun project.
side back side sleeve
Thank you for the comments letting me know that you like these posts. I know there is little time in a day and don’t comment myself as much as I used to do. Reading blogs on my phone is a great way to keep up to date, but it’s the worst platform to comment (I don’t like typing on my phone, it’s so slow (being used to typing without having to look at the keyboard) and errors are easily made. So I really appreciate if you take time to comment and even (like Renee on my last post) to give tips and advice on drafting. Thank you Renee! She mentioned that the original has a dropped shoulder and I’m aware of that, but choose not to make the shoulder dropped.

Tuesday, July 7, 2015

Blouse with woven strips of fabric – part 2

muslin front muslin back

Sorry to show you again such boring fabric. Sometimes I think I’m only publishing posts with muslins ;). They serve a purpose though and I like to document what I do in my blog too. Muslins can be the first part of a real garment but also be part of my progress in drafting patterns and (of course) a muslin can help decide it’s no use to continue on a project because the style does not work for me.

Not so for this blouse, I like this so far.

My interpretation of the front waist pleats is sewing the dart partially. I’m not sure yet how to proceed with the back. The original has a waist seam in the back that continues to halfway the front. My guess is that the wide back is gathered to the waist. I’m not so sure I would like it that way on me and consider leaving out the pleat center back and use partially stitched darts as in the front. Any thoughts on this?

imagemuslin on me

Analyzing the fit and design I need more curve the front placket . I like the opening at the neckline of the original and drafted it almost wide enough, but forgetting the width of the placket extensions. The neckline is fine and does not need any changes. The shoulder needs to be half a centimeter wider. It’s a lesson in checking and re-checking, as somehow I’ve lost that half a centimeter compared to my sloper.

   muslin on me

The right sleeve was the first I made and it does not have ease. Too tight and feels uncomfortable.

muslin on me

I widened it and it now has a bit of ease. Feels comfortable but the fit is not as I want it to be. Í will try to set it in differently and see whether that helps.

muslin on me muslin on me 

The main body was drafted based on the sloper made in Suzy Furrer’s Craftsy class. The sleeves are a combination of the Danckaerts method of drafting and then adapting for shirt sleeve as described in the book by Helen Joseph Armstrong. In her book she makes a distinction between patterns for dresses and for blouses/shirts. Can you have too much information? Perhaps it would be better to stick to one method. Alas, it does not work for me that way. I have taken real life classes, I’m watching Suzy Furrer’s classes and also reading the books. Hopefully not too much information to digest. 

Perhaps I will try Suzy Furrer’s draft for sleeves after all for this blouse. My main concern is the lack of height of the sleeve cap in her way of drafting. The shirt style has a lower cap and is wider. Why do I realize something like that after doing it in a more complicated way? And that is a rhetorical question.

Sunday, July 5, 2015

Blouse with woven strips of fabric – part 1

When inspired like this I want to continue and despite the heat I started working on the muslin. The main focus point of this design are of course the woven strips at the top, I think it’s difficult to do this right without using a layer to fix them during construction. For the final product I plan to use water soluble fabric (Avalon) for this. In the muslin I opted for a thin fabric that does not add bulk and which I will cut away later. It’s thin and fluid so I starched it. I traced the pattern piece on this “temporary”  pattern piece with carbon tracing paper on both sides. In that way I can see the actual seam lines adding the strips of fabric and in construction.

For the weaving I used fabric strips of different width as in the inspiration piece.

  DSC_1259

When woven and pinned I turned the pattern piece on the carbon tracing paper again and marked it.

DSC_1258

Then I cut away the extra length of the strips.

DSC_1260

There is a little room between the strips but not a lot. On to the next part and sewing the muslin together. To be continued…..

Tuesday, January 20, 2015

Dress coming together

After showing you all options I like to share my progress. This is the result of a rainy Sunday afternoon.

011e3815d3455371d833a6729be7d2c9de8909414f012dbe63a30555002c19beff90835425bd07676a57 

I considered all the suggestions and votes given. thank you so much for that. The blue was more teal than I remembered and after also coloring the back options I decided on above variation. I took my chances and did not make a muslin. I’ve made so many in the past months (a lot not blogged about) that I was completely in a mood not to make one. I drafted a pattern with my own measurements with no ease for the bust (either positive or negative), drafted the lines in it, repositioned the darts in the front to match the lines and crossed my fingers it would work. It does! Happy dance. I do need the bust and back darts and did not try to take those out.

I will cut 3/4 sleeves and see how that will look. A sleeveless dress is no option here in these winter months and a jacket or cardigan will also hide what this dress is about.

The side seams are only basted and the darts not pressed yet. To be continued…..

Monday, November 10, 2014

Jacket – self drafted

I’m still going to class working on pattern drafting. The past weeks I worked on a pattern for a jacket, inspired by a Marfy pattern. It is a complicated pattern and it was not an easy task to make it. I’m very happy with the result though.

My version of the jacket has princess seams on front and back, one dart in the front (not continuing below the pocket), no side seam, welt pockets and notched collar. The original has a flap in the pocket, two darts and probably bound buttonholes.
After all work on the pattern drafting constructing the jacket was not very difficult, I’ve made quite a lot of jackets before and I decided not to use tailoring techniques, speeding up the process of construction a bit too.
     
The jacket on me, it’s difficult to take pictures with the sun giving such strong shadows and changing the color. Inside is not a real alternative, the light there is not good either in November.
I think the back could use a tiny bit of extra space at the hip. Otherwise the fit is quite good. The fabric I bought when meeting my sewing friends Pauline and Clare about two years ago. It’s a great quality for a jacket in a nice brown (not my usual color, I have to make one or two skirts to go with this).
For this jacket I made a muslin first and it needed almost no alterations, something I can’t say for commercial patterns. I want to make another jacket soon to see/feel the difference of another amount of ease (this one has only 6 centimeters bust ease, I wanted a fitted jacket). It takes a bit more time in the drafting phase, but for me that time is well spent as it did not take me 2 or 3 muslins to get where I wanted.
 
A few details: the roll line for the collar, the sleeve and the lining. The collar was made using a Threads article by Jan Schoen. This article on their website describes this method.