Tuesday, January 31, 2017

Drafting a dress - 4

I’ve been working on the sleeves for the dress. The original has short sleeves and I intended from the start to make 3/4 length sleeves. Whicht meant of course drafting those too. I am rather intrigued by the various ways you can draft sleeves. Because of that I took my time and drafted several versions of the sleeve, using 3 different drafting systems: the book Building Patterns  by Suzy Furrer (same as in her classes on Craftsy), Patternmaking for fashion design by  Helen Joseph-Armstrong and the one-piece sleeve from the Dutch Danckaerts system from the book dresses. It’s fascinating to see the different approaches and still coming to a more or less similar sleeve draft. That certainly is true for the methods used by Suzy Furrer and Helen Joseph-Armstrong. The cap of the sleeve drafted by those methods was very similar, the way to get there very different. The Danckaerts system gives a different shape for the back of the sleeve, which I know not to be good on me but I wanted to draft it anyhow to see how it would be compared to the others. In my next post I’ll show pictures of the different pattern pieces and describe the different approaches in more detail.

I made mock-up sleeves of the two versions. On the right is the SF draft and on the left the HJA draft.

DSC_0357

DSC_0360

The HJA draft felt more comfortable. Both had a few unwanted wrinkles.

DSC_0358

This meant (and I had to check my fitting books for that) that the sleeve should be rotated a bit to the front and after I did that, it improved, but I wasn’t there yet. On the photo below I also made the sleeve cap higher (the height from the biceps line where the armhole starts to the top of the sleeve) by basting it with a very narrow seam allowance. This gave a pretty good result and I can move that arm properly. I’m pretty sure that if I had adapted the sleeve drafted with the SF method it would have resulted in a good fitting sleeve too.

DSC_0367

DSC_0369

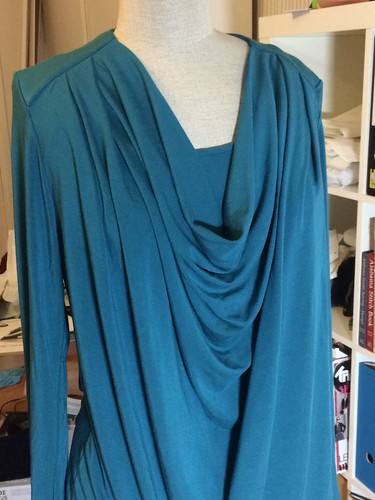
Though I’m this far in drafting and constructing, I’m in doubt about the dress. When I first saw the picture of it a few years ago I really loved the design and thought it really would be a “me” dress. As it is I’m not so sure. Don’t know whether it’s the fabric or the design on me but I’m not as enthousiastic as I thought I would be. I might leave it alone for a week or so and see what I think.

Thursday, January 26, 2017

Drafting a dress - 3


What lovely comments on my posts on drafting. Based on your comments I will try to give more details on drafting the funnel neckline in another post (if I can do that without infringing copyright) and will show you how I use my sloper to check a pattern. There were other questions and I'll answer these in another post. Never feel that you might not have enough experience to comment or apologise for being late with a comment. No need!! I love to read them all. 

Today two pictures of my progress. The front now stays in place, so the change worked. 


Aweful selfie photos in a mirror, you'll get the idea. The pleats are only provisionally pinned and I will change them a bit before closing the seam. Just wanted to know if I was on the right track. 

On the inside I used silk organza on the bias cut triangle at the waist to stabilize and used a little bit at the right front to eliminate bulk for the zipper in the side seam.

Friday, January 20, 2017

Drafting a dress - 2

First I’d like to thank those of you who commented on my recent posts. I have a few very regular commenters (extra thanks!) and recently I’ve seen quite a few new names too. Welcome to my blog and please share your thoughts. In a time that blogging is regarded obsolete by some it’s nice to know this is still a lively community.

Back to the story of the dress. I’ve cut and basted the dress and there was a moment of disappointment. The pleats did not form a nice fold, there is too much fabric. Worse even, the neckline was gaping a lot. So much that I don’t want to share a photo.

I think the pleats are just too long. As I said, I’ve drafted this dress two years ago and I’m not sure now whether I took out the space of the darts. Well, better too long than too short. I hope that these will be fine with some manipulation.

Part of the gaping is probably caused by my figure. If I would have an A or B cup it wouldn’t be so bad, but there is a bit more to cover. It would be fine if I could put on the dress and stand completely still all day. Don’t know about you, but that’s not the way I spend my days.

It was mainly the right front that was pulled away.
As you can see in the first picture of my previous post, I drafted a straight line to the waistline from the point where the left and front cross in the neckline. That is probably the main problem . The right front is not “anchored” properly. Back to the draft and making sure the right front is attached to the left side. Below again the sketch of what I did on a block from a book.

Instead of going down to the waistline, I extended the right front to the left side, keeping the line below the bust point (in this drawing on the bust point).

IMG_4566

I moved the top of the waist darts to the bust point. Something I’ve learned in Suzy Furrer’s classes (I keep referring to her classes, I learned a lot from those). She either uses a high or a lower point for the waist dart, depending on what you want to do with the pattern.

IMG_4568. The waist dart on the left side is cut out, the legs of the dart can be placed together, thus removing that dart (cutting one dart leg and moving over would have been enough, but thought this might be clearer).

IMG_4569

In the next picture the left waist dart is closed, as is the shoulder dart. The space of the shoulder dart is moved to the bust dart. That’s the extra space you see there under the original bust dart. That’s one option to get rid of the shoulder dart.

IMG_4570

A second option to remove the shoulder dart is to move the space to the waist dart.

IMG_4571

The last is what I’m doing. Keeping the original bust dart and use a wider waist dart. It will be covered by the pleats of the left front panel.

I’ve tried this extension on the front by cutting it from a piece of silk organza (thinking I might keep it that way) and have basted it to the front, waistline and side. A huge improvement. I will however re-cut the right front.

Hopefully I’ll get some sewing done this weekend, but I’m not sure.

Wednesday, January 18, 2017

Drafting a dress

In case you wonder if I’m not doing any pattern drafting any more, making patterns from my magazines more, the answer is that I’m definitely doing more pattern drafting too. Sometimes it’s just easy to take a pattern from a magazine. I usually take my sloper to compare the pattern draft, which already helps to get a better fit from these magazine patterns.

But I love to draft myself too.
There are a lot of styles and ideas that I want to try in drafting. Some are ideas from pictures that I have found on the internet. Those I usually pin on Pinterest (I have inspiration boards per category of garments). Other ideas come from the many books I have collected on drafting and there are a lot of things to try. I want to try things that won’t be a garment for myself, just for the technique. So if you’re more interested in posts on drafting, there will be posts on that too.
My next project is a dress inspired by a picture from the internet. It’s a Ralph Lauren design.
IMG_4517
To be very honest, I’ve already drafted this pattern two years ago. Then life got in the way and I never came round to making it and I forgot about it untill I was clearing out a box of patterns recently.
My observations on this dress:
  • It has a funnel/opera neckline (as Suzy Furrer describes this style in her class), not standing away from the neck but hugging it. This I assume from the picture, I don’t have a picture of this dress worn by someone.
  • There are pleats on the right side waist area, a separate waist piece on the left side. Plaids in the waist matching to the skirt. Not sure whether that will work with my fabric, so I might cut it different on purpose.
  • The straight of grain in the top is the same on both the left and right side in the bust/shoulder area (plaids match)
  • In the center back a zipper is inserted. I think I will add a zipper to the side seam
  • I’m assuming the back has no special features and I don’t want to add anything special
  • I’ll probably make 3/4 or long sleeves
The draft
Disclaimer: this is a work in process and the dress is not yet made, just want to show you my process. It’s not a course in drafting.
A design like this (asymmetrical) needs a full pattern. In this first picture I’m trying to show you how the pattern pieces are drafted in the sloper, still having all darts (shoulder, bust and waist darts). I’ve used different colors for the different pieces to make it clear.
IMG_4519
For illustration I’ve done the draft in a quarter scale for a default size (the scale version is in one of my books)
The full sloper without design lines. Just the darts
IMG_4520
The design lines drawn into it (should have drafted the lines with the same end at the hipline)
IMG_4521
The pattern piece for the left, I’ve inserted lines where to open the pattern piece.
IMG_4522
The pattern piece with closed shoulder and bust dart. The waist darts still have to be removed and the pleats more evenly distributed.
IMG_4526
For the pattern of the right side I’ve rotated out the shoulder dart but kept a bust and waist dart. The waist dart will be hidden by the left panel and I can’t do without a bust dart. I did not make a sample of that.
What do you think of a post like this. Do you like to see so many details? Is it clear/helpful?

Tuesday, January 17, 2017

Knip mode dress

The last of the three unfinished objects is a dress I started in the last week of December. In the same spirit as the Burda challenge Marianne from Foxgloves and Thimbles started a Knip Mode challenge to sew more from her Knip mode magazines. I don’t have as many of those as I have of Burda magazines, having had a sort of love/hate relation with the magazine. I loved them around 2009/2010 when they had some really good and original designs. Since then I’ve occassionally bought the magazine as mostly their styles did not attract my attention but I must say they are improving. I must even confess that browsing through the issues I have there are quite a few patterns I want to try and I took up the challenge (again without fixed rules) and will try to sew at least 6 items from other magazines than Burda.

2016-06-3

This dress is not very original, but it suited me for the fabric I had. It’s a mix-and-match pattern with several skirt and collar/neckline variations. I used a different skirt variation then the one in the line drawing.

After washing this fabric it was not as beautiful as it was on the bolt and I left it in my closet for quite a while. Rummaging through my fabrics I saw it and thought it was a shame not to use it after all. It was pretty straightforward sewing, no surprises. I used a size 38 for the back neckline and 42 at bust level. It’s easy to merge between sizes and a “fba” like this mostly works for me in a knit like this.

I did sew a zipper in the side seam, as I was afraid I could not get into the dress, the waist having no extra width.

DSC_0356DSC_0355

I like the top part of the dress, but not so sure on the skirt. I shortened it because the original length was way too long and made it matronly. Shorter is definitely better, but perhaps a pencil skirt style is better on me.

Sunday, January 15, 2017

A lesson learned

This is the second of my three ufo’s from last year. I showed the start and interfacing of it at the start of December. My last post on it is dated December 18 and then I said I hoped to complete it within a week, unless I would make a Christmas dress. Well, I made the Christmas dress and started other things in the meantime too. Somehow I was just not too pleased with it.

I tried it on this week and first of all cut off the extra length I had added to make a longer jacket possible. Not good on me, I like my jackets shorter, I’ve yet to find a longer style jacket that I like on me. I tried it on again and still was not satisfied with it. It felt too big, even when it was made from the same base pattern that I used for my previous jackets that I drafted myself and that fit perfectly. I realized that using a fabric with stretch would feel very different in a jacket. I’ve made ponte-knit jackets before but they behaved, especially after using interfacing on them, almost like a woven. I did not interface the body of this jacket, as I wanted a more unstructured jacket.

Of course I could not completely go back to the drawing board, as the jacket was almost completed. I took in the sleeve width and made all vertical darts deeper. In the back I sewed the darts till the hem, thus taking a bit out of the back hem width too. It is closer fitting now and looks so much better :).

My lesson learned is that if I want to make a jacket from a knitted fabric, I’d probably better start with my normal sloper, not the jacket sloper that has more ease.

DSC_0333DSC_0326

DSC_0327

No surprises on the inside this time. I used a plain black stretch interfacing. When I put the jacket on after it was finished it felt so comfortable. It will get a lot of wear I think, it feels like a cardigan. At the same time I can see the difference interfacing the front and using a shoulder stay makes. I prefer the tailored look, but I wear those tailored jacket not that often.

DSC_0334

The fabric looks only black and white in the photos, but in reality it has some grey and blue threads as well, making it a bit more special.

DSC_0324

The pattern I drafted myself, copying the collar style from a rtw jacket. I used the sloper I made in the Craftsy class Pattern making basics – Bodice sloper from Suzy Furrer, with the extra width added for a jacket. As said above I think it would have been better to use the sloper without extra ease with this fabric..

For the collar I used the instructions for the notched collar from her class Collars & Closures, without making the notch.

The two piece sleeve was drafted using another system (Danckaerts) as I don’t like Suzy Furrer’s way of making a two piece sleeve (difference shown in this blog post).

Friday, January 13, 2017

A week of finishing ufo’s

In the last few days I’ve been finishing 3 projects. All started in 2016 and still lingering around for one reason or another.
The first one to show here is a lace bra. My lingerie drawer has been in need for new items for quite a while now and I’ve been trying to get my bra pattern right again. I had a problem with fitting and just couldn’t get it right (obviously my body changed a bit). When I read the blog post How to add volume to your bra cup by Norma Loehr from Orange Lingerie it dawned on me that this could be the answer to the problem. And its was. I had been making my upper cup longer but what I needed more was some extra room in the cup itself.
DSC_0314
I’m ever so pleased that the lace in this bra is quite symmetrical, except for the center front (bridge). I did not want to insert a seam there with this lace.
DSC_0320
The only reason this bra was unfinished for several weeks was the fact that I missed the right colour shoulder strap. Basically it’s a staple colour, but I am short on a few supplies. Around the Christmas period I didn’t get around to going to the shop in Amsterdam and at the beginning of this week I just ordered a few meters of several off-white variations online at Lijfgoed (a Dutch shop, no English text).
DSC_0318
DSC_0322

Edit to add the pattern name: it's the Marlborough bra from Orange Lingerie.

Monday, January 9, 2017

A top with lots of drape

Having done a proper review of this top, I almost forgot to post about it on the blog. Thanks Nancy for reminding me through your comment.

The top has a lot of drape and because of that I don’t know yet whether this will be a favorite or not. I’m used to more fitting clothes. Still I was attracted to this pattern and “had” to make it. It’s from the January 2017 issue of Burda.

Again I compared to my sloper but have to remember it’s different for knit fabrics. I could have used a size smaller. Being so wide it’s not a real problem.

Burda 01-2017-119 front

Burda 01-2017-119 Side

Burda 01-2017-119 Back

I found this fiddly to make with the double shoulder parts and the binding at the neckline. At the point where the shoulder pieces and neckline meet, there are a lot of fabric layers creating a bump.

With the experience I have now I would have done it differently and have made the back with a cut on facing. Also I would serge the shoulder pieces on the inside, thus eliminating another layer. Burda’s instructions tell you to fold the seams on the inside and then stitch.

A plus to this pattern was the added camisole. Burda realized this time that the neckline was too deep for being comfortable in day to day life and solved this by adding a pattern for a camisole. I made my own bias tape for the top from the same fabric and used a lingerie elastic at the bottom. Not an exact match in colour, but well, no one will see this.

camisole backCamisole front

A final note on the fabric needed: the measurement given in the magazine is 2.2 meters, using a fabric that is 1.35 meter wide. This is not a normal width in most knit fabrics. My fabric was 1.6 meter wide and I could cut both the top and the camisole from only 1.7 meter of fabric.

Saturday, January 7, 2017

Audrey Hepburn - Givenchy exhibition


If you are in The Netherlands in the next few months or live here, don't miss the Audrey Hepburn - Givenchy exhibition in The Hague. Lovely exhibition with beautiful garments, a lot of them worn by Audrey Hepburn. Combined with photos and video of the films showing her wearing them. 
Also some that would be very wearable today. 

Just a few phone photos to share, doesn't show the beauty of them. 

Monday, January 2, 2017

Happy new year!

I wish all of you a very happy and creative 2017!
I’m a bit late but have made an overview of the items sewn in 2016.
2016 sewing
Not a lot of garments, I’ve had more productive years. A few things never made it to the blog, but that won’t be more than about 5 items. A skirt and pair of pants for my daughter and the odd t-shirt. Taking into account that I moved twice in 2016 it’s not too bad. My closet needs an update on some items though.
Of course there are favorites but there were no real wadders. If I’ve sewn them and thrown them away, I’ve forgotten by now.
I don’t make a list of what I plan to do this year. In general I just want to sew more, either from patterns or self-drafted. There are a few things in my head but everything is subject to change and of course the spur of the moment. Speaking of which: this is a top from Burda’s January issue, bought on Friday, traced the same evening and made (mostly) on January 1. More details in another post.
Burda January 2017