Sunday, June 29, 2008

Sewaholic and/or blogaholic

For sure I'm a sewaholic. And writing 3 posts in 2 days, and reading a lot of blogs makes me a bit of a blogaholic too I'm afraid.  I saw that I reached my 200th post this weekend. Do I "talk" too much? Well, you don't have to listen if you don't want to, that's easy.

This week I want to make the BWOF jacket I wrote about earlier. I plan to post the steps I'm making with it.

jasje 004 jasje 001First I made a muslin, no pictures of the first stage. And I made only made minor changes: added a center back seam to make a curve possible (the original was straight, cut on the fold) and took a bit out of the back waist and added a bit to the hip. On the pattern I added a bit of space to the bust area, which is just a little snug, which you can see on the muslin. Not surprising, I cut a size 40, while by bust measurement I'm a 42 in BWOF sizes. I don't want a lot of space, this is a jacket to be worn on its own, or open with a cami underneath.

The sleeve area in the back is perhaps not quite good, but I leave that till I basted the sleeve in the final garment, as fabric and interfacing will add more stability.

Like Nancy K said in her comment on BWOF patterns: the sleeve ease is perfect.

Tonight I cut the fabric. Isn't this a handy tool to add seam allowances?

jasje 011

Next step: interfacing.

Saturday, June 28, 2008

The serger behaved

Thank you for "listening" to my frustration a few hours ago. At 8 pm I tried again, and to my surprise my serger behaved again after re-threading for the 10th time or so (the other 9 times were this afternoon). It behaved weird before, so I do think I will have to buy a new one in the coming 12 months. But this at least gives me more time to think about what I want, probably a Bernina again. Anyone of you experience with the Bernina that has a coverstitch in the same machine? I do have a coverstitch, but might sell it in favour of 1 machine with two functions.

The result tonight: Jalie 2806 with gathered neckline.

I made quite a few Jalie patterns before, and I've never been disappointed. Good fit, good instructions (this is a very easy one to sew). Exactly what I expected it to be: an instant gratification project, though my serger made it not that instant.

For the gathers I used Belinda's instructions for a gathered neckline, if you want to make this top, do it her way. It's much easier to keep the gathers in place and evenly distributed.

I'm frustrated

blouse 002 It's Saturday afternoon, after a tough week I have the house to myself. DD has a birthday party, DS has a hockey-sleepover party and DH is away running for a last training before Wednesday when he wants to do a 15 km run. This morning my two Jalie patterns arrived in the mail. I could do with an instant gratification project, and traced a Jalie tee, cut it and wanted to sew it with my serger. No way... my serger is on the point of breaking down I think. 16 years old, already a repair job last year. I did everything I can do: cleaning, oil, other thread (started with Seralon, a high quality serger thread) and other, new, needles. Re-threading numerous times. Nothing helped. My tee could easily have been finished by now, and all I have after over an hour of trying are these accumulated scraps.

Time to make dinner for the two of us. After that I'll try again.

Thank you all for your comments on my last post: I agree about the points made about finding out that the pattern you want turns out to be a RTW item and that the line drawings are important for the details in the back too. The last point was in my post originally, must accidentally have deleted that while editing.

Friday, June 27, 2008

BWOF -is there nothing to dislike?

BWOF receives a lot of praise these days, and as you know, I love BWOF patterns. When I started browsing the internet and found Pattern Review and the first sewing blogs, BWOF was not mentioned a lot, as I remember it.
On Dawn's blog I left a comment, saying that when I started sewing again for myself, I was a bit envious of all US ladies who could get their "big 4" patterns so cheap. The envy has faded away after a few disappointing results.  Mind you, I'm not saying I'll never use a big 4 pattern again (I've got a few in my stash that I want to try), but am more critical of whether the extra money I have to pay for these is worth it.

I'm happy I learned to sew tracing patterns, adding my own, in general smaller, seam allowances and using their short instructions (or just doing it my own way). BWOF and similar magazines like Knip Mode were the only patterns you could get here in the Netherlands when I learned to sew in the early 70's.

Is there nothing to dislike about BWOF?  Cidell said in a comment on my previous post, that the ease in coats is not large enough. That could be true, and I remembered I observed in my review for a jacket from the November 2007 issue, that I found it strange that the same pattern was used for a jacket and a coat, because of the jacket being close fitting. That's why I traced my BWOF coat a size larger than my usual BWOF size. I never actually have sewn a coat from BWOF yet.

My main dislike are the magazine pictures. Regularly the pictures just don't show what the pattern is about, you must use the line drawings to see that.
The line drawings are the most important part when deciding which patterns I like and want to make (usually more than I can actually sew). My BWOF subscription is worth every Euro I spend on it. I predict a lot of BWOF sewing for me in the next months (and 2 Jalie tees I'm expecting in the mail, my experience with these patterns is great too).

But: I would like the pictures to be better. A few examples.

08-2007-113
Skirt with flounce, the model is really showing off the flounce, isn't she? Or is there something to hide in the way the skirt was made?
01-2008-114
Jacket with pleats? Not to be seen in the picture. Collar only to be seen in the line drawing.
05-2007-116
Magazine text: "Did you see the striped sleeve cuffs?" 

The total idea of the blouse is lost. It's a basic one, nothing wrong with that, they may show it. We all need those basics.
05-2007-101
The picture of this jacket doesn't show collar style, the model has beautiful long hair, but this is not a hairdresser's advertisement.

Wednesday, June 25, 2008

Tracing and making muslins

That's mostly what I'm doing at the moment when I have a spare moment. As said last week I'm making long working hours at the moment, and there is little time for actual sewing besides the normal work in house, children with exams etc. I managed to sew the muslin for the coat sew along, as shown in my post last weekend.

I do agree with those of you who commented here or on the sew along blog that the collar is the main problem. As the Butterick pattern also has another view with a conventional collar, I will take the collar off and sew the other collar on.

Still, I'm not completely convinced that it is the right pattern, so I traced a BWOF coat too, to compare style and fit. Tonight I cut the muslin, and hope to sew it before or in the weekend.

It's pattern no. 120 from the December 2006 issue. No reviews to be found, but I am more sure with the fit of BWOF patterns.
Dawn of the blog Two on, two off wrote a post today on why she likes BWOF patters, and I agree with her on most points, especially fit and not having too much ease. And I would like to add the consistency of fit of BWOF. I really don't know for sure which size to make with the "big 4". Remember the dress my daughter made from a McCall's pattern? By size chart she needed a 12, we ended up with size 6. This doesn't happen with BWOF. At least, I never had that experience.

I also traced and cut a muslin for this jacket. This is from  BWOF February 2003, pattern 115. A relatively easy jacket with  princess seams and  collar stand. For this I'm going to use the bouclé fabric I received from Textile Studio Patterns last month. 


Well, I hope to have some sewing time this weekend. I need the diversion.

Saturday, June 21, 2008

Coat sew along - 2

pattern1 line drawing

Last month I posted two patterns from which I wanted to choose the coat for this sew along. The decision is/was on the Butterick pattern for a couple of reasons

  1. Its style will last longer than the Vogue coat
  2. The sew along is a great way for me to try to sew a good fitting coat with some advanced details (with help from the experts here)
  3. After this experience, I'm confident that I can sew the Vogue coat on my own.

So, I decided to make Butterick 4665, with the following alterations:

  • 2-piece sleeve
  • welt pocket (with or without flap, depending on a test later in the process)
  • bound buttonholes
Fabric  
Fabric

This is my fabric, a silk tweed from EmmaOneSock. In real life even more beautiful than in the picture. DH told me it was one of the most beautiful fabrics he'd ever seen.
It needs an interlining for a bit of warmth and stability, as it is a bit thin (correct word?) partially and you can see the light shining through. Fabric for that I still have to find. Any suggestions on what to use with such a fabric?

Sleeve

 
Sleeve pattern

For the sleeve I took the 2-piece sleeve pattern from a BWOF coat from the January 2003 issue (pattern no. 108). In the picture you can see that the length of the cap of the sleeve is almost  the same height as the Butterick pattern, only the total width of the sleeve is a bit less.

After measuring the circumference the BWOF sleeve is 56 cm, while the armscyce of the coat is 51 cm. The Butterick original sleeve has a longer circumference. According to Sandra Betzina in her book Power Sewing, 4-5 cm should be enough ease. So I made my muslin without altering the BWOF sleeve for a start.

Muslin    

Observations on the muslin:

  • It feels too small, but that could also be because of the corduroy I used for the muslin. I used the right side on the inside because you don't see the markings on the right side very well. But the right side of the corduroy just doesn't go easy over my linen jacket.
  • I lowered the waist by 4 cm, it's too low
  • Upper back is too wide
  • The sleeve could be a bit wider (the Butterick original sleeve is wider), sleeve length is OK, but because of the back being too wide, I can not see whether the sleeve will be allright.

General observations

  • I don't like the style on me as much as I thought, in the front picture I think that it adds weight to me which is not there. I do have wide hips, but this suggests more, also to the upper part of my body.
  • The collar is not as good on me as I hoped, perhaps I should go for a more classic style

What do you all think, should I find myself another pattern?

Saturday, June 14, 2008

Purse Nicole Mallalieu

This is the last post for the moment. I won't be blogging the next week or two. Though I like sewing and blogging (you didn't know, did you?) but I have a lot of work at the moment, and want to study a new programming language, so I need my time for that. Not much time for sewing, so no blogging too. Though I will follow what others are making. There will be some time in between (I'm at the computer anyway most of the time) to read the new posts on sewing blogs and pattern reviews. One has to feed the addiction a bit.
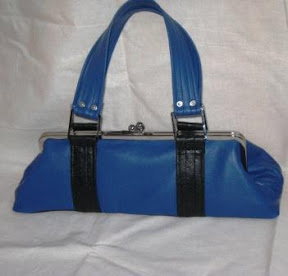
The purse

By lack of inspiration for a new text, here the almost identical text as the review I'll post on Pattern Review. It gives you the possibility to see the pictures direct with the review.

The moment I read Connie’s review of this purse I was totally smitten (can you say that of a pattern?). Impressed by the design and the way Connie’s bag turned out I immediately went to Nicole Mallalieu’s website and after some e-mails ordered the kit (and another pattern and some notions too!).

Like Connie said in her review, Nicole (and Leah who works with her) are very quick in responding. This was my first order from Australia, and it went smoothly.

As Connie has already written such a perfect review, I’ll make mine short. Besides for the pattern idea I owe her for the way of handling the topstitching on the straps and getting it perfectly straight. Read her review for great details.

Pattern Description from the website
This little framed bag is a bit retro, and extremely cute.
With very detailed step-by-step instructions, you'll learn how to construct the bag, add rings to the straps and add purse feet and a hard base.

Pattern Sizing
Purse for a 30 cm frame. Bag Size 40cm x 20m x 11cm. Strap length is variable.

Did it look like the photo/drawing on the pattern envelope once you were done sewing?
Absolutely

Were the instructions easy to follow?
The instructions are very extensive. For me there are a few “duh” moments in it (like what is topstitching, what is backtacking), but I think these instructions are written for people with no particular clothes sewing experience. A few times there was something unclear to me when reading the instructions, but when doing it on the purse it was clear what to do.

Not sure if this is clear for everyone, but as this is rated as a difficult pattern, it’s reasonable to assume that it’s not your first experience sewing something and you have some insight in construction details.

What did you particularly like or dislike about the pattern?
Like I said above, I was smitten from the moment I saw it.

Fabric Used
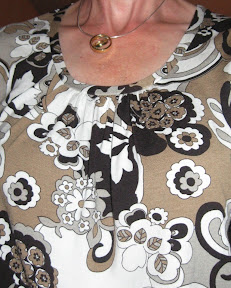
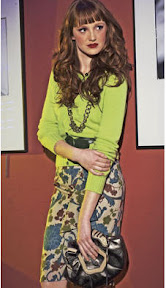
The blue is genuine leather, the black a fabric with a coating. Originally I cut out an all blue bag, but found it to be dull when I laid the flat pattern pieces together.

Other notions
Because of the leather I used special, thick nylon thread, that was sold at the specialty leather shop where I bought my leather.

I used a leather needle and used a long straight stitch to sew all the layers. This is important, certainly when you sew many layers of fabric or leather, because part of the length of the stitch will go into the layers. Using a straight stitch the length you use for clothes, would make a too short stitch, and too many holes in the leather at a short distance.

I did not use a special leather foot, and encountered no problems at all. Of course I tried on scraps first and the result was good enough. Don’t know if a leather foot would have given even better results, but as the special leather foot for my Bernina costs 60 Euro I decided against that investment now.

For the leather I used special interfacing and cement glue to hold the seam allowances and to glue the straps before topstitching (it did feel more like a craft project at the start than a sewing project, one evening I was only glueing things together).

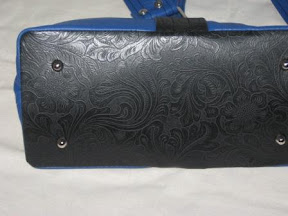
I ordered the kit to see what exactly is used (I don't have a lot of experience in bag making, just the one I made in March), but in the pattern itself the things you need are described clearly. For the bottom a special stiff interfacing and a plastic template is used.

Pattern Alterations or any design changes you made
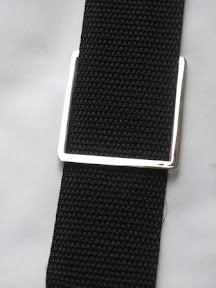
As I used the “flat square rings” I had to alter the width of the straps. No big deal. But I did change the size for cutting and attaching for the straps that go onto the bag.

When you follow the instructions, you end up with straps on the bag that consist of 4 layers of fabric. When using fabric that might not be a problem, but with the leather I used that really is a lot of layers, as they have to be folded over the ring and topstitched, which means there are 9 layers of leather to go through. Though I trust my Bernina on almost everything, I assumed this would be too much.

For the strap on the bag it is enough to cut the width of the strap plus seam allowance. This decreases the number of layers that you have to topstitch on the bag by 2, and on the point of topstitching the ring to the bag it decreases 4 layers.

Be aware that you can’t do this when using a continuous strap!! You want the strap on top of the bag to be neat on both sides, there I used the pattern as provided.

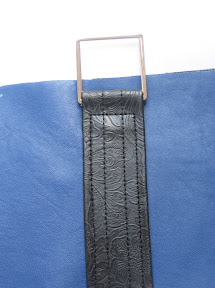
As the black fabric I used was very thin, I folded this over a length of grosgrain (?) ribbon of the exact width needed. Here you can see a picture of that.

I topstitched the two centrelines before attaching the strap, and did the two outer topstitching lines and the horizontal line in one go. A picture of this says more than words.


Would you sew it again? Would you recommend it to others?
I do recommend the pattern, it’s a wonderful purse. I have another frame, that will be a purse for my daughter. She wants an oilcloth at the outside and we saw something nice when we were in the UK (but stupidly didn't buy. Do you know that feeling? We should have bought it when we saw it, and now regretting we didn't). Still looking for something here that has the same feeling.

Conclusion
Wonderful pattern, with nice details to make a purse that is a bit exceptional. And it's not a short review after all, I'm sorry.

Some pictures from the inside and the bottom. I share Connie's opinion that a zipper does not belong to this style, but I like a small zipper pocket in a bag so much, that I added it.

Thursday, June 12, 2008

I wear what I sew (2)

Past week I took more pictures of the clothes I wear. For the complete idea I start with the outfit that was already described last week.

Wednesday Wear what I sew 002 Wear what I sew 008 wear 002
Jalie 2449 RTW blouse Origami blouse BWOF 03-2007-113
BWOF 02-2007-109 linen pants, copy of rtw Vogue pants 2896 rtw jeans
wear 005 blouse 002 IMG_2822  
Jalie 2788 RTW top BWOF 05-2008-121  
Vogue 7856 skirt made by me, few years ago, pattern unknown    

Of 6 bottoms and 6 tops and 1 dress, 3 are RTW, that make 77%  clothes that are sewn by me. I do think this give a good impression of what I wear. More skirts/dress than I thought, but that's mostly summer season. Generally I think of myself as always wearing pants.
Apart from the jeans all bottoms are made by me, as those are so incredible difficult to buy with the big size difference I have.

Some clothes I wore to business appointments (no. 3, 6 and 7) one set (no. 5) I will not wear in this combination again. This was just a weekend/at home combination, but not good.

As I mostly work from home, most of my clothes are rather casual, and even for business appointments it's not really neccessary to be dressed formally. I could have gone to a business appointment in set no. 1 or 2 without problem. As I wear jeans regularly enough, I never wear jeans to whatever appointment I have.

Wednesday, June 11, 2008

BWOF 06-2008-107

blouse 001

   062008107klein    blouse 005

The blouse was finished on Monday evening. At the moment the European football (soccer) championship is being held, and on Monday evening the Dutch team played. To be honest: I couldn't care less, but DH and children are following along closely. By the time the match was finished and the endless talk on television came to an end ("we" won from leading world champion Italy), my  blouse was finished and the review on PR written. My idea of a good time.

This is a well drafted pattern, I changed the length in the waist and did a small FBA. Certainly will make it again. Here are a few extra pictures of the sleeve.

blouse 009 blouse 008


For turning the collar I used a collar clamp, which I ordered with Sew Exciting, together with samples of interfacing (great quality, as mentioned by some on the internet before). After some practise on scraps I used the following method for the clamp, which is a bit different than described on the Sew Exciting website. I find that there is too much of the collar to hold the point firmly.

blouse 012 Cut off the seam allowance of the point
blouse 014 Fold seam allowance over each other and take them in the clamp tool. The "jaws" lock, so that both of your hands are free to turn, while the seams on the point are held in place.
blouse 015 Collar is turned (this was only a practice piece, not my real collar).
blouse 017 Result of point after turning and pressing.