Showing posts with label Burda. Show all posts

Monday, November 17, 2025

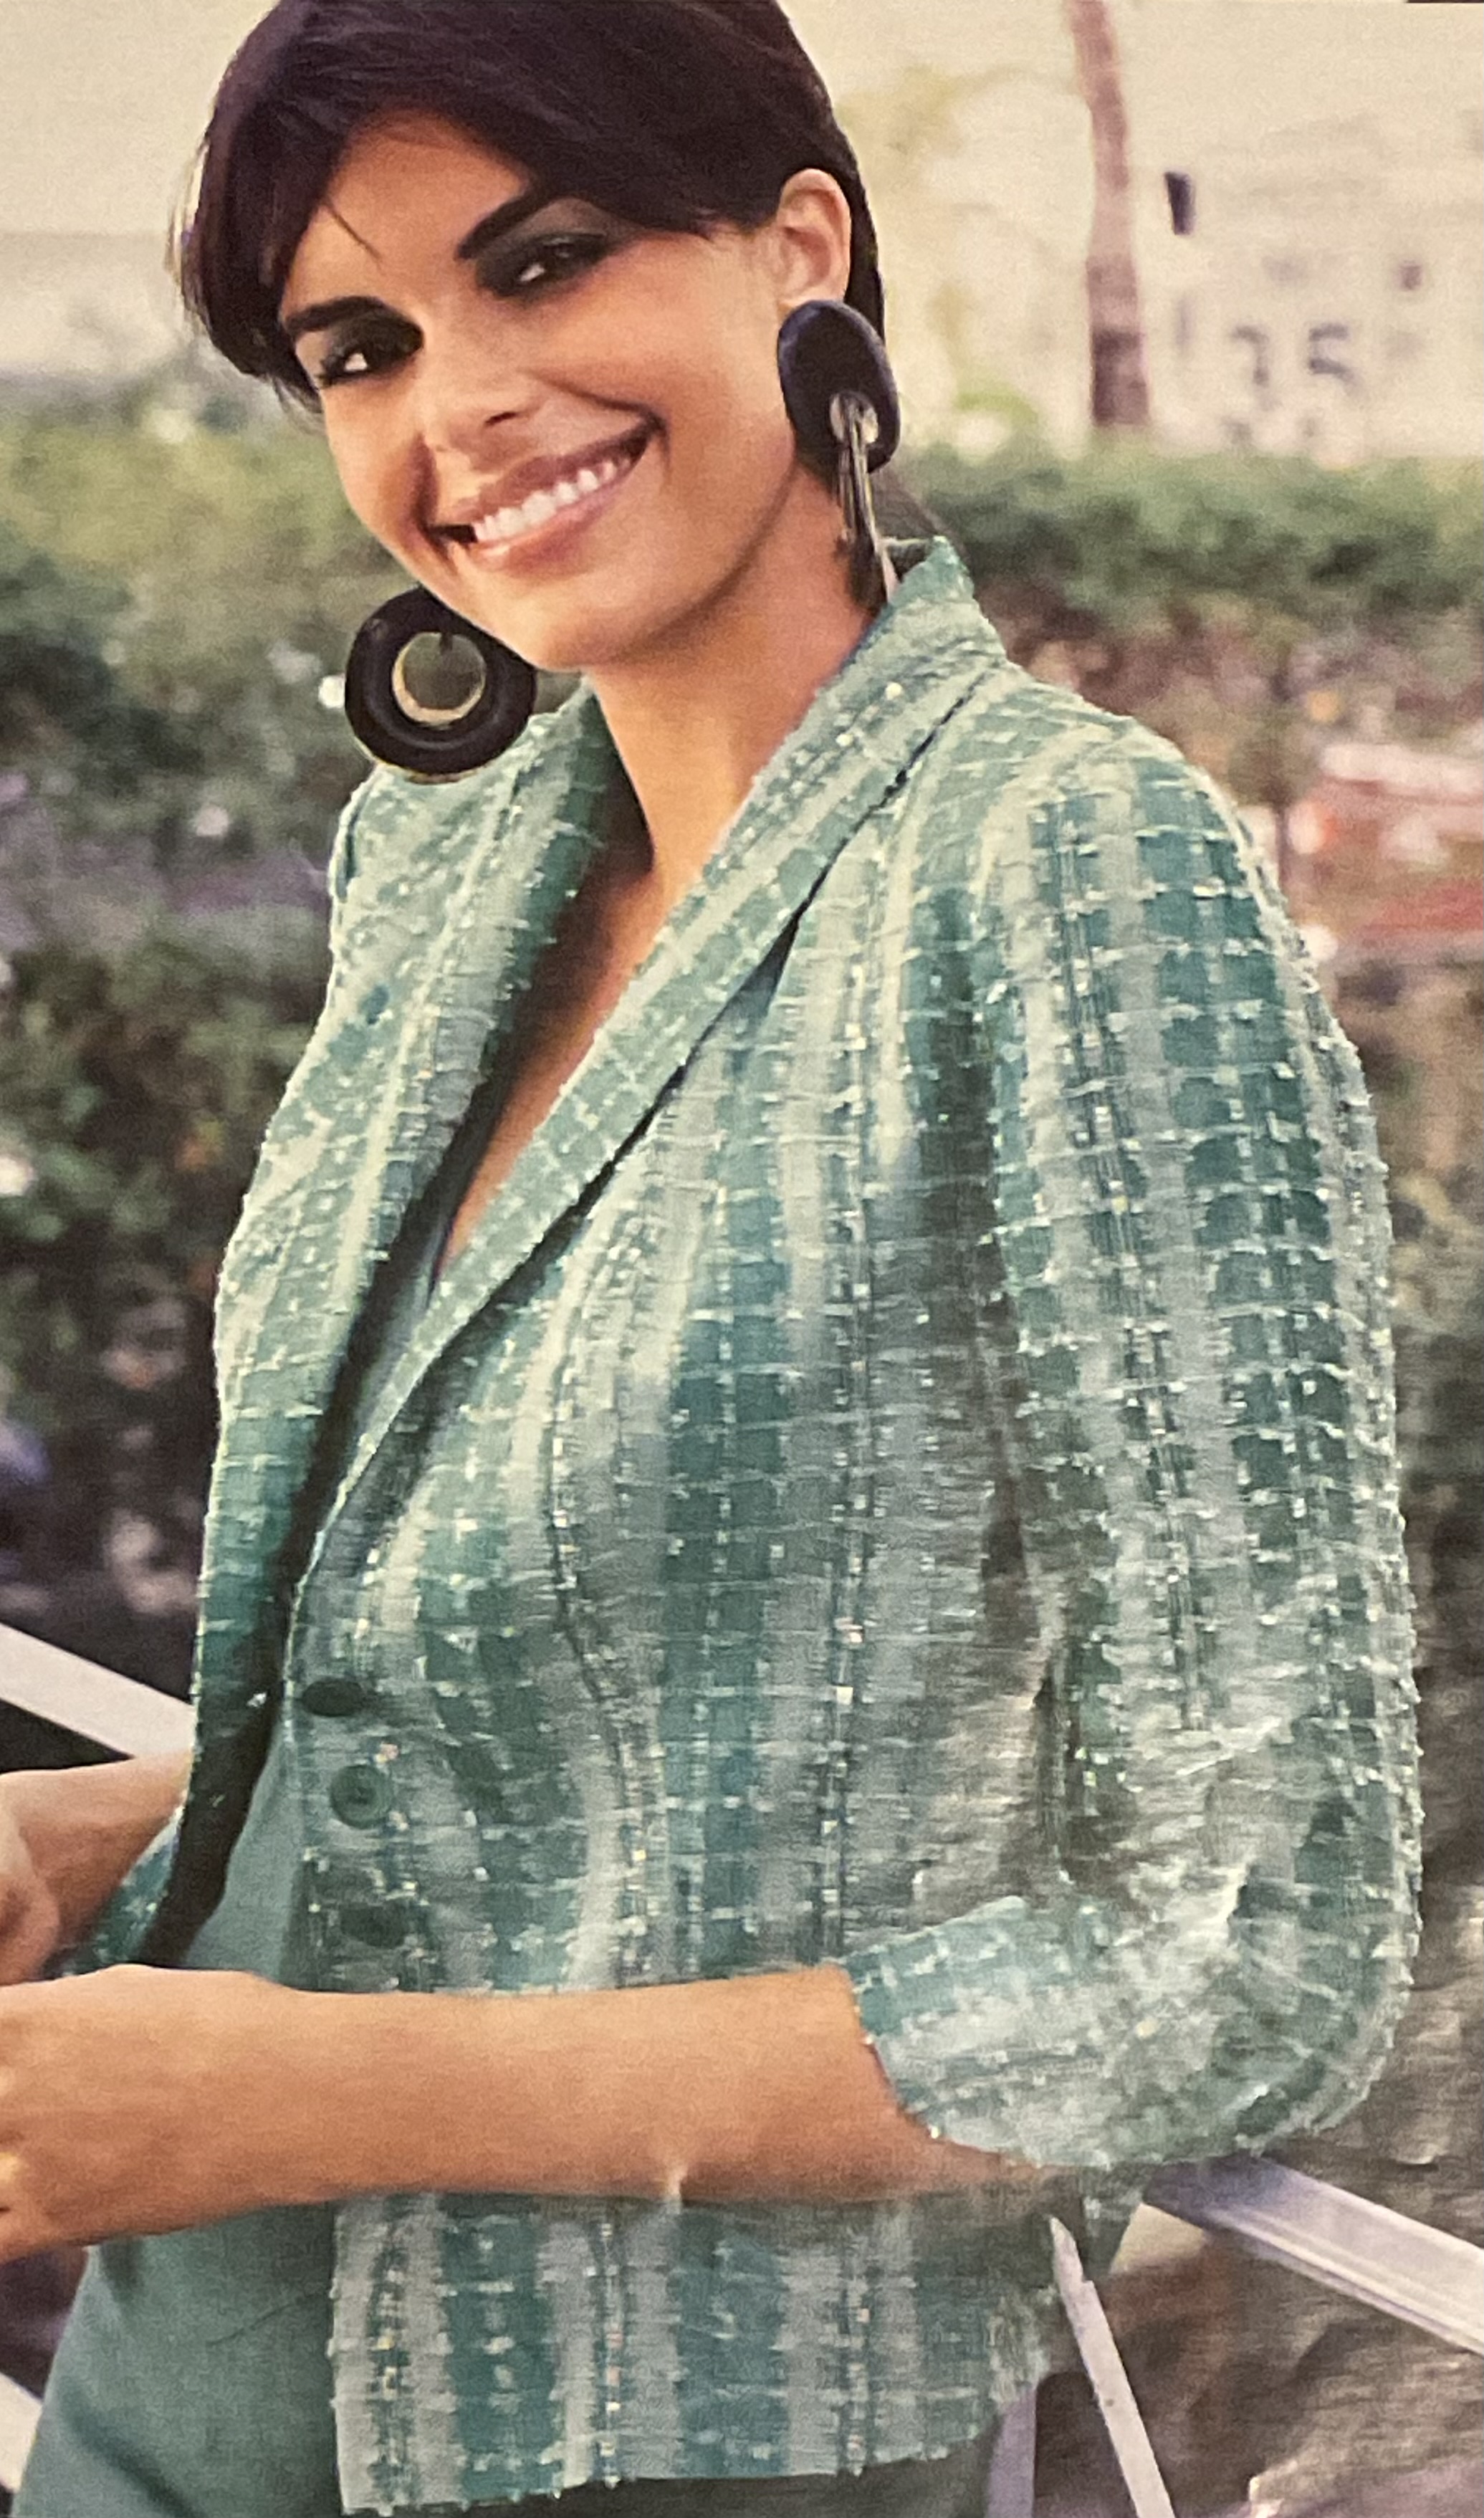
Burda jacket November 2025, no 117

The weeks flew by again and this jacket has already been worn twice! So much for keeping up with my blog 😳. 

I'm quite happy with the result, it's very comfortable to wear and I don't feel restricted in my movements. The way the sleeves are constructed works well. The design lines would show better with a different fabric. 


The shape of the sleeves is a bit rounded and shaped more narrow at the end. See my previous post about the issue I had with Burda's instructions for adding 4 cm seam allowance to the sleeve hem. I used a facing as described in my post.


Here you can see the inset of the under sleeve and side panel. Needs some extra attention and precision sewing. Again, it would be more of a statement in a different fabric.

The pattern doesn't call for a lining, but with the extra interfacing spots at the points and especially my fabric I liked to have a lining. There were extra steps for the sleeves here too, as the circumference changes quickly at the hem. Won't discuss it here, but something to think about if you would use this pattern and want to line it too. 


An overview of my changes:
  • Made the body 3 cm longer, default adjustment for me
  • Used a facing at the sleeve hem
  • Slightly shaped the waistline to make it less boxy
  • Added lining
  • Used thin raglan shoulderpads
The photos don't really do it justice, light is a problem at the moment, grey and short days!


Monday, November 3, 2025

Jacket from Burda November 2025 - part 2

The jacket is coming along nicely, but I don't have photos yet of a more complete jacket. Days are getting shorter so light to take good photos is more difficult. So a few more photos of details and observations on the pattern instructions.

This photo shows an extra detail of the sharp corners that have to be clipped to the stitch line. Burda advises to add a fusible interfacing at that point. I fully agree on that but have added small stitches in that corner as extra "insurance", especially for my fraying fabric. Using a small stitch length makes that the fabric remains stable. The corner is exact, the other stitches are within the 1.5 cm (5/8") seam allowance.
Clipping the seam allowance of the neckline. Clips are not made to the stitch line, but remain at a small distance from it (2 to 3 mm). This makes sure that there is enough room to have a nice smooth neckline when turned without any sharp corners. When you clip to the stitch line a sharp corner could be the result. A remark on Burda's instructions: they say to be "extra careful when you use knitted fabric". Why?? You should always be careful when clipping corners, not just knitted fabric. 

Which brings me to another issue: the instructions tell you to use only stretch/knitted fabrics. I really don't understand that and is wrong in my opinion. You probably can use a stable knit like a ponti di roma but it's perfectly fine with a woven fabric like mine.

Then something that is really strange, especially in a pattern that is shown with "step by step" instructions. In the cutting instructions they tell you to add 4 cm (1.5") for the hem of the sleeves. HOW?? The sleeves are tapered and have a rounded hem!! They don't tell you how to cut the hem allowance.
These are the three pieces that construct the sleeve. The red line is mine, not part of the pattern. If you would cut 4 cm in a continuous line, would turn it up you are missing a significant amount in circumference as this sleeves is tapered (quite a bit). And because it's round it wouldn't be easy to do either. 
My solution is to make a facing for the sleeve hem, the red lines indicate where I want that to end. I will trace these parts and cut a separate facing. 

I really love Burda patterns and don't mind their limited instructions. But adding  4 cm and then just tell you to fold it over and sew it would not work.

This jacket is unlined but I prefer a lining. Making the lining is my next step. 


Sunday, November 2, 2025

Jacket from Burda November 2025

My current project is a jacket (or cardigan jacket) from the latest issue from Burda, November 2025. It's the cover project and lovely in the fabric they used for it. As I am trying to use stash for a while (cupboard overflowing 😳), my version is made from a fabric that's at least 10 years old. Well matured! I made a pencil skirt from it and always meant to make a jacket from the fabric too, but as things go, it was forgotten.


Today I used for cutting and preparing. Normally I don't use wide seam allowances. This fabric is very loosely woven so I did use 1.5 cm (5/8 inch) seam allowances and used a handy tool to mark them (Burda magazine patterns don't include seam allowances). 
 

This Prym tool has a larger wheel that you hold along the paper and a smaller wheel with a dispenser to mark a line with tailor's chalk. The default markings are 1.5 cm, 2.5 cm and 4 cm. I would have loved it even more  if there had been a possibilty for 1 cm allowances, but alas. It comes in handy though when I want the 1.5 cm seam allowance. Mostly I use carbon tracing paper to mark the actual stitch line, but with fabric like this that's hardly visible, if at all. 


On parts that I want to be exact, the darts, the points that have to be clipped,  I basted the stitch lines. After cutting out, I serged all edges, to prevent the fabric from fraying. 


In the video you can see the use of the tracing wheel. 


Thursday, July 17, 2025

Sewing for my daughter

I have been sewing quite a bit for my daughter. I joked when I called her recently that I she spoke with her personal dressmaker😆

Joking aside, she loves wearing the garments I make for her which makes it a joy to sew for her too. We went fabric shopping recently and she chose this striped linen for the combination below.

The shorts are a Burda pattern. She showed me a rtw pair she loves and this Burda pattern was very similar. Size 38 withouth changes, never happens to me.

Below the steps for the slant pocket. I always interface the edge because ir’s cut on the bias. 


When pressing I make sure the outside fabric is folded a bit inward, so the edge is less visible. 
After topstitching ready for further construction

The gilet is inspired by a rtw piece too, of which I don’t have a photo. Base for this was a gilet from an Ottobre issue.
In the meantime this ensemble has been with my daughter a few weeks now and she loves to wear it. 


Thursday, June 5, 2025

Suit finished

Photo overload ;). I'm very happy to be able to say I have finished the jacket and the pair of trousers to go with it. Though if I'm honest, I'm not too sure I will wear it together much. It's a lot of green!


The label is one that I had laying around, no special meaning to it. It came in a package with several text options. Both the jacket and the trousers are lined with Venezia lining. A lining that I love as it feels very comfortable against your skin. 
I hope to make photos of me wearing the suit, but as that may take a while it's here on the dressform and hanger for now. 


Sunday, May 25, 2025

The difference of a sleeve head


difference in sleeve with and without sleeve head

In the photo above you see the same sleeve! Can you imagine? I added a sleeve head and all the wrinkling was gone. I must say that, even though I know that it is a game-changer, I wondered whether it would be enough or that I would have to re-do the upper part of the sleeve. Not necessary. 
I used the method described by Ann Rowley. The link shows her Flickr album where she explains the method. 

Thank you for your comments. They are very much appreciated, though I do understand that there is no time to comment every time (Dorothé). When I was last active on this blog about two/three years ago I already experienced problems with replying to comments. That has not changed. Even though I'm logged in, I can often only comment anonymously. So I'm sorry I'm not replying, I keep trying!


Sunday, May 18, 2025

Progress

The jacket of my green suit has seen progress this week, though it isn’t finished yet. The inner construction of the front is done, I added a shoulder placket for extra support as I do in most jackets I make. 

The sleeves are sewn in but they don’t have the sleeve head and (small) shoulder pad yet.


Getting there, it’s the sleeve inner details, hemming and the lining to be done. Hope to finish it in the next few days. If the work we need to do on our house goes as planned.  


Tuesday, May 6, 2025

Old Burda magazines, I love them

Thank you for the lovely comments and kind words on my blogging again. I can’t say how much it means to me that you read this after all the time I neglected this blog. 

The green suit I plan to make is not yet cut, I’m considering two jacket patterns and can’t decide yet. Let me share the options.

First the pattern that was my initial plan, until I realised that it was a ‘petite’ pattern for shorter women. It is from rhe February 2006 issue. I browsed all of my magazines (and I have a lot) to look for a similar shape for the sleeve but the only pattern that was close was a petite pattern too! 


If I would choose this pattern I must make changes I’m not too sure about. A muslin would be a first step. 

The other jacket is this one, from the May 2006 issue:


Both have 3/4 sleeves that I like but this one has a different style. It is in regular sizes. I know what to change for my figure on this one, Burda being consistent in drafting makes that easier. I love Burda patterns for that. And I love the older magazines better than the current ones, though there is improvement at the moment. There were so many repeat patterns and simple designs! 

This is my favourite trouser pattern right now, from a 2000 issue! I made it twice in the last month, adapting length and width a bit between the two. Will try to make photos of them and planning to use it for the green suit too  


Sunday, April 16, 2023

Sewing for my daughter


About two weeks ago my daughter asked me whether I had any special plans for this weekend and on my answer that I had nothing planned she asked me whether I liked to have a sewing weekend. She wanted to sew together, so that she would get back in the groove of sewing and could get a little help. What does a mother say to such a request? For me it's a very rhetorical question. Of course I would like that. So that's what we did this weekend, sewing together. We even found time for some baking. Confess that my DH was a little neglected this weekend 😉. 
The tally is 5 tops and one pair of trousers altered! Easy patterns, most of them used before, all but one using the same colour thread which reduced time needed for changing thread on three machines (sewing machine, overlocker and coverstitch). I made her a couple of tops (after 50 years of sewing I can sew pretty fast if I want to, usually take my time though) and my daughter traced and made one top on her own. 

First is a top with layers from Ottobre 2/2014 with layers at the front. Rolled hems on the layer pieces.This was the most important piece as it is needed in two weeks time for a wedding she'll attend, but not difficult. 

Number two and three: t-shirts. On the left an Ottobre pattern I used before but changed a bit for the look she wanted this time (a bit wider, short sleeves a bit wider too than the original version). On the right the Bobbie pattern by Jalie, for which I made a curve to the armholes and added a cuff. Based on a photo of a shirt she liked.


Shirt 4 is the same Ottobre pattern, but then in original width of body and sleeves:


Last but not least the top my daughter made completely by herself, using a Burda pattern:

I'm proud of her doing this on her own. She asked a few things, but I only had to confirm that her way of thinking or doing something was correct. 

Finishing off with one sewing detail I'm pretty chuffed about: a v-neck topstitching done on my coverstitch. 

Needless to say my daughter went home happy. It was a lovely weekend, today the weather was especially good for sewing (cold and grey where I live). Back to work and household chores now. And of course thinking about the next project for myself! I already got a dress finished I want to show you, so stay tuned!


Tuesday, March 28, 2023

Burda blouse, April 2021

It's been again quite a long time since I posted. I won't bother you with the details, I'm well but illness and mourning has been part of the past months. 

Now it's time to get back to some sewing. A relatively easy blouse from Burda April 2021. 

A good preparation for when spring will finally arrive, it's been cold, raining and storming most of March here. I look forward to wearing this blouse.


I made this blouse before, in March last year and loved to wear it. So when I was looking for something to make from this fabric I remembered this pattern and as it was already traced and ready to use an easy choice. I had only about 1.20 meter as I bought it with the intention of making a short sleeved blouse. The facing has a seam as it couldn't be cut twice from that length in that amount of fabric. The little tricks we use to make a fabric work!
Below my first version of this blouse.


Wednesday, November 30, 2022

Blouse from October Burda

Thank you for the nice comments on my posts! I'm having trouble commenting on blogger, even on my own blog at the moment, so therefor a general thank you and no reaction in the comment section itself. Hope I can find the problem and solve this, as apart from posting myself again, I also started to read other blogs again and would like to be able to comment. 

My most recent make is this Burda blouse from the October 2022 issue. Being a lover of special necklines, this immediately got my attention and ended high on my "to sew" list. 


The fabric is a viscose from Atelier Brunette, with good drape and easy to sew. I bought it last year in a fabric shop in Denmark, it's a holiday souvenir. 
I didn't like the sleeves had no cuffs, so I added those. 
If you made Burdastyle magazine patterns, you know that the instructions are not very detailed and more an order of construction (unless it's the pattern of the month, which this wasn't). As the neckline is not your everyday neckline, I did read the instructions! They  have you put on the collar first, attach it to the inside and only then add the zipper at center back. Which is not very neat in my opinion. Or I have understood it wrong ;).

I followed the first steps: sew the center of the collar, clip and turn and sew one side of the collar to the body. As the next step I inserted the zipper, so that when turning the collar, the top of the zipper is wrapped neatly inside. As last step the inside of the collar was handstitched to the neckline.


When there is no band to be attached above the zipper, I don't sew the start of the zipper tape, where there are no zipper teeth. In that way you can more easily fold the end out of the way and the fold of the fabric is more smooth.