Saturday, February 28, 2009

BWOF 02-2009-102

It was a lot of work, but definitely worth it, I'm very happy with the result.


I used size 40, tapered down to 42 at the hips (default for me) and the muslin proved that the bust was a bit snug the neckline too low. The next pictures shows my alterations to the front: a full bust adjustment as described in Fit For Real People by Pati Palmer  when only a little extra room is needed.

The neckline I made 4 cm higher, and adjusted the button placement and roll line. No other changes.


Two helpfull tools: the button attachment foot I ordered from Gone sewing company at ebay when I ordered my zipper foot. It has a hole where you can put something (in my case an old needle) to make a longer thread shank for the button. Much cheaper than the original foot.

The other is the collar clamp from  Pamela Erny (Off the cuff style/Sew Exciting). It was a very helpful tool to turn the beltloops and epaulets.It's long and you can clamp the fabric in the pliers, so that you have both hands free to turn.

Friday, February 27, 2009

What the (BWOF) instructions don't tell

I'm doing a lot of time consuming projects lately. First the Marfy-like pants, then the weekender bag (thanks for all your kind comments on that, either here or on PR) and now this jacket/blouse. It worth taking the time though, as the result is very nice. I did a quick fit and it really looks good, if I may say so myself.

And I found it very nice to read the comments on the coat with 3/4 sleeves. As it struck me as silly, it's a) a trend apparently and b) some of you live in climats where this is a good style to wear. For me a coat always will have long sleeves, though I certainly like those 3/4 sleeves on other garments. This jacket has them!


At the beginning of the week I said I wanted to write about what the instructions don't tell. Though not very detailed, the instructions are seldom wrong, I agree on that with Allison C.  But most patterns are not that difficult to make, when you have some sewing experience you know the order of construction, and for the difficult parts there's the internet or sewing books as reference. For the notched collar I used the instructions from the book High fashion sewing secrets by Claire b. Shaeffer, even though I understood the way BWOF wanted me to do it, I preferred her method (I'll make pictures/tutorial on my next project with a notched collar).


Summerset wrote three wonderful posts (one, two, three) on how to use BWOF (or Patrones/Knip mode etc) patterns  and showed how to trace and how to read the drawings that are included.

What is not included are generally the little details in construction.

Cutt off the corners and grade the seams. This is the top of the pocket before turning, but it could also be a sleeve cuff.
Baste essential fold lines like here in the center fold.

Turn, baste and press the sides of pockets before  stitching them to the garment
Clip curved seams and do this with bias clips, at different points at both sides of the seam (the last was a tip I read in either a book by Roberta Carr, or Claire B. Shaeffer)
Finish the inside of the belt loops with a zigzag stitch (especially for this pattern, but in general these things are not mentioned)
When using a thick thread for topstitching, use a longer stitch length. I use the Gütermann thread that comes on a grey bobbin (upholstery thread) with normal sewing thread in the bobbin.

And this pocket was taken off! With publishing the picture earlier this week I saw that it was off grain too!

My jacket needs lining and the sleeve cuffs. I'll be doing that this weekend and hope to publish finished pictures soon.

Tuesday, February 24, 2009

Mistake in instruction BWOF jacket

A warning for those of you who want/are making the BWOF jacket no. 102 from the February issue: on pattern piece 12 (top part of pocket) a buttonhole is drawn and the instructions tell you to make one. It's wrong! The buttonhole must be on the belt loop (which is described too). On the pocket is only the button. Luckily I saw that in time.

IMG_4720

3/4 length sleeves on a coat?

Today I received the BWOF March issue. It's not as inspiring to me as the February issue, but there are three (!) trenchcoat patterns in it. Great, isn't it.

But... I saw one of the patterns (the red) has 3/4 length sleeves and to me that looks silly. What do you think about that? Would you wear a coat with 3/4 sleeves?

(Pictures from BWOF site)

Monday, February 23, 2009

Tools

I was planning to write a post "what is not included in the bwof instructions" based on pictures I made for the pocket. But I'll write that one later this week. Just too tired.

In the picture you can see what color I'm using. It's a deep red linen, and I decided to line it. I also interfaced the complete front pattern pieces and part of the back.

For the topstitching I use a darker red. The topstitching is a feature of this jacket and the darker color makes it more distinct. Unfortunately it also shows each unevenness, as in the left of the picture. I might take it out and redo it.

In January I posted about the problem of the zipper foot of my Bernina machine.

Kay Y (who doesn't blog, but writes great reviews of the beautiful clothes she makes on PR) and someone in a private mail advised me to buy a low shank adapter. With that tool I could use generic feet.

I followed the advise and bought the adapter and zipper foot on Ebay from this supplier. It was a very good experience in communication, and shipping costs for Europe were very reasonable. I had thought to use this for the piping in the weekender bag, but as you know, I omitted that. (And Belinda, yes, my hands were hurting from the pins after making the bag, and DD asked why we had so many bent pins!)

Now I can use my Bernina too when I want to have a more free needle.

Saturday, February 21, 2009

BWOF 02-2009-102, muslin

A quick update, I'm in a sewing mood. I managed the muslin tonight and was not disappointed. The muslin is a size 40, tapered down to 42 at the hips, but otherwise no alterations. The fit is good, though (as expected) a bit snug at the bust and the neckline a bit too low to be comfortable. I did an easy fba to add just a little extra room as described in the Palmer/Pletch book Fit for real people, made the neckline a bit higher and cut the fabric tonight.

Weekender bag finished

Wow, I did it. The weekender bag is finished! I can't tell you how happy I am that this came to a good end after all. Technically I've sewn better things before, but the end result is not that bad. The "wrinkles" on the corners of the top I decided to keep. Design element...

If you would like to see all the pictures I made during construction of this bag, start here. Most pictures have a description of what I did at that stage of construction. I'll post a complete review later tonight at Pattern Review, the review is almost finished, but still some links to be added. It's quite a long review, so I'll  not post it here.

For the moment I'm completely done with bag making, and think that my next bag will be one from the stores.

Now it's almost dinner time here. Tonight I'm on my own, as DD is on holiday in Switzerland with a cousin for a week (Patrones skirt pictures on her will have to wait, she was too busy the last couple of days), and DH and DS are going to a soccer match.

Guess what I'm doing? Making a quick muslin for the BWOF February jacket/blouse and hopefully cutting that from the red linen I have for that. My mind is set to some spring clothes. the sun was shining today and the birds made it sound like spring is finally coming. Spring garment sewing is next on my agenda.

Thursday, February 19, 2009

Your positive energy worked!

That and a leather needle did the trick: the outside of the bag is ready. I'm so happy I did try again. It was good to leave it a few days.

Pictures of a finished bag this weekend!

Wednesday, February 18, 2009

Finished

Not my weekender bag, though I'm certainly trying again in the next few days. I learned something new too: needle lube, as suggested by Kat. I didn't know something like that existed. How would that work? Would you occassionaly drop it on the needle? This will not be the first thing to try, but a new/other type needle might work.

And before I start working on February BWOF patterns (thanks for all your input on that too!), I had to finish a few other things that were started. Just felt I had to do this, and apart from the weekender bag there's only one UFO left (and will remain an UFO a bit longer).

The center is the Patrones skirt I made together with my daughter. It's a high waist pencil skirt from the 272 issue. I'll write a review when I have some proper pictures. The ling erie sets were only in need of matching panties.

imageAnd the jacket... this was started in 2006! It's vogue 2896, a now out of print Anne Klein pattern (she must be my favorite Vogue designer, I have 3 patterns for jackets from her). I think it's the pattern through which I discovered Pattern Review in November 2006.

That summer I bought this pattern and together with two American sewing books, it made me start sewing more for myself. I did finish it, but omitted the belt openings. I did make them, but it didn't suit me, and I closed the opening again.

I finished the jacket, it was in my closet and I didn't wear it. After some time I wondered why that was. And found out that the reason was that I was not satisfied with the sleeves. There were slight puckers which gave it a home-made look, while the rest is quite good and the fabric is high quality wool. I remember spending a lot of time on this jacket.

Well, it took me a very long time to actually do this, but this week I opened part of the lining, took out the top of the sleeves and sewed them in correctly, adding sleeve heads too. Now I must look for a way to make it look less formal.

Saturday, February 14, 2009

The weekender bag: a wadder?

Just a short post to express my frustration on the weekender bag. Yesterday evening I sewed in one side of the bag to the middle part and even though I did not do the piping on the bag, there are a lot of layers to stitch at the sides. The needle goes through without problems, but I do get skipped stitches. Just now I tried to sew in the second side and the same happens even more! A few stitches can be done by hand, but the whole bag?? Not looking forward to that. If it's going to be a wadder, it's an expensive wadder.

I'm all admiration for all those who have made such beautiful versions with piping even. This is a diffult bag! For this weekend I'm going to leave it. Perhaps I'm going to do some garment sewing, perhaps just finish some work that's due next week.


ETA: Thank you for the positive energy you are sending me and the tips. I am leaving it for a few days but will not give up. And I will try a new needle. I hadn't done that yet! Started with a new one, but you are right nowaks nähkästchen, the needle could be blunt. Good you asked.
Cidell: good luck with yours! You might need the industrial back up machine.
In the meantime I started finishing UFO's, it's good for something!

Friday, February 13, 2009

Question

Blouse/jacket no. 102 of February BWOF is one of the projects I want to make. Reading the instructions, I saw that this jacket is the short version of dress no. 101. A bit strange, as the ease in a jacket is usually more than in a dress?

Probably jacket 102 is more the kind of jacket to be worn as a blouse, at least, that's how I would wear it. But in construction it's more described as a jacket, and lining is used for the jacket/blouse, but not for the dress.

If I were to make this jacket/blouse from a blouse quality linen, would you use lining? I usually don't line my blouses, but would I have to do it on this pattern?

Your ideas and thoughts are very  much appreciated.

Wednesday, February 11, 2009

A purple elephant

To remain in the same theme as last post, the Amy Butler weekender bag really is something to do in little pieces and steps. Quite a time consuming project, and I had to work in another way for the interfacing, as my interfacing is not fusible :(.

I've a few things as comment on the instructions of this pattern, but will save that for the complete review when I'm done. I'm making a lot of pictures, uploaded them but right now I don't feel like blogging about each step in detail.

One important decision was to skip the piping. The faux leather is rather slippery, and didn't want to cooperate on two test pieces for piping. I don't have much fabric left and don't want to find out on the real bag that it's not working. I can't start again.

For today, two pictures of the "bag in the making", one of the large side panels with large pocket and handles and one of the inside of the large pocket. I've added a magnetic snap to the pocket, which I ordered last year from Nicole Mallalieu when I made my first bag. The real color is somewhere in between these pictures.

Threads to be knotted and cut.

In the comments on my last post, Nancy K asked "Do you actually sew on more than one at a time, or just have them ready to sew?" The answer is that I prefer to work on one thing at a time, but sometimes I can't help myself and get carried away, like with this bag. I did finish my lingerie set last weekend before I started on the bag, but DD's skirt and bra will have to wait. The BWOF blouse is not cut yet, but I often do cutting and marking a new project during working on another project. Often later in the evening when my son goes to bed. He has the room adjacent to my sewing room, and I don't want to disturb him with the sound of sewing machines and pressing.

Usually I don't sew at two projects at the same time, because changing needles and threads for sewing multiple projects is too irritating.

Saturday, February 7, 2009

How to eat an elephant

No, I'm not writing a post about strange food. This is a phrase I was thinking of several times after I listed all the projects I'm currently working on. In the late eighties I worked for an American company and the management course of the day was a time management course. There this phrase was the starting point and I remember the diaries even had a tab with a white elephant on it (my boss did the course, not me).

The solution was (if I remember well): in little pieces. And with my long list of active projects and projects in mind, that is what I thought I would do, little pieces and one step at a time. I finished my blouse first. The full review is on PR, but you know most of it already. Difficult fabric and the end result is not quite what I prefer. I'll wear this blouse, but won't make any blouse with dropped shoulders anymore. Just not good on me, my shoulders are small, this might be a reason.


The wrinkles in the pants are the result of a long day behind my desk.  And I forgot to have pictures taken with the blouse tucked in, which is how I'll probably wear it.

Off to the gym and later this weekend to the next little step.

Wednesday, February 4, 2009

One project at a time?

Not for me at the moment. One of my goals of keeping a blog was not having too much projects at a time, and in general that was quite succesfull the past year and a half. But now I'm doing (too) many things at once, and I don't even have a lot of time for sewing right now. Next week will be better I hope.

What am I doing?

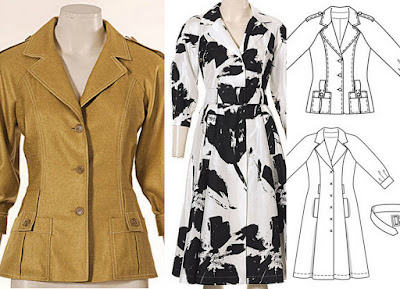
The BWOF january blouse: I've taken the pocket off, most of you didn't think it was good (but I liked to read the few reactions with other opinions too!) and asking the question was probably seeking confirmation of something I didn't quite like myself. The topstitching of the collar stand to be done, the buttonholes on the placket and sewing on 14 buttons. Must be done tomorrow. Not more than an hour of work.

BWOF February blouse (104): traced the pattern, did an FBA and washed the fabric I bought for it.

Skirt for DD: a Patrones pattern for a high waist pencil skirt. She has done the main work herself, including cutting and sewing a muslin, but I recommended boning for the waist and she's not up to that yet. And I promised to do the lining.

Lingerie set: I changed my bra pattern in December as I found that the pattern I always used didn't fit as before. Now I "must" sew a couple of new sets. The bra isn't the problem, the accompanying panties are, cut but not sewn yet. Might be strange, but I prefer sewing the bra. And now I'm listing things: there's one for DD in a basket for months now.

And last but not least: I cut the pattern and outer fabric for the Amy Butler weekender bag.

Cidell wrote about the bag and the handbag contest on PR. It reminded me of the fact that I do have the pattern more than a year now, bought all I needed but never started this project. The contest might be a good incentive to get it done. There's only a little difficulty: I'm sewing with a fabric which looks like leather. Though I really love to see all variations in fabric it's just not my style. I like bags of leather or look-like leather for myself. On the picture you can see the purple outside and grey (knit) inside of the fabric. I was a bit short on fabric, as I originally intended this for the Sophia bag, which is smaller. Wondering whether I will get all piping done from this or have to search for something else, which would be difficult.

Don't know whether this bag is going to work at all, I'll keep you posted. And for the rest: a lot of other ideas in my head and fabrics washed and ready to go. But if I'm realistic and see what I've done last month, finishing all the above projects will keep me busy for some time. I must not start other things any more. (saying this very loud to myself now!)