Friday, November 27, 2015

Black and white are my colors

It’s not often that I’m really, really happy with something I made. Usually I do find something not to be 100 percent pleased with, even if I don’t mention it when publishing about it. This time I’m very pleased with the result. Again it’s the black and white theme. How much I try, I always come back to black and white, with some grey and red added to the favorite colors. When fabric shopping with friends it’s obvious, they will see a fabric and say “that’s Sigrid fabric”. I made the base of the dress in the sewing weeking early November and I only had to make the facings and lining. That took me 3 weeks….

Excuse the bad hairday, but here are the pictures of a very comfortable dress.


The dress is made from a remnant piece bought at Jersey fashion. That’s where I bought the fabric from the skirt in the previous post too. Very nice quality, stable but also with stretch. I lined it with a stretch lining and did not use a zipper. The black strips are not made with regular piping. These are made with strips of black jersey, cut at an exact width, folded and sewn between the seams. Those seams were all cut with 1 cm seam allowance to make the strips peak out at the same width.

You might remember the pattern from earlier this year. The dress I made for the knock off contest on Pattern review. I drafted the pattern myself. The only change I made was lowering the neckline a bit. And no sleeves obviously, there was not enough fabric for those.

A picture of the dress with the Vogue jacket. Too dark to see the details. November certainly is not a good period for taking good photos.

This will be my last post in a while. Work is very busy so  there’s not a lot of time for sewing or blogging, as you may have noticed in the past months. Also important is that we sold our house  and will have to move out in January. Which is good but also very time consuming.  We’re still house hunting.

Hope to post again at some point in 2016. Have a good festive season and see you next year.

Wednesday, November 18, 2015

Vogue 1440 jacket - the easy way

I bought the Vogue 1440 pattern mainly for the blouse. I was intrigued by the style and even made it, though it never made it to the blog. Kay (the sewing lawyer) wrote about it and I have the same feelings on the shirt pattern as she has.

image

I never thought about making the jacket initially, as it’s construction with piping, trim on both sides and fringes didn’t appeal to me. Too much hassle for a jacket I was not sure I would like on myself.

Two weeks ago I was on my annual sewing weekend with 9 sewing friends again, and this time I really wanted to make something not too complicated and have something to show for it after the (long) weekend, that is: have some finished garments. I did succeed, made a skirt and the Vogue jacket and the outer shell of a dress.

The jacket was brought to my attention a little before the event and I considered making it in a black felted wool in my stash. And doing it like this made it soooo easy. Finished in only a couple of hours, from cutting to final product: no lining, no finishingn of seams. I did tissue-fit the pattern, something I normally never do but with so many sewing friends around that was doable. The shoulders were too wide and I changed those, but otherwise it’s straight from the envelope.

The complete outfit:

A lightened photo of the back.

Inside, I used a hook for closing at the front.

And the skirt. The ensemble is already a favorite.

To my sewing buddies: thank you for a lovely, lovely weekend. It was so inspiring again!

Saturday, October 24, 2015

Collar of jacket finished

Sewing is slow at the moment, there’s just too much other things going on. I only managed to work on my jacket tonight. I finished the collar using the technique described in an old Threads magazine (no 68). I’ve used this method since Nancy K once mentioned it to me and it works so well.

detail collarcollar finished

Having drafted the jacket and the collar myself I’m quite pleased to see how well everything comes together. It’s nice to become more confident in drafting and changing patterns.

The upper collar is larger because turn of cloth. Only the trim pulls it together slightly, though the effect in the picture is more significant than in real life. Perhaps it can be steamed out in final pressing.

back collar

In this last picture the collar is flat on my table. You can see the extra space in the upper collar.

upper collar

Saturday, October 17, 2015

Jacket with notched collar

I can’t believe it’s October 17 already and over a month since my last post. Time flies very hard at the moment in which I did not sew a lot. I love making jackets (did you notice ;)), started another one a few weeks ago but only continued working on it tonight. Again it’s a self drafted jacket. It’s based on the same sloper I used on my previous jacket but now with a notched collar.

A few in progress shots, the collar and facing are pinned to see how it all goes together and whether I like the black faux leather stripe (I do).

IMG_2127 IMG_2128 

The rest of this post is not sewing related.

I spent a lovely holiday with my husband in the Peak District (UK). Most of the days we spent with long walks, the weather in general was good. Such great views.

DSC_1509 DSC_1592


We visited Chatsworth (Pemberley in the movie Pride and Prejudice)

IMG_2017

and Masson Mills, now a museum, but once one of the first cotton mills/factories, dating from 1783. We saw machinery from the 19th century that is still working. Impressive place, it must have been very hard to work there. The machines demonstrated already made so much noice that you could hardly hear anything, imagining many of those machines working at the same time and workers not being protected is not a good thought. But such craftmanship and inventiveness to build all those machines is impressive.


IMG_2050 IMG_2046 IMG_2039 IMG_2038  IMG_2027 IMG_2042

I have some catching up to do on blog reading too, there’s a long list of unread posts…..

Monday, September 14, 2015

Miscellaneous tops

I’ve been sewing more than blogging, the way it goes from time to time. I’m working on new pants which I’ve drafted myself, more on that in a separate post. This post is mainly about the tops I made.

First this BurdaStyle top which is double layered. I had this fabric around which is a bit sheer on its own. I made the blouse of Vogue 1440 early summer, never got round to do a blog post about that one, but learned that it was too sheer to wear without underlayer. So this top was the perfect choice for it. Actually it was the pdf pattern I traced in my previous post, I did not have the issue it was published in (July 2013).  It’s a nice basic for summer, will have to stay in the closet for a while now as it’s getting chillier here.

BurdaStyle twist shoulderimage

Couldn’t be more basic, a white top based on an Ottobre pattern. Meant to be worn under a jacket or cardigan. I changed the neckline and made it deeper. Initially I made the neckline band using the technique shown in this video by Sarah Veblen. It’s a good technique in general but did not work for me this time. Probably because I stretched too much. In the end I measured the circumference of the neckline on the pattern and subtracting 20% for the length of the neckline band. Worked perfectly.

Ottobre

The Presto top by SavageCoco is very popular at the moment  and I jumped on the bandwagon. A lovely top. The inside finishing is very neat. The construction is described well, just do as instructed and you get a perfect finish of the neckline/shoulder area. I’m not often using the so called “Indie patterns”, often they are too expensive and/or too basic for my liking but this top was very reasonably priced ($4.99). Combined with the positive reviews on it, it was worth trying.

Presto top

I sewed a medium size and it turned out to be too tight. Too much negative ease for my liking. But the fabric is sooo nice and soft that I hated to throw it away. It fitted my daughter very well, but she didn’t like it. As this will mostly be worn under a jacket or cardigan too I added a strip of fabric to the side. It goes from the hem at the bottom in one long strip to the sleeves too, as these were very tight as well. Next time I’ll trace the large size.

Extra strip Presto top

The last one I made yesterday, it’s StyleArc’s Gail top. After making this photo I hemmed it and am wearing it today, casual with a nice twist. The fabric was bought a few years ago and all the time I did not know which top I would make from it. Then I thought about this variation and I quite like it. I’m going to do some work on the pattern for my next iteration: take out a bit in the center front waist area and have the neckline cross a bit higher. Both are figure related problems, not a pattern fault. Though StyleArc’s instructions are confusing. One sentence says “sew together”, the next one “join together”. I was thinking I had to do something else than sewing together in the last instruction. Could be my English but it was confusing me. And as construction is not that obvious, I was referring to and needing the instructions. They could do better on that.

StyleArc Gail image

Three of these four tops were pdf patterns that I traced using the method described in my previous post. I really like to do it that way.

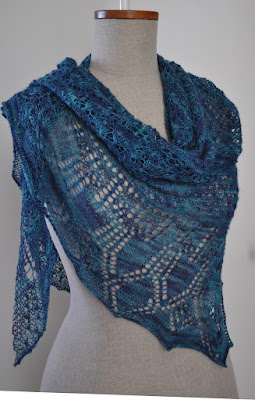
And to finish off for today (mainly for my own reference): another shawl finished:

Friday, August 21, 2015

Tracing pdf pattern without taping

 
Though I’m not a huge fan of pdf patterns, I do realize that times change and sometimes use them, when they have a limited number of pages.
Some time ago on a Dutch sewing forum I read about tracing a pdf pattern without taping them first and it was a lightbulb moment to me. Less fuss and the pattern can be stored away easily. This is how I do it:
Take a sheet of tracing paper large enough for the pattern piece you want to trace and place the first page of the printed pages underneath.
clip_image002
Trace the pattern lines you want (this is a Burda pattern so it has multiple sizes) and also trace (part of) the lines for matching to the next page. Often there are notches on the lines too, so I mark those as well.
clip_image004
Then you slip the next page under the paper sheet, align with the notches and lines and trace that page.
The resulting pattern: there are a few extra marking lines but that does not disturb me at all. If they do disturb you could erase them.
clip_image006
The printed pdf is not cut and can be stored away.
clip_image008


Thursday, August 20, 2015

Jacket finished

Not a very original title, but that it’s what this post is about. My jacket is finished and Ilike it very much. As you may remember I drafted the pattern based on my sloper and a Burda pattern from 1993. In my previous posts you’ve seen how I interfaced it and this post is all about the outside.
I’m pleased with the fit, though for the next jacket I will take out a bit of the width at the back at the waist and below. The muslin was a bit longer and I did not see that this would happen shortening it.

Nancy and Tany expressed curiosity for the sleeve wrap. The link I gave was to one photo of a series of photos from Ann Rowly from which you can go to further photos, but it seems not to work on all devices. This link is a more general one to her photoalbum, the sleeve wrap instruction starts at photo number 70. AllisonC: I learned this method at the English Couture company too!

jacket frontjacket back   worn open  Side 2    jacket 1detail button

Thursday, August 13, 2015

More progress – sleeve

In this jacket I chose to use the “sleeve wrap” method instead of the more conventional sleeve head. I first saw this method used in one of Ann Rowley’s jackets and kind as she is, she has a photo tutorial in her Flicker album. I’ve used it once before when doing a course in making a classic tailored jacket.

This is how it looks like on the inside.

sleevehead

And here on the outside.

front jacket 

Lyndle asked how and when I add seam allowance, on the fabric or the pattern and whether I use the actual seam lines. I absolutely prefer to work with the seam lines and not often add the default seam allowances. I use wax tracing paper to trace the actual seamlines to my fabric and use those during construction. That paper is a normal sewing notion in the shops here.

That said this jacket is a break from that routine: the fabric would not take marking with wax tracing paper and a lot of fusibles were applied too. I cut with the 1.5 cm (5/8”) seam allowance added to the paper pattern, but still mark the actual seamlines on crucial points after applying the fusibles. For example the top of princess seams, the top of sleeve seams, the neckline corner. I love the accuracy of working with the seamlines. It’s how I learned to sew, patterns with added seam allowances were something I did not know till I bought my first Vogue pattern (pretty sure that was a Claude Montana pattern), and then I was in my twenties and had been sewing for over 10 years. Never got used to patterns with added seam allowances.

seam allowance marked  

In above picture you can see the curved ruler that’s 5/8”wide which I used to mark the corner. Claire sells them again, also in metric measurements. I use them regularly, they’re such a handy tool.

Tuesday, August 11, 2015

Nice progress

My jacket is coming along nicely, though it’s not finished yet. Just showing some inside photos  and a first idea of how it looks now. The sleeves don’t have sleeve heads yet, but already have a nice curve.

sleeve 1

The inside looks like this. This time I’m using speed tailoring techniques, using fusibles. Two types of interfacing are required here: a light and a heavier fusible interfacing. The shoulder placket is a canvas, held in place by a fusible as well.

inside back

It’s quite a bit of work pressing all the interfacing in, but once that’s done, construction is pretty straightforward.

jacket inside

Anne asked in her comment “When you use the word 'sloper' does this have seam allowances on it or is it more of a block, so without seam allowances? I'm assuming that the burda pattern, being old and from a magazine doesn't have seam allowances?”
As I understood the word sloper and the word block have the same meaning in pattern drafting. It’s a basic pattern including some ease based on your moulage. The moulage has no ease. Here (meaning The Netherlands where I live) Burda magazine patterns, new or old, don’t have seam allowances added to them. Both my sloper and the Burda pattern don’t have seam allowances. That works fine for me, it’s the way I learned to sew and for me it’s also easier to evaluate the size of a pattern if seam allowances are not included.

Thank you Vicky for mentioning the book by Lynda Maynard on using a sloper with your pattern. For the moment I’m fine but it’s good to know there’s a reference book available.