Thursday, May 31, 2007

Making a bra - 3

Edited to add: I've made a pdf file for these instructions. You can find it here.

The next part of my tutorial of making a bra. Meanwhile I'm thinking of my next garment to make, other then lingerie. Difficult choice, but I would like something with a bit of a challenge. On the other hand, I need some capris or shorts for the summer. Well, that's for next week.

Making the cups of the bra.

Sew narrow elastic with a zigzag stitch to the scalopped edge of the lace. The elastic should be approximately 10% shorter then the seam. This also applies when you use non-stretch elastic. This narrow elastic will make sure that the cup lies to your breast properly.
Of course there is a difference in using stretch or non-stretch lace. If your lace has a lot of stretch, it will more easily take shape. I find it a matter of personal preference but have used both kind of lace. I tend to add 0,5 cm to the length of the upper cup when using non-stretch lace.


Sew upper and lower cup together with the 1 cm seam allowance.


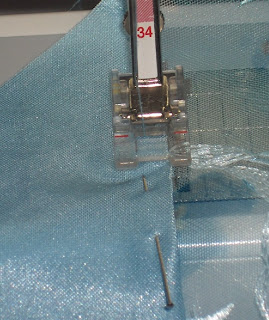
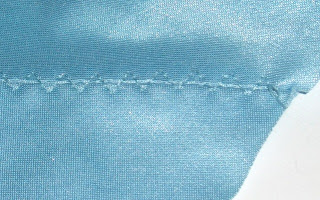
Topstitch from the right side, using your fingers to mould the seam and make sure that the seam allowances stay in place. Like before, I use my blindstitch foot for this.
In a fabric combination as this, I fold both seam allowances to the lower cup. When your upper cup is lycra too, or stable lace, then you open the seam allowances and topstitch on both sides of the seam.


Now you trim the seam allowance on the inside very near the topstitching. This will give your cup a smooth curve.


The cup is now finished


Sew the cup to the center front and band with 1 cm seam allowance. If you have a pucker, like I had in this picture, open up a few stitches and make sure everything is inserted neatly. A few wrinkles that you can easily flatten with your fingers is normal, and nothing to worry about. In my picture you see that at the bottom of the cup, where the center front piece and band meet.


The bra is getting shape.


Link to part 4

Wednesday, May 30, 2007

Making a bra - 2

Cutting and preparing undercup

Edited to add: I've made a pdf file for these instructions. You can find it here.
All pieces are cut with a 1 cm seam allowance, with the exception of the upper cup, that is cut to the scallop of the lace (see my earlier post on cutting lace).
Look carefully on the patternpieces how to layout the pieces on the lycra. Patterns have a line to lay them in stretch direction. Always check to which side the lycra has the most stretch.

Lower cup
The undercup is cut a bit larger then the paper pattern. This is because I use fusible interfacing for the lower cup. The ironing of this to the lycra could mean that the part shrinks a little, so I cut my lower cup after interfacing.
Needing a D-cup the interfacing is extra support that I find very comfortable. For a size A or B this is not necessary.


Apply interfacing

The lycra is on a piece of pattern paper, right side down. Then the interfacing laid on top, then again a layer of pattern paper.


Iron

Then iron the interfacing to the cup with your iron on the paper. This will prevent curling the interfacing and adhesive parts on your ironing board. While sewing lingerie, this is the only point I use an iron.


Finished cutting

These are all the parts of the bra, including the strenghtening tule for the center (behind the piece in lycra).

Assembling center and band

Sew the center piece in lycra with the right side to the tule, with a small straight stitch.


Lay it down like this picture, and stitch just below the original stitching on the tule (believe this is called understitching) This prevents the tule from turning to the right side.


Trim the seam allowance, turn and topstitch.

Stitch the tule to the center pieces with large stitches.
Not necessary to do this very accurately, later on it will all be trimmed. For now it will hold the pieces together.


Sew the band to the center piece


Open the seams and topstitch near the seamline. I use my blindstitch foot for this, which works very accurately (do this with almost all my topstitching btw).


Center en bands are now ready.


This was a very long post. Hope this is helpful. To be continued (my bra is already a bit further, and I already took pictures). But this is enough posting for one day.

Link to part 3

Tuesday, May 29, 2007

Making a bra - 1: What do you need


Edited to add: I've made a pdf file for these instructions. You can find it here.


As mentioned when I started this blog, I like to make a tutorial on making a bra. Today I will start with what you need to make a bra.

  1. Lycra (0,5 mtr makes usually one bra and two panties)
  2. Lace, with or without stretch. I usually buy 1,5 to 2 meters, but that is for panties too.
  3. Wire casing
  4. Narrow elastic for the lace in the upper cup
  5. Shoulder strap
  6. Elastic for lingerie (usually decorated with loops)
  7. Tule, only a small part necessary, used behind the tab center front
  8. Hook and eye closing
  9. Strap slides and rings
  10. Decoration for center front and at straps (optional)
  11. Cotton, only needed if you make panties too
  12. Wires (not in photo)
  13. (Fusible) interfacing for cup (also not in photo)
    mainly for larger busts, must stretch a bit. I use special interfacing for lingerie, but could not find it on the internet.
This is a detail of what I call tule. You will only need 10x10 cm. It has no stretch in the width.


And of course you need a pattern. There are several patterns available on the internet. I use my own made to measure pattern and have experience with patterns of Merckwaerdigh (Dutch) and Sewy (German), but can't recommend a pattern in the English language, by lack of experience.
Perhaps others can help with their experience.


Link to post no 2

Sunday, May 27, 2007

Burda pants 2

The pants are done. A complete review is on PatternReview. I like it a lot, it feels very much like summer.
Must admit that when I saw the picture of the back that I posted in an earlier review, this made me want to stop. What was I thinking, white! It looks enormous. Not good for me.
Didn't I read the article in the last Threads issue about seeming slimmer in dark colors (as if I didn't know that, I have everything: dark brown/blue, black). But sometimes you want something else. Now I'm glad I continued making these pants, as I think it's fine as it is. It does not make me thin, but that's something I know. Together with a good top it is great.

Saturday, May 26, 2007

Burda June


It was after all a week without much sewing. I spent long hours behind my computer and finished a job with a deadline for today at about 4.30 this afternoon. Pffff.
Tonight I spent a little time sewing, and my pants are now lined. Tomorrow I hope to finish it.

And the June Burda arrived in the mail today. A few lovely tops and I absolutely fell in love with this jacket. Like the skirt too, but that one is not for me. Only Burda says that the waist of the jacket is a bit higher then usual. Which means a lot of redrafting, because normally I have to lower the waist of Burda patterns by 3-5 cm. Not for now, but I will remember this pattern! It will make a nice jacket just after the summer.


And my daughter likes this one (make it soon please).

Tuesday, May 22, 2007

Burda pants

As I thought, the welts of this pants took as much time as the rest of the construction. It took me 1 1/2 hour. The result is this, with the welts still held together with a zigzag stitch:
For the construction I mainly used the method described by Ann Steeves (Gorgeous Things) in a Threads article last year. I think you can find it on her blog as well (but you have to search, I can't find it right now).

As for the pants itself, here are some pictures of how it is without waistband still. Lining has to be added too.

The front and waist are OK, only the back has folds, I hope they disappear when I add the waistband and pull up the center back a few millimeters.

Anyone any idea how to get those folds away?

Monday, May 21, 2007

Designer fabric?


In my post last week I showed two lycra fabrics for lingerie. I thought I saw this fabric used in RTW, but didn't remember exactly. But I do keep leaflets as source for inspiration, and found it. The same fabric is used by the label Marie Jo.
It's exactly the fabric I bought last week. I can't make this cup, but will try to copy the little center detail when making my bra.

And fun to know: buying 1 bra and 1 panty would cost about 90 euro (approx. 120 US dollar).
For lycra and notions I only spent approx. 25 euro ($33). And this is certainly enough for1 bra and 2 panties for myself, and 2 bra's and 4 panties for my daughter. Well, I need time to make them, but that is the fun part for me.

Friday, May 18, 2007

Currently working on ....

Yesterday was a holiday here and I took a day off too (as I mostly work from home I can plan my own working times).
Did less than I had hoped on my sewing plans, as finishing my Vogue top gave more complications then I cared to mention in my PR review. Everything went wrong: the neckbinding double serged, puckers, coverstitch problems etc. But I'm satisfied with the final result. It is at least a shirt out of my personal SWAP plan completed.

Next are a couple of lingerie sets for my daughter, she liked the fabrics as much as I thought she would. Cut those out last night as well as the white linen from my SWAP.

I'm going to make this Burda pants that has a beautiful detail in the waist. The welts will probably take as much time as the rest.

Wednesday, May 16, 2007

Adding to stash

What do you think of these fabrics for sewing a set of bra and panties for both my daughter and myself? The green/yellow notions for my daughter,the lilac for me.
Today I went to Kantje Boord, it's a lingerie makers heaven. Bought not only this combination, as no one could leave that shop with only one combination, I am sure. Lucky thing for my purse I only had one hour to shop.

Now back to sewing (if work permits).

Monday, May 14, 2007

Vogue 8323 does not work for me

Saturday late at night I cut view A of Vogue 8323, view A and sew it together swiftly. Some weeks ago I made view C and had some fitting issues, which I described in my review on PR. All in all I considered that for this fabric (mentioned in my earlier post in which I described my personal SWAP) I should use size 12 for the shoulders and 14 for the bust, and not doing a FBA. This was a correct decision.
So far so good.


Not good: the pattern for view A. On the envelope it gives the idea of a high neckline, but do the designers really think that the height from the base of the neckline to the top should be 13 cm (5 inch)? I did not think of this when cutting, only afterwards of course.

On trying this was the result: the first picture shows the top as it is using the pattern, strange wrinkles in the neck area. In the second picture I folded the neckline to see whether this would help. Could be, but the seamline of the shoulder came too far to the front, plus the drape of the fabric did not work anymore. Very angry at myself for not trying this on another fabric and very sorry to loose a fabric that I am very fond of I laid it down.


But today I just thought of the fact that the center front has a lot of fabric, as it is folded double and saw that it is possible to make view C instead. So I just had coffee and the 8 o'clock news together with this top and a seam ripper and cut the front part out. Grrrr. It was all serged! Took a bit longer then the 8 o'clock news. To be continued.....

Sunday, May 13, 2007

Making a panty - sewing together


Sewing the panty is not very difficult. With some experience you will make it up in one to two hours.

For topstitching a multiple zigzag is used. Don’t make it too short, as this will curl the edge.

Attach the narrow lace with a zigzag stitch to the scalloped edge of the lace, pulling the elastic very lightly (you could also measure it: take 10% off the actual seamline). This will make sure the lace remains in place and no gaps appear when wearing it.


Sew the lace to the center front part using a small zigzag again, the stitch should not be too short.

Turn and topstitch with a multiple stitch zigzag. The front part is now ready.

Attach crotch part and lining to front with a zigzag stitch. Right sides of lycra of front and crotch part together, right side of crotch lining to wrong side of front part.

Trim seam allowance, turn and stitch with (multiple) zigzag.


Now attach back part to crotch, right sides of lycra together, don’t attach lining.
Open the seam and lay the lining over it. Trim the top of the seam allowance of the back part.


Topstitch over the seam with the widest possible multiple zigzag stitch. This is something I figured out for myself, in this way you have a minimum of bulk in the seam. (Another way is cutting the back part and crotch in one piece of fabric, you then just use the multiple zigzag stitch, no seam at all, my fabric was not long enough any more to do that).

The center looks likes this now.

Sew front and back together at the sides with a zigzag, topstitch with a multiple zigzag.

Add the lingerie elastic

For that measure your seamlines and take off 20%. In this panty you combine the lengths of the back part and the crotch piece. Cut the elastic with approx 2,5cm/1 inch extra on both sides (I use pins to mark beginning, end and seamlines, and in the picture a fade-away pen to mark the point half way the back part).


Pin the elastic with the softer side up. Stretch the fabric when pinning. You need a lot of pins and in the end it looks like this.


Stitch it with a small zigzag on the fabric, making sure that when you turn the elastic, the edge remains visible. I use a transparent foot for sewing, because I then can see very clearly where I stitch. Remove the pins while sewing.


And here I always do what all my teachers said you should not do: I stretch the elastic so that it lays flat when attaching it. My first teacher wanted me to use many pins and sew over them, which always resulted in ripping out parts of the stitching, because the lycra had come together in the wrong way. And a lot of broken needles!

By now I have made many panties for myself and my daughter and I stretch the elastic BUT NOT THE LYCRA FABRIC. Capital because if you do that, it will “bubble”. But why not stretch the elastic? It must stretch to your body, mustn’t it?

Trim the fabric, turn and topstitch with a multiple zigzag.

Finished.

Please let me know whether you find this helpful or whether I could do anything to improve the tutorial.

Saturday, May 12, 2007

Burda top finished

Just finished my top. A complete review of this is added to PR. When I bought this fabric a month ago, I just thought of vertical and horizontal stripes and using this fabric as a hopefully wearable muslin.
But the article of Ann Steeves (Gorgeous Things) in the current Threads issue made me go a bit further and I changed the grain line for the upper front part and collar too. Took me quite long to cut the pattern, because when there are stripes involved, I want to match them accurately (see picture on the right).

As said in my review, next time I will use a plain color, but I like the pattern of this top.

Friday, May 11, 2007

Making a panty - Cutting lace

As I made my bras last week, I forgot to take the pattern of one panty with me and cut this out just now. As I mentioned in a post at the beginning of this week, I'm considering writing a tutorial about making a bra, but that must wait a little longer. So I start with a panty (strange word, as we call a panty what in English is called stockings I believe, what in English is called panty, we call slip, very confusing).

Before explaining how I make a panty (or perhaps later on a bra), let me say that I learned these techniques from 3 different teachers in courses or workshops and from information from books and the internet. So I'm not a professional sewing teacher, and not saying that my description is the only right way to do it. There can be better ways perhaps, this is only how I do it.

For panties you need the following:
  • lycra
  • lace (optional)
  • small piece of cotton (for crotch lining)
  • edge elastic
  • narrow lingerie elastic (only when you use scalloped edge of lace on the side of your leg)

Cutting lace is always taking some time, because I want my bra's and panties to by symmetrical. Usually I cut all pieces for 1 bra and 2 panties at the same time to make sure I'm not falling short of fabric. All my pattern pieces have 1 cm seam allowance and seamlines clearly marked, certainly for the parts that must be cut from lace.

Step 1:
Lay the paper pattern piece on the lace. In this case the edge of the lace will be on the leg side, so it gets no seam allowance. I use the lowest part of the scallop as guideline.

In the picture, the corner with the red arrow will be the point where the lace will join the back part. I like it to be a low point of the scallop, so match the seamline exactly there.

Step 2
Remove the paper, and use the first part of your lace as guide for cutting the second part. Make sure you lay wrong sides together.


This is a detail of the 2 layers. The embroidery of the lace matches. The extra print on the fabric has no symmetry.


An example of the 2 layer, exactly matched.


Example of all pieces for the panty, except crotch lining.