I want this jacket to last some time, and do a little bit more than usual for a summer jacket. I considered using the stitch and flip method for this jacket, but decided against it, as I want to be able to fit while sewing. Though I made a muslin, I want that flexibility.
In the next pictures I'm showing what I did for the interfacing, and I'm definitely not saying this is the correct way to do it. I'm experimenting on some points for the first time, and have gathered my information from previous experiences, several books, and of course the internet. Just sharing my experience, could be misinterpreted, should be experiment .
 | The front, completely interfaced (woven interfacing, I don't know the English names for all varieties) except for dart opening and hem allowance. The front facing has another interfacing. This was a "judgement call" as Roberta Carr says in her book. I thought it would be too much to have two layers of the same interfacing. On the shoulder thers is an extra piece of interfacing, cut on the bias. |
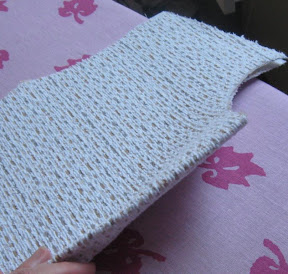 | I left a small opening between the two interfacings on the front. Without pressing the fold is already good. This was inspired by something that was done in the book mentioned below for the lapel in the fusible method. |
 | Inside collar on the bias, no seam allowances on the interfacing. |
 | Front side panel completely interfaced except hem allowance. Back side panel only the hem and the armhole. |
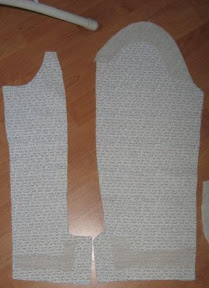 | Sleeves: hem and top of sleeve rounding. |
 | Back: sewn in interfacing, as by instruction in the book below. As the book showed a back without center back seam, I decided to sew the jacket pieces first, and do the same for the interfacing pieces, then I sewed the interfacing to the seam allowances. The hem was interfaced too. All partial interfacing (hem, sleevecap) was cut with pinking shears. In this fabric the line of the interfacing will not be very visible, but I did it all the same. |
A great book for tailoring jackets is this one, which I bought after Tany wrote about it.


The book has many, many pictures and describes the conventional tailoring methods, the machine method and the fusible method.
Some Q/A
Nancy K asked for the name of the tool: in English it's a sewing gauge. This specific, aluminium tool is hard to get now, and the common available gauge is plastic, and does not have the 1,5 cm (5/8") measurement, which mine has.
LindaNan commented on the combined Bernina: thank you for that comment. I received a similar reaction in a private mail, so I will certainly take it with me in my decision.
And Vicky added the computer to the list of things Els mentioned that should work always. Yes Vicky, you're so right, I really thought of your comment when mine refused to install new software and had to restart 3 times this afternoon. Then I decided to do my interfacing! Came to something good.
Sigrid - On Gorgeous Things blog she has just reviewed a metal seam guide she was given as a present. Could this be similar to what you are referring to?
ReplyDeleteSorry I also meant to say that I've got very little experience with interfacing, so I'm reading anything written about it, avidly.
ReplyDeleteYou are doing great, Sigrid!
ReplyDelete