After the front pocket, the back pocket gave me some trouble too. I made the first one and had to do the topstitching around the welt (as seen in RTW ) in two passes. Not easy to work and I thought of doing it another way.
In the past I've found many tutorials on (welt) pockets, but not this particular one. I decided to make the opening first and adding the welt later. Inspired by the method that Ann shows (which she described in an article in Threads too, and I've found the same technique described by Claire Shaeffer) .
As I was making a sample, I made pictures so that I could share it with you.
Notice my new sewing foot in the fourth picture, it is open in the front so that you can see exactly what you do. I already know it's worth every euro I paid for it.
 | The red is the wrong side of the fabric, the location of the welt has a lightweight fusible interfacing. To the right the welt itself and the inner pocket (a lining fabric). The opening is marked on the interfacing, exactly the height the welt will have. |
 | Sew the inner pocket to the welt and press down. |
 | Pin silk organza on the front of you fabric, making sure that there is enough fabric around the opening. |
 | From the back, sew the marking line. Make small stitches in the corner and keep the needle down while pivoting. |
 | Cut the opening, slashing to the corners exactly (but of course not through the stitching) |
 | Press the opening |
 | Pin the welt to the opening (other way round then I did in this sample, you'll want the seam pointing to the wrong side) |
 | Pinned to make sure everything is in place, basting might be better in a real garment. |
 | Topstitch the edges. I use the blind seam foot for that. |
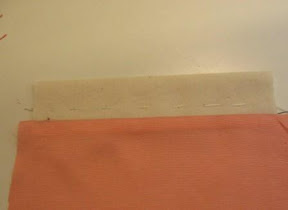
 | Here you can see the opening of the welt. |
 | The welt is topstitched all around. The little white strip you see is my table underneath. |
 | Cover with the pocket facing. |
 | |
 | Open the top so that you see the seam allowance from the opening. |
 | Stitch the seam allowance to the pocket facing. This stitching doesn't need to be too secure, as the seam allowance itself is already secured by the topstitching. |
 | Sew the pocket all around. It's now ready to serge the edges (not in the picture). |
 | The finished look on the inside |
 | The finished pocket in my project. |
nice work. Thanks for the detail pics.
ReplyDeleteExcellent tutorial! I'll have to try this method some time.
ReplyDeleteThanks for the tutorial. These pockets will make all the difference on the pants.
ReplyDeleteThank you so much for the photo tutorial! I'm saving it for future reference! :)
ReplyDeleteExcellent tutorial and work. Thank you for sharing.
ReplyDeleteVery nice! Thank you for the tutorial!
ReplyDeleteThanks for the single-welt tutorial! I was just looking at a lady's pants in church yesterday and she had single welt pockets in the back. They looked pretty nice, too, so I was thinking about doing them in some dress pants. That is, once I get to back to my pants draft which pops up on my activity list about once every three months.
ReplyDelete