Saturday, May 9, 2015

4 shoulder darts

A few weeks ago I showed you the muslin I made for a top with 4 shoulder pleats.

IMG_1263

It was รค study on how it worked out. I liked it enough to make a top for myself. Changed a bit to the lenght of the darts as there was excess fabric on me and this is the result.

 IMG_1318IMG_1317  

   4 shoulder pleat top detail

Only when seeing the photo of the side I realized that the back has too much fabric/is puffing. I’ll either have to have a bit more room in the waist or increase the back darts.

Side top

For those interested in dart manipulation or are taking the Craftsy class on it: I did not completely rotate the waist dart out. When I would do that, the angle of the waist to the hip would be very sharp. For the difference in waist/hip measurement I think it does not work well without waist darts, certainly when there is no waist seam. For that reason I also have more ease in the waist. Very fitted looks good on a dressform, but not on me ;)

Friday, May 8, 2015

A blue and a taupe dress

Here are pictures of the two dresses on me. I could do with a bit of a tan ;) and the blue dress especially was pictured after wearing it so has more wrinkles. Seeing the pictures I can of course see a few points for improvement, but in general I’m quite happy with the result. I wore the blue dress with a shawl this week and it was very comfortable.

The drafting is a combination from existing sloper combined with the square neckline technique from Suzy Furrer’s class. The taupe dress was made before I took any of her classes. Also the fabric of the taupe one is less stable, more a jersey knit whilst the blue one is a ponte knit. Which also accounts for the difference in drape

blue dress sideDSC_1023

blue dress back DSC_1026

DSC_1030 DSC_1029    DSC_1025

Saturday, May 2, 2015

Two dresses

I’ve been in dress-mode in the past month: I made 3 dresses, of which I’m showing two here. The first one I made is a black one which is exactly the same as the taupe version. Black garments are awefully difficult to photograph, so I’m only showing the two others. I was inspired seeing a black dress/colored jacket combination at a work meeting and realized I was short on plain dresses. Read: none in the closet, except for one silk dress. I knew I was missing something….

I wore my black dress/jacket combination to a work appointment this week and when I entered the conference room the other two ladies present wore the same sort of combination: black basics with a colored jacket. Very different colors and styles so definitely not the same look, but it was such a coincidence. Or it’s the current work-dress trend which I obviously was not aware of.

The dresses were made based on the same sloper as my color-blocked dress from January. I started out making a pattern for a dress with princess seams. Very easy to make, even with the lining it does not take more than two evenings.

DSC_1016 DSC_1011

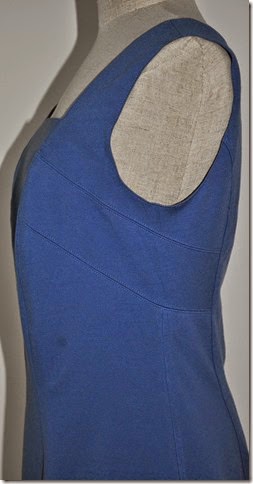
The blue version below was inspired by this Marfy pattern. I did not want the flared skirt and also omitted the center front seam. I don’t know whether the Marfy pattern has a full side seam. It’s not important, I just used the inspiration and decided to continue the diagonal lines that come from the front seam to the back.

image

For the square neckline I followed the instructions of Suzy Furrer in her class on necklines. It was a new to me method to draft the back neckline to match the front and make sure it does not gape. It worked well for me.
DSC_0998  DSC_1002   

DSC_0997 DSC_1000

This was the quick muslin I did on the top of the dress with some remnant pieces of ponte knit. In the color blocking I see opportunities for a sports top (with a different neckline). Initially I had the back seam open and asked my daughter to pin it . Then I wondered whether I could go without a zipper. The neckline is wide enough and the fabric has stretch, as well as the lining. So I closed the center back seam and could easily put it on and get out of it again. So even easier to make: no zipper.

DSC_1006

DSC_1008

Perhaps I can show you some photos of me wearing the dresses tomorrow. Would be nice to make photos outside but the weather forecast says it will rain

Friday, May 1, 2015

Dart manipulation ideas

It must be in the air: shortly after my last posts on dart manipulation The Cutting Class blog wrote a post Bust shaping with panel lines by Dior. Lots of dart manipulation ideas!

Bust Shaping with Panel Lines at Dior | The Cutting Class. Christian Dior, SS15, Haute Couture, Paris.

Once you look for it you come across more ideas. Marfy patterns/catalogues are a source of inspiration too.

01487754577c53d2b5b97196ca4f718733036b6842 013a9d991300e0cb3ba726759b375eedcaa0700d14 01b09a17064bc726fd402b4b5317f29016aeacdefc


015fb865b0b46c607f4d3707cdb34a7b64beedddfb 01fdf9348cf92cb5583f9f6b454dbcecc72e6fd946 0157b5b34072df1fc302893cb8e3dcfd22b9e20ac4

image

It’s nice to think about how to draft these patterns. I will not do them all but my version of the yellow Marfy dress is almost ready in a denim blue. Will show you later this weekend.

Monday, April 20, 2015

Dart manipulation inspiration

It’s nice to read in the comments there are others working on pattern drafting and dart manipulation too. I don’t think you see it a lot in the blogosphere. If you know blogs/sites let me know in the comments, it would be nice to see it more.

Apart from the in person classes I took Suzy Furrer’s Craftsy class on dart manipulation and it was a great inspiration. I only bought this class a little over a week ago, and I can heartily recommend. She’s very clear and deals with the subject very, very well.She uses the imperial system, but it’s not a problem as in this class it’s not about taking your own measurements and converting that to a paper pattern. It works from a sloper/block pattern, which I have. (disclaimer, I’m not affiliated to Craftsy, this is just a great class if you’re interested in pattern drafting/changing patterns).

Browsing the internet as one does from time to time for inspiration, I found this top. Certainly dart manipulation, combined with pleats/doubled fabric and a ruffle. The ruffle is a bit much to me, I’m not a ruffle-person in general, but the variation is something I might try.

image

This top is from the Jil Sander collection spring 2015, price 690 euro. It’s not even made from silk.

Sunday, April 19, 2015

Top with 4 shoulder pleats

As I’ve mentioned before I’m working on pattern drafting. Till now I’ve worked on tops, dresses, jackets and skirts that I wanted to wear to get a better fitting result than with commercial patterns. In general it worked really well (the color-block dress from January was such a project).
I want to explore possibilities a bit more and are working on drafts that not necessarily will end up as garments that I make in fabric and are worn by me.
This is a draft described in the book Patternmaking for Fashion Design by Helen Joseph-Armstrong. This is a textbook for students with many illustrations and ideas. It also describes how to draft a sloper, but I use my own sloper drafted with another system. In the end slopers are more or less the same. The instructions from the book do not work for me because it’s not metric. I’m fine with instructions like 5/8, 3/8 of an inch, making a complete draft with a non-metric system was too confusing (I tried).
IMG_1263 IMG_1264
This muslin was made with the basic block drafted with my measurements which has a waist, bust and shoulder dart. I do want to get an idea of what will work and what not. I like the detail of the shoulder darts. For a summer top the neckline needs to be different, lower and wider. That will mean that I have to reconsider the draft: either the smallest dart is omitted, or the darts must be closer together. For the moment I see this as a practise run, not sure whether I will make it to a wearable garment.
(nb: the dressform is not like me, so defenitely not showing the fit correctly).

Friday, April 17, 2015

Inspired by rtw

Hello dear readers, my absence was not as long as expected. The sale of our house did not happen (yet). Quite disappointing but well, it’s what happens and life goes on. My sewing room is still the same, though a few things are packed away to make space. It makes for a few things I can’t find (bias tape maker this week) that I always knew where they were. Don’t feel like unpacking all though, because we still hope to sell in the next months. 

In the meantime: I’ve started sewing a bit again and this week I made a simple t-shirt with a little twist, inspired by a rtw shirt.

The inspiration piece (Claudia Strรคter)

image 

My version.

IMG_1247 IMG_1246

IMG_1245 IMG_1240

So easy to make, using a t-shirt pattern that you have. On the neckline I took 2 centimeters from the shoulder and drafted a new neckline and marked the point where the new and original neckline crossed. The original neckline is the line the band is following.

I cut the neckline with a little seam allowance from the notch up, no seam allowance center front and back where the neckband is attached. Then I interfaced the seam with a strip of light fusible to get stability and topstitched. The neckline band has a finished width of 1 centimeter, which meant cutting a strip of 4 centimeters wide. After a firm press I pinned and basted that strip over the neckline below the notches, stretching a little to make sure the neckline will be close to the body. Topstitching the neckband finished and attached it in one pass. (I close the neckband after pinning most of it, so that I know where to put the seam).

Cute detail, don’t you think?

IMG_1234

IMG_1235