Showing posts with label muslin. Show all posts

Monday, January 20, 2020

For the record

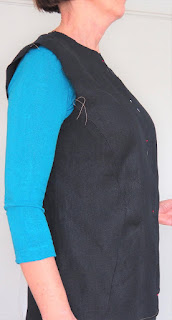
For the record I'm publishing these photos. I know the design lines are difficult to see, especially in the front because I used a remnant piece of dark navy linen and because there was not enough of it a piece of muslin fabric in the back.  You can see that it's straight down at the front and back. By the size chart I'm a size 42 in the bus area and I used 40 because of my narrow back. My reason was that I could do an FBA easier than changing the width of the back. On the back it's still too wide and there's no need for an FBA.
Of course I graded out at the hip area. There's more than enough ease in this area, even though I'm the largest size in the middle set of hip circumferences (see my post from yesterday). Imagine this circumference at the hips for someone whose hip size is 12 centimeters smaller!


I'm still loving the design and despite this thinking of a way to make it work for me. Perhaps I have to draw it based on my sloper. Not this week though.

I don't have confidence in the "drafting adjusted to the size chart" from Knip mode. Back to Burda and Ottobre!

Sunday, April 19, 2015

Top with 4 shoulder pleats

As I’ve mentioned before I’m working on pattern drafting. Till now I’ve worked on tops, dresses, jackets and skirts that I wanted to wear to get a better fitting result than with commercial patterns. In general it worked really well (the color-block dress from January was such a project).
I want to explore possibilities a bit more and are working on drafts that not necessarily will end up as garments that I make in fabric and are worn by me.
This is a draft described in the book Patternmaking for Fashion Design by Helen Joseph-Armstrong. This is a textbook for students with many illustrations and ideas. It also describes how to draft a sloper, but I use my own sloper drafted with another system. In the end slopers are more or less the same. The instructions from the book do not work for me because it’s not metric. I’m fine with instructions like 5/8, 3/8 of an inch, making a complete draft with a non-metric system was too confusing (I tried).
IMG_1263 IMG_1264
This muslin was made with the basic block drafted with my measurements which has a waist, bust and shoulder dart. I do want to get an idea of what will work and what not. I like the detail of the shoulder darts. For a summer top the neckline needs to be different, lower and wider. That will mean that I have to reconsider the draft: either the smallest dart is omitted, or the darts must be closer together. For the moment I see this as a practise run, not sure whether I will make it to a wearable garment.
(nb: the dressform is not like me, so defenitely not showing the fit correctly).

Wednesday, July 2, 2014

Jacket muslin

Remember my struggles with fitting a jacket last year? I lost count of the amount of muslins I made, the tweaks I made to patterns to get it right. These struggles with fit have led me to learning pattern drafting (better). I had some basic knowledge of it from a few lessons in the past, but never did work on it properly.
I’m convinced now it is a good approach for me. Last week I drafted a pattern for a jacket, the same idea of jacket I made  last year. I wearit but after all the work I’ve done on it I still think it could be better. It was made from a Burda pattern which I altered and altered…

The muslin of my self-drafted pattern. Could not find shoulderpads which will help with the fit in the back, but otherwise I’m pretty pleased with the result. Remember this is also not interfaced or otherwise stabilized. Just muslin fabric. Taking it to class tonight to hear what my teacher thinks.

Thursday, April 17, 2014

Knip mode dress – quick muslin

The dress got priority and tonight I’ve sewn a quick muslin of the top part. It isn’t that difficult, just a lot of pleats to fold before stitching the shoulder seams. As long as you mark all notches carefully, this is easy. I made this in a little over an hour (cutting and sewing).
But…. again I think they didn’t try the pattern before publishing. The right shoulder is ok. It will be difficult to sew the facing  and I would have constructed it a bit different, and will do that when I sew it in fashion fabric. The left shoulder is not good.  In the photo of our queen wearing the dress you can see that the left shoulder is a bit upright, but moves down again in the back.
DSC01238
I found this picture too, where the left shoulder is folded over.
image  
Knip Mode’s version: very high and the edge of the  facing (which of course is not added to this muslin) would be visible and there’s not enough room for folding.
DSC01261 DSC01260 DSC01259 DSC01258 
My enthousiasm for the pattern has gone a bit. I like the right shoulder but would have to redraft the left shoulder part and the neckline. What do you think? Should this be a “normal” shoulder with perhaps one or two pleats. Would it make it more wearable? I know I have to add some space to the body, it’s too tight and the armholes have seam allowances that I did not cut off. With this result it will definitely not be ready before Easter.

Friday, February 21, 2014

A quick update

SewMaris (who’s starting a sew along vor the Ziggi jacket soon) asked in a comment which size of the jacket I ordered. I bought a size 12 by bust measurement. The size 12 in StyleArc size chart gives a bust measurement that is 2 cm smaller than my actual bust measurement. It was fine for the Marie and Marni jacket, on the Marni jacket I did an FBA. For this jacket it was far too wide in the back, though total bust circumference was fine. A common problem for me, as you’ve seen my muslins in the past few months that really is a problem challenging area for me. StyleArc patterns are in one size (like the Italian Marfy). My body has 3 different sizes comparing bust, waist and hips. On multisize patterns it’s easier to grade between sizes.

I’m getting there though (thanks to the sewing teacher). This is the jacket provisionally sewn with long stitches, sleeves not pressed.

It will be taken apart again as it has to be interfaced, zippers inserted etc. Step by step I will get there (doing some easy things in between). I’ll be posting about the steps taken.