Sunday, July 21, 2013

Finished jacket photos

I must admit that when I see the photos I’m less satisfied than I am with the real thing. Wearing it and moving in it is different. The photos seem to highlight every little thing and even show things that I don’t really see or notice in real life. I’ve seen a blogpost by someone else some time ago who said something similar. It’s disappointing a bit.
But I will show them anyhow, thinking that it’s good to see the finished project and for myself to see the improvements next time I make a similar jacket. I might even make the same one in another fabric that shows the design lines better.
Let's start with the part that is no longer visible. The front was interfaced for stabilty, the other details are exactly the same as described in this blog post.
 
The back stay is from silk organza.

The details that are hardly visible when wearing:
The strip of the lapel collar was extended to the facing (let’s pretend not see the extra wedge I had to sew in Knipogende emoticon)

The collar as Burda drafts them often, with an extra insert.


And finally on me:


The design lines in the back ar lost.


To conclude: I will do a few things a bit different next time, but I’m really happy with this jacket and the process to the finished garment.

Wednesday, July 17, 2013

Bias strips on lapel and pocket

My jacket is almost finished. A little bit of work on the lining, buttonholes and buttons and then it’s ready. Before posting about the finished jacket below the way I made the bias strips of fabric on the lapel and the welt pockets. Photographed on scraps, while I was doing it on the jacket I forgot those.


First the bias strip was ironed with a bias tape maker. As the fabric is a linen and cotton mix it is easy to iron.

Then I took the SA curve ruler and placed that on the edge of the pattern piece. All strips were sewn before further construction of the lapel or welt. The bias strips I placed to the inside edge of the ruler and in this way the distance was even everywhere. My seam allowances are 1 cm (3/8”) and in this way half a centimeter remained between seam line and bias tape.

I used a special adhesive pen I recently found in a notions store (website here).


But still used some pins too.


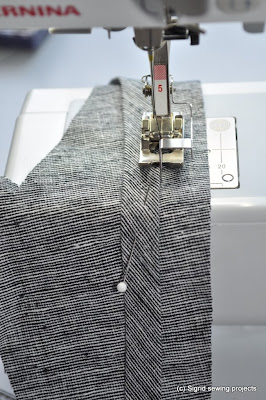
The final step was topstitching using the blindstitch foot and upholstery thread  which is a bit thicker than normal thread.

Saturday, July 13, 2013

Progress made


I’m getting there, I made a mistake tonight and held my breath for a moment. Then I realised that it was only unpicking and sewing a new seam, nothing really dreadfully wrong (remember I have not a piece of fabric left). I corrected the mistake  prior to stopping sewing, so that I can start with inserting the sleeves tormorrow. The most difficult things are done. I’m very happy with the lapel collar. I used the technique as decribed in Threads no. 68 by Jan Schoen. An adapted version was published in SewStylish in 2010, which article is online as well.

Further I’m a bit sorry the design lines don’t show very well in this fabric. Still like it though, the fabric is very “me”.

Monday, July 8, 2013

Jacket cut and set sewn


Tonight I’ve cut my jacket. I have just enough fabric. It’s a remnant piece of cotton/linen that I bought last year. Initially I thought I did not have enough, but repositioning the pattern pieces on the fabric solved that. Nothing may go wrong. There is just a bit left for the welt pockets and some strips along the lapel collar and on top of the welt. Whether that will be working is doubtful, as I have to sew a few pieces together to get enough length. If the seam is too visible I’ll have to change my plan and either buy a ribbon trim or not use any.

In between I’ve sewn this set. This time I used a Merckwaerdigh kit. It’s a bit different than my usual sets, I quite like it. It’s very comfortable.

Saturday, July 6, 2013

SA ruler–coupon code


In my post from today on the muslin of my jacket, I showed that I made the seam allowances with the SA rulers from Claire.
I got the 3/8 and 5/8 ruler to review and I’m so happy with them. It made adding seam allowances to my jacket pattern pieces very, very easy. I see a lot of ways of using them. I do have French curve rulers, but these rulers combine the french curves with the ease of adding seam allowances at the same time. Also tracing a pattern from Burda or Ottobre is easy. Claire shows that in a video as well.

Below the 5/8 ruler used on a Burda sheet.
 
Not all curves/lines can be drawin in one pass, just move the ruler a bit and you have the right piece of the curve again (or a straight line).

If you’ve read my blog for a longer period, you might know I’m not a great fan of the 5/8 default seam allowances, because I miss my reference of the size of the actual pattern piece (being European and grown up with Burda and Knip Mode has to do with this I think).
This makes it a matter of seconds to add the actual seam lines.

\
And I’ve used the 3/8 ruler for tracing a bra patter. The 1/4”inch line is a good seam allowance for this kind of sewing.
 
As said, I’ve received these from Claire for reviewing, but I wouldn’t be as positive as I am if I was not happy with them. She has some other nice gadgets too and is working on metric rulers.
If you would like some as well she has a discount code for my readers: use SIGRID20 (valid till July 31 2013) in her shop for a 20% discount. That’s a nice discount isn’t it?

From muslin to pattern

I realised I’ve never shown the pattern I started with. It’s a pattern from Burda magazine, January 2006. Doesn’t look like the jacket I wanted, do you think? But it had lines that could be altered. That is what I saw when I started using this.

A few questions were asked on the process. I do no longer have a dressform made to my measurements. I made one in a workshop a few years back, using brown paper packaging tape, but the body length wasn’t good. Either I didn’t stand tall when made, or it lost  a bit in drying. After a few frustrating results I stopped using it and recently threw it away. One day I want to make the dummy like Bunny has done.

I don’t have a sloper for myself. And never heard of the possibility of someone else making them professionally for you. I see that it could be useful. As would be a more professional pattern drafting class (which someone asked in an email), but there’s not enough time to do everything I want.

Pixie asked me to show how I use the muslin to make the pattern. I’ll share the main things I did in this post. I’m not using the muslin itself as a pattern, as is done in for example “The couture dress” class, but making a paper pattern, with seam allowances as I now know that the fit is quite accurate. Some details may be adapted in the fashion fabric, though not a lot to be expected.

First I marked all seams that had changed. Also noted that I wanted the lapel collar half a centimeter wider in the end.


On the back these were the seams that had changed.

The sleeve was altered in the muslin process and needed no further alteration. But I checked all the same:


On the front the part to be added to the side panes was marked, the bust point widened


The back was cut open and pinned flat. I made notches on the fabric and cut them apart to transfer these pieces to paper.

All pieces were transferred with the changes to make new pattern pieces. All seams checked for length on both sides of the seam.

After and during transferring them to paper I added seam allowances with a new ruler: the SA ruler 3/8 inch (= 1 centimeter) wide. Absolutely a pleasure to work with. I’ll do a separate post on it. I’ve received this from Claire for reviewing, and I’m 100% positive I’ll use them a lot!

I’m almost ready to cut into the fashion fabric, there are a few things I’m considering (using silk organza underlining?), which interfacing to use etc. before I’ll do that.  Will happen sometime this week.

Tuesday, July 2, 2013

Getting there

After a few more changes I think I’m ready to use my muslin as a pattern. Thank you so much for your comments. A special thank you to Kenneth D. King, I was very grateful for your comment, I’m a great admirer of your work and books and was surprised you saw my post on this and took the time to comment.

Below the first change: added a thicker shoulder pad, it definitely helped (change to the left side)

Then I made a slight change to the armhole and deepened it a bit. As Gail suggested I also did a little swayback adjustment. Time to transfer the muslin to a paper pattern I think. What you see at the upper back is not a round wrinkle but the camisole I’m wearing underneath.


Since making this muslin I’ve looked at a lot of photos of garments I made in recent years and I see the problem more often than I like. I’ve learned a lot from this muslin, blouse patterns have to be altered too. Also that I have to refer to my fitting books again that have been accumulating dust and keep looking with a critical eye. 

It’s definitely worth all the time spent. A jacket like this I will probably wear for quite a while. I still wear the jacket below (same problem of the upper back being too wide at the armhole). It’s from May 2010. I intend to construct the above muslin jacket in the same way, which hopefully will lead to another jacket that will last for a while (can you tell that I’m not dressed following the latest fashion?)