Ýesterday's empty post was about an e-mail I got from BurdaStyle with a survey link which irritated me enormously and I wanted to vent. An hour after publishing I thought it wasn't worth your time reading my venting and removed the text of the post. In Google Reader (how I still miss it) that was the way to delete the text of a post, as deleting the post made the original still show up in the reader. I was not aware of people reading through RSS feeds still getting the original post and ending up on my blog with an empty post.
That's the reason behind the empty post.
Further I've been sewing the second undie for my daughter, decreased the foot pressure, put something under the end of the foot making the foot not tilt backward at the beginning of a seam and it seemed to help. The fabric didn't get stuck that badly any more. Thank you for all suggestions. It did help a lot. She has worn the set and is very happy with it. Bonnie D: the preformed cups are from Kantje Boord.
What's next? I'm not sure yet. I've been working on lingerie (again, it might get boring) and want to make plans for early fall. Very hot weather is predicted again for the end of the week, so sewing will be on the backburner for a few days, as there is also quite a bit of work to be done.
Till next time, a post with photos probably.
Tuesday, July 30, 2013

Monday, July 29, 2013
Friday, July 26, 2013
All lace bra
Thank you for your suggestions on my sewing machine problem. This weekend I will make another undie for my daughter and will try the solutions. I think it must have something to do with pressure and/or feed dogs, possibly in combination with a hump in the fabric. The lycra I used is very slippery as well, perhaps that has to do with it too. I’ll let you know how it goes. Lilian even had problems solved with changing a light bulb, that is quite special (btw Lilian, I’m missing your blog, hope you do get some sewing done and just don’t feel like blogging, I know that happens).
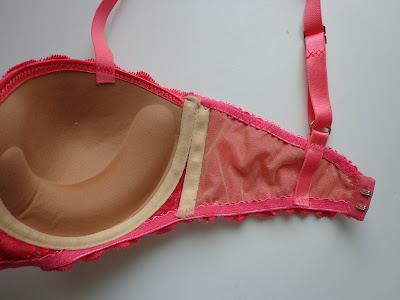
This is the bra I made for my daughter. It has preformed cups in a rather dark color. The lace is a bit open, I covered the cups with the lycra that you saw in the thong and then covered the lycra with lace.
Pinning it on the dressform gave a little dent in the right (left in the photo) cup, it’s really smooth over the whole cup.


While I need a strong support in the band, that’s not the case for my daughter, so a regular, rather straight band is ok for her.

The inside. I used some thin, stretch interfacing under the band because of the open structure of the lace. It will also give a bit of extra support. I find the lace on itself not stable enough for a band.
DD preferred rtw for a while, but now said she would like me to make a few more sets. Good we bought some more fabric and notions 
Thursday, July 25, 2013
Sewing machine problem

I’m working on a set for my daughter. Yesterday we went to Kantje Boord to buy fabric and notions to her taste and yesterday evening I made this thong for her. It’s Melissa’s free pattern (check the downloads) which is really easy to work with. Thank you Melissa for making this available. It’s the first thong I ever made, as I do not like them myself. My daughter likes them, and this one especially.
Topstitching gave me problems and I’m asking you whether you know what could be the cause. My machine misbehaves sometimes and makes a number of short stitches and then continues correctly. It looks like the fabric is caught at the back of the sewing foot. It’s been to the dealer where of course nothing happens like this and he said my transparant foot with some damage on it might be the cause. I agreed the foot needed replacement so I bought a new foot. But when I was working on this it happened again on several places and I used the regular foot (metal) and the walking foot. Two different feet, same problem. So annoying. It’s a Bernina Aurora 430 machine.
Any ideas of the cause or a way to avoid this?
PS thank you all for your lovely comments on my jacket. It’s in the closet right now because we have very high temperatures here since about a week. No way I’m wearing anything with long sleeves.
And those of you who bought the Craftsy course after my recommendation: I do hope you enjoy it as much as I do. I’ve been a bit reluctant of doing these reviews as they are only my perspective. The same is true for pattern reviews though, so I hope you all make a decision to buy something not only because I recommend it.
Right now I’m following Kenneth D. Kings’s class for a jacket. I’ll write more about that in a later post.
Monday, July 22, 2013
A Craftsy class review
In the past year I’ve bought quite a few Craftsy classes and have enjoyed some more than others. Past week a sale was on which you will not have missed, I saw quite a lot of links in blogland to them. Today I entered my first review for a class on Pattern Review. I plan to add more on my experiences with the classes I’ve followed, but there are still a few I have to finish watching. I was rather disappointed in what I saw from Sandra Betzina’s class on pants fitting for example but still want to see the rest before I am too negative about it. The couture dress by Susan Khalje was a wonderful course. I wrote about that course on my blog last year, though through various circumstances never got round to making the dress. Last week I bought Sewing on the edge by Lynda Maynard. I followed all lessons within 2 days and HIGHLY recommend this class which is about finishing the edges of your garments: necklines, armholes (tanktop, sleeveless top) and hems.
These are the subjects covered:

A few extra decorative ideas are added to the class, but the main focus is on clean, beautiful finishes. I tried one of the finishings for a knit based on the book (blogpost here ) and that was a success, but till now I never tried others.
Because I have the book I was a bit reluctant buying this class. As I had positive feellings about Lynda Maynards class on fitting (still not completely finished those lessons) I thought it might be worth to buy the video class and I am happy I did.
Lynda Maynard is a great teacher and she shows the steps of construction very clearly and is well prepared. She made sure that it is very clear which side is the right side of the fabric and what is the wrong side.
I learned quite a few tips and trics and it's easier to see her doing it then reading it all in the book. Though I'm sure happy to have the book too, which covers more than only these edge finishes.
Below a few screenshots from the class and the blouse I finished this weekend to fill the missing gap of white summer tops in my wardrobe. I used the double fold binding on the armholes. With Lynda’s method it’s more precise then what I did before (and honestly I mostly avoided them).
ETA: just to be clear: the first 3 photos are from the class, not my work. Only the white blouse is mine.


These are the subjects covered:
A few extra decorative ideas are added to the class, but the main focus is on clean, beautiful finishes. I tried one of the finishings for a knit based on the book (blogpost here ) and that was a success, but till now I never tried others.
Because I have the book I was a bit reluctant buying this class. As I had positive feellings about Lynda Maynards class on fitting (still not completely finished those lessons) I thought it might be worth to buy the video class and I am happy I did.
Lynda Maynard is a great teacher and she shows the steps of construction very clearly and is well prepared. She made sure that it is very clear which side is the right side of the fabric and what is the wrong side.
I learned quite a few tips and trics and it's easier to see her doing it then reading it all in the book. Though I'm sure happy to have the book too, which covers more than only these edge finishes.
Below a few screenshots from the class and the blouse I finished this weekend to fill the missing gap of white summer tops in my wardrobe. I used the double fold binding on the armholes. With Lynda’s method it’s more precise then what I did before (and honestly I mostly avoided them).
ETA: just to be clear: the first 3 photos are from the class, not my work. Only the white blouse is mine.
Sunday, July 21, 2013
Finished jacket photos
I must admit that when I see the photos I’m less satisfied than I am with the real thing. Wearing it and moving in it is different. The photos seem to highlight every little thing and even show things that I don’t really see or notice in real life. I’ve seen a blogpost by someone else some time ago who said something similar. It’s disappointing a bit.
But I will show them anyhow, thinking that it’s good to see the finished project and for myself to see the improvements next time I make a similar jacket. I might even make the same one in another fabric that shows the design lines better.
Let's start with the part that is no longer visible. The front was interfaced for stabilty, the other details are exactly the same as described in this blog post.

The back stay is from silk organza.

The details that are hardly visible when wearing:
The strip of the lapel collar was extended to the facing (let’s pretend not see the extra wedge I had to sew in )
)

The collar as Burda drafts them often, with an extra insert.


And finally on me:


The design lines in the back ar lost.


To conclude: I will do a few things a bit different next time, but I’m really happy with this jacket and the process to the finished garment.
But I will show them anyhow, thinking that it’s good to see the finished project and for myself to see the improvements next time I make a similar jacket. I might even make the same one in another fabric that shows the design lines better.
Let's start with the part that is no longer visible. The front was interfaced for stabilty, the other details are exactly the same as described in this blog post.
The back stay is from silk organza.
The details that are hardly visible when wearing:
The strip of the lapel collar was extended to the facing (let’s pretend not see the extra wedge I had to sew in
)The collar as Burda drafts them often, with an extra insert.
And finally on me:
The design lines in the back ar lost.
To conclude: I will do a few things a bit different next time, but I’m really happy with this jacket and the process to the finished garment.
Wednesday, July 17, 2013
Bias strips on lapel and pocket
My jacket is almost finished. A little bit of work on the lining, buttonholes and buttons and then it’s ready. Before posting about the finished jacket below the way I made the bias strips of fabric on the lapel and the welt pockets. Photographed on scraps, while I was doing it on the jacket I forgot those.
First the bias strip was ironed with a bias tape maker. As the fabric is a linen and cotton mix it is easy to iron.

Then I took the SA curve ruler and placed that on the edge of the pattern piece. All strips were sewn before further construction of the lapel or welt. The bias strips I placed to the inside edge of the ruler and in this way the distance was even everywhere. My seam allowances are 1 cm (3/8”) and in this way half a centimeter remained between seam line and bias tape.
I used a special adhesive pen I recently found in a notions store (website here).

But still used some pins too.

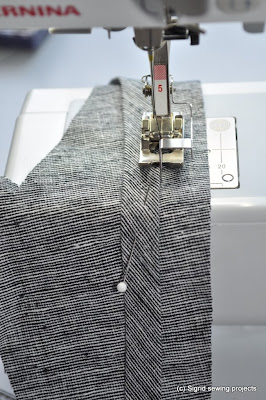
The final step was topstitching using the blindstitch foot and upholstery thread which is a bit thicker than normal thread.
Subscribe to:
Posts (Atom)