Tuesday, January 20, 2009

What did women wear for small waists?

Alexandra said in a comment on my previous mail that she would want "whatever undergarments they wore to make their hips and waists look like that. (They can keep the bullet bras.)".

It reminded me of a link recently shared on a Dutch sewing forum which shows what women did wear. Alexandra, would you want to wear this (as if you would need it)? I definitely don't want to, even if it would make my hips look smaller.

Monday, January 19, 2009

A Vogue from 1956

I know you might be expecting me showing my pants, but it isn't finished yet. Almost there, but a few little things still have to be done.

Below a few pictures from a Vogue from 1956 which I found on a local site when I looked for some older BWOF issues. One of the sellers also had this Vogue issue from 1956 for sale and I bought it. I'm not really into vintage style sewing (yet), but I do like to see books and magazines with clothes and patterns of the past. Aren't they wonderful feminine clothes? And it's a bit difficult to see in most of the pictures, but the lines are so special on some of these designs.


Saturday, January 17, 2009

Copying a pair of pants (5)

I'll continue showing the steps of constructing these pants. The pockets of the waistband are done. Because the fabric is a bit "beefy", I made the flap not of two layers of fashion fabric, but used black cotton for one side. The welts with the layer of ribbon in between had enough thickness already, so it was important to reduce bulk. I'm hoping to finish these pants this weekend.

Then it's time for something in another color. I've a feeling that I've had black thread on my sewing machine for ages now. This morning I was in a fabric shop, which had the first few bolts with spring fabrics. Couldn't resist to buy a lovey cotton for a shirt with shades of light blue and mint green.

IMG_4492

Thursday, January 15, 2009

Copying a pair of pants (4)

Here are pictures of the closing method for the pants. I made a zipper in the pocket.


This is the view when the zipper is closed.
Here you can see how it looks when I open the zipper. I laid a yellos paper behind the pocket to make the picture more clear.

I know the zipper is brown and my fabric grey. 
Others won't see the zipper at all , and the pants will be lined. I won't see much of the zipper when it's finished either.
The inside. The zipper is over the full length off the pocket. My hip and waist size have a difference of over 2 sizes. Therefor I need a  lot of opening space. I think you could make the opening shorter when the difference is not that big.

Tuesday, January 13, 2009

Copying a pair of pants (3)

It's very slow sewing here. I haven't touched my sewing machine for days and only tonight found time to make the alterations to my pattern and I am ready to cut the fabric.

Helen, I'm grateful for your comment on the Sandra Betzina method. I checked and that method is described in the book Power sewing that I have. And I'm going to do that instead of leaving the pocketseam open. I'll show pictures when I've done this.


When trying on the muslin to determine the position of the pockets in the waistband, I saw that the center front line was bent too much to the center at the location where I moved the dart.

It's a bit difficult to see in the picture, the line is drawn about 1,5 cm more to the outside at the top and then I made a smooth curve to center front again.

You can see the drawing of the pocket and the possible sizes for the tab. The same I did (with the help of DD) on the back.

I like the experiment and hope that the result is going to be what I have in mind.


There were a few comments on Kenneth King's book. I'm not the only one who loves this book, but if ýou already own a book by Kenneth King look at the reviews here. The 3rd review is of interest!

Designdreamer: thank you for the link to his book in the comments. And let us know when you make your version of these pants! It's a nice idea others are going to do this too.

And finally: this is why I want another foot for my Bernina:

The dark stitchline is as far as I can go to the left with my Bernina zipper foot, there is no other Bernina foot that will get me closer to the piping. The light blue thread is sewn with the old Elna machine. With piping this is the most obvious, but there were occasions in the past year where I wanted the needle to be further to the right or left then possible. Don't get me wrong, I still love my Bernina machine, this is the first thing I don't like about it. And could have easily been solved if they would sell another zipper foot.

I was advised by Kay Y and in a private mail to buy a shank for my Bernina so that I could use generic presser feet. I did find a supplier on Ebay and am eagerly awaiting my order. It will take some time before it will be here, and I'll let you know the results.

Thursday, January 8, 2009

Copying a pair of pants (2)

Based on the instructions from Kenneth King in his book Cool couture I made a sample of a welt pocket with flap. It really is just another method of making a welt pocket and attaching the flap after the basic construction of the welt. But I can't praise his instructions enough. They're well written, clear and mentioning how it must look like in the different steps, and sometimes what you could do wrong in a step. Some of the chapters in it were published earlier in Threads magazine, but as I only subscribe to Threads since about two years, I don't know whether these were all published before, and I didn't bother to check whether the book has more info on the chapters I've seen before or not. I don't care, I love the book. And he gives the measurements in metric equivalents too, which I find really helpful, as I never really get used to the inches (1/16, 5/8, 7/8, it's sounds so unlogical to me).

I started with the instruction for a welt with zipper underneath, and added the flap instead of a zipper. The basic idea is using a woven ribbon of the exact width of 7/8" (2,2 cm) which serves as interfacing and measurement. There I had to cheat, as I didn't have this width. Will be difficult to get this size too, as most ribbon in the metric sizes will be 2 cm. For my first samples I wanted to stick to the measurements of the instruction, so I cut this size from some woven waistband interfacing. It was evening and shops closed, no use even trying to get the right ribbon at that moment.

There are also marvellous instructions on how to avoid seam lines on the edge of the flap. I must try those someday, but as I now want a flap with a curve, this was not applicable.

I didn't make a picture of the first sample, which I made from thin muslin fabric. The second sample above is made with a flap too quickly sewn without drafting a proper pattern, so it's not even and a little too short. But I know how to do it now. Time to decide the length of the pockets and height of the flap and tab on the muslin waistband.

Recently Designdreamer asked which sewing machine I have. It's a Bernina Aurora 430, but for these welt pockets (not really necessary here, but I want to try piped welts too for another reason) I took my very old Elna machine, which I hardly use. This picture shows why. And if anyone has a solution for the Bernina, please let me know, my dealer didn't know one!

To finish the answers to two other questions:

Rachel asked for a way to get the Marfy pattern. In Threads it was mentioned as number 1666, and not published on the Marfy website. From the magazine: "To order send an email through the web site "contact us" page www.marfy.it .

NancyK: I won't make the open seam at the bottom of the leg. It makes this pair of pants even more special, but doesn't suit me. It would mean that the pants can only be worn with higher temperatures and after my legs have seen some sun.

Sunday, January 4, 2009

Copying a pair of pants

As I showed in one of my last posts, I was intrigued by a pair of Marfy pants as shown in the last Threads issue. And in the past few days, I took some time to try to get the basic pattern and made a muslin.

I took my last BWOF pattern as starting point. These are a basic pair of pants with shaped waistband that I love to wear and fit is not the main issue now. Therefor no pictures on me. After drafting the pattern (see below) this is the result. At center front there's more a corner than a straight line, which is easy to change. As you can see the pocket is not drafted as the original drawing, in which it extends to the center front seam. It would have been too much for my figure.
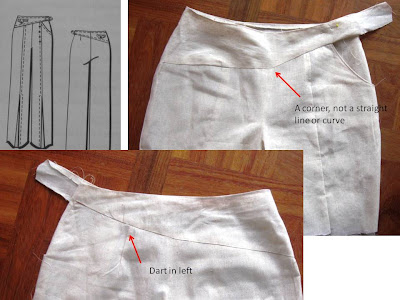
 

I've been thinking some time on the closure for these pants. First I thought to make an invisible zipper in the side, but that's not really a good option in these pants. Based on something I've seen in Sandra Betzina's book I try to make an opening by not closing the pocket all the way up. I'll have to leave it open 2 cm more, as it's a bit difficult to get into the pants now. Further I'll have to make the pocket pattern a bit wider, so that it extends more to the center. The picture below shows the outside on the left, and the inside on the right.

There are a few steps to think about the final pattern pieces and the order of construction. If I would have bought the original pattern, this would not have helped me at all, as Marfy patterns come without any instruction on cutting layout, order of construction or line drawings. The drawing in my first picture is from Threads magazine.


This is how I made the pattern. The dark lines are the original lines of the pattern, with the band attached to the front and back pattern. The red lines (indicated with scissors too) are the lines that I made for the design. The small green arrows indicate where I closed the dart. On the right back pattern I moved the very small dart that was left to the center, on the left back it remained, as in the original drawing too.

The same idea is in the front pattern. The dart of the right front was transferred to the seam line that is made at the center front of each leg.


Now I have the basic pattern, I'll have to do some practise on the pockets in the waist band. Both pockets in the waistband are more embellishment than functional, but I like them, they give the pattern the little extra that caught my eye.

On the back there is a welt pocket with flap, which I never made before. Last week I received the book Cool couture by Kenneth King (thanks Elaray for the heads up on this book, it's very inspirational), and this technique is described.  Last year I did an online class from Kenneth King, and was impressed by the way he explains things, which makes me confident that the instruction in his book will work out well.

I really have been buying some books lately, I'm eagerly awaiting the book The fashion designers directory of shape and style, on which Lindsay T wrote a post. In the past two months I've bought Jackets for real people by Pati Palmer, and Easy guide to sewing linings by Conny Long. Don't exactly remember what post or review brought me to buying these, but I'm happy with each book, as it's always good to be able to read different methods, or a different way of explaining the same thing. Till now I've always found something new.

This will be a "slow sewing" project, taking my time to explore the new technique and I also want to line the pants, which is also something that needs careful planning. Tomorrow the normal routine will be back, after two irregular weeks, which for me means less time for sewing too, and work will take (a lot) more of my time.