After the test post (thank you for your input, I'm debating/considering options) let's get back to sewing.
A while ago I learned about a great, yet simple technique to avoid the little pucker at the end of an invisible zipper. I insert my zipper this way all the time. Though the trick is at the last step of inserting the zipper, I include all steps I do for inserting a zipper.
Disclaimer: as always when I do a tutorial, there are more ways to do it, this is just my take on it.
Step 1 - preparation
- Apply a strip of non-stretch interfacing where you insert the zipper, at least it should not stretch in the length of the zipper.
- Finish the edges
- Do NOT sew the seam under the zipper
Step 2 - inserting the zipper
If you haven't inserted such an invisible zipper often, it's a good idea to visualise how the zipper has to be positioned.
- Open the zipper and fold it over so that the front of the tape is on the right side of the fabric.
- Pin the tape to the fabric (and baste if you want to match stripes/plaids or have slippery fabric)
- Stitch with a special foot for invisible zippers. I love my Bernina foot for this, but use the foot suitable for your machine.

- Stitch as far as you can, till the slider is in the way.
- Make a few back stitches to finish.
- Fold over and pin and stitch the other side of the zipper tape in the same way, again till the slider stops you (for me that always makes the stitching end at the same spot).
Step 3 - finishing the seam
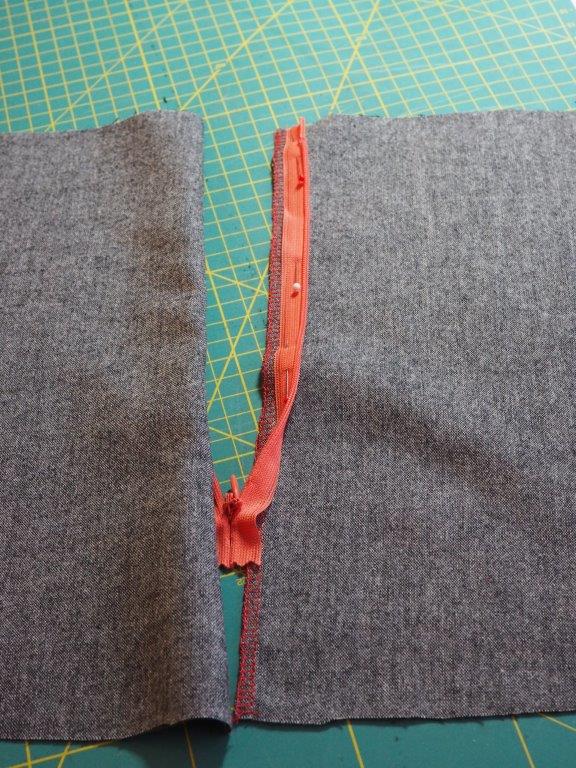
The trick not to get a pucker at the end is not matching the stitching lines. Leave 1 or 2 mm in between the stitch of the seam line and the stitch line of the zipper.
s
Below three photos of the result , first without pressing and then after pressing.


Yes, that is how I do it too. I learnt it from the Palmer & Pletsch fit for real people book.
ReplyDeleteGood to know it’s in that book too. I have it but didn’t use it in a long time.
DeleteThank you, this is very helpful.
ReplyDeleteThank you for the tip.
ReplyDeleteThis is the method shown in the directions that came with the invisible zippers I used to buy when they first came out. I always wondered how the zipper could hang properly when the seams didn't match up, but they always did somehow. Then, as I got to be a more proficient sewist, and began ordering zippers in bulk without packaging, I started making a concerted effort to MAKE those stitch lines line up. My results were no better, in fact they were worse! Thank you for explaining that I should have continued to use the "imprecise" technique all along.
ReplyDeleteHow strange it was once a default method and then almost forgotten. Thank you for sharing your story. I never had the zippers with those instructions, but did indeed try to match the stitch lines, with often mediocre or bad results.
DeleteThank you for showing this. I always try to make the seam lines flow into each other. I'm glad you showed that it is better to have them neither touch nor align. I will try this next time. Do you have any tips for having the top of the zipper end smoothly at the back of the neck on a dress? I usually end up with a little curve or lump at the top of the zip where I haven't managed the top of the zipper right.
ReplyDeleteI’ll try to do a few photos of how I do that. I thought I had done it before but apparently not.
DeleteDo you move the main seam 1-2mm deeper into the seam allowance? I just wanted to be clear. Thanks for your help.
ReplyDeleteAs you say, the main seam joining to the zipper is the problem.