Tuesday, December 31, 2013

Last post of 2013

I can’t join the ‘sewing top 5’ meme that’s going around in blogland as I haven’t sewn much more than 5 garments this year (not counting the many muslins!). My blogging was very irregular and commenting on other blogs even more lacking. Somehow it just didn’t work this year. Which may sound as a negative, but it was not a bad year for me personally, after a very difficult 2012 I can say I am looking at life much more positive now and I feel more balanced mentally. 

The work/free time balance is not good yet and I do hope to improve that in 2014, with more time for sewing as well, my closet shows a few gaps. I have bought a lot of new patterns and fabric in the past year which are waiting to be tried and sewn. I’d also like to sew a few exercise garments, as I’ve started running. I’m doing this “couch to 5K” program and have reached the 5th week. I was going to the gym regularly, but never was into running. I must say it’s quite a different way to start your day. I do like it! Mellissa’s new pattern for leggings got my attention. Love the lines of it and it gets positive reviews from the testers. I saw StyleArc having a few nice patterns too.

Talking about StyleArc: I think I will order their motocycle jacket pattern. After seeing Dilliander’s review I think that the lines of this jacket might suit my needs/wants better. So the jacket is postponed for now. After 3 muslins I still wasn’t happy with the result. To me that meant a stop and thinking about what to do next.

For now I thank you all for reading and writing comments on my blog and is wish you all


A VERY HAPPY 2014

Monday, December 30, 2013

Intrigueing pattern design video’s

Not claiming to have found this, I just saw a link to these video’s on Pattern Review and thought it worthwhile to share:

http://www.youtube.com/user/trpattern?feature=watch

image


image image

Lots of techniques for (special) pattern drafting. Some look similar to Pattern Magic patterns I have seen. I won’t be making anything like this soon, but think I can learn quite a bit watching a couple of these video’s.

Sunday, December 22, 2013

Jacket muslin no 3

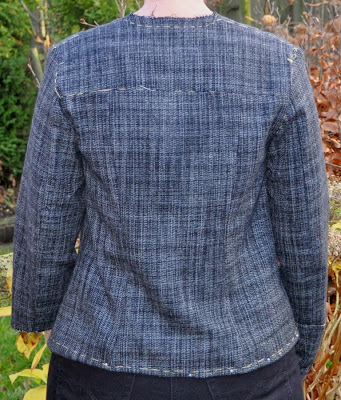
Let’s just say I’m getting somewhere. Not perfect yet but better? To compare the photos of my first muslin (not completely fair comparison without sleeves) with the last one. Nancy was right in her comment that shoulderpads would help too, I couldn’t find any, they’re hiding and I will find them probably the moment I bought new ones. I’m sure I have them somewhere.
This last muslin is not the January Burda jacket but a pattern form the September 2004 issue. It has the same collar style as the KwikSew one. I did not cut it yet as I was hoping that this might end up in a wearable jacket and wanted to save the fabric.
I did the same as in the previous muslin: size 36 in the back, 42 in the front with an added fba. After trying it on with one sleeve attached I noticed the sleeve was too narrow to my liking and for the next one I gave some extra width. Felt much better. On the left sleeve I took an extra centimeter of the shoulder width, not very visible in the photo.
On the sides and back I let out the hems.
Should I:
  • do a bit more fitting in the waist? Not too much as that is not what the style needs? Now it still seems a bit too boxy for me, especially in the front
  • do a sway back adjustment?
  • a new one: a forward shoulder adjustment?
  • any other suggestions?


Friday, December 20, 2013

Another testgarment, wearable

Working on the muslins is good as it will hopefully result in one or more patterns that I can make to well fitting jackets.This week I was game for sewing something that I could actually wear. Not another jacket muslin.

When I sewed the MakeBra DL01 last October (bra with foam cups covered with lace) I wondered whether the pattern would work too without the foam but with non-stretch lace. As I made sure the foam did not stretch any more, it was logical  that this might be a good possibility. Foam doesn’t take that much space in the cup. So here’s my wearable testgarment from a remnant piece of lace and firm lycra that was a gift from my sewing friend Hilde (thank you again!).

BTW, there is a lovely bra from this pattern on the MakeBra site now in white: here.

The lace I used was not symmetrical and I tried matching the center piece of the flowers. What I did not see until after construction of the cups is that I should have matched the scallops of the lace better. Now the left side has less scallop points because of the way the seam intersects. The center front has one side with point of the scallop, one side without. It’s the sort of things that bug me a little, it won’t keep me from wearing it. I’m the only one to notice it anyway.

If you have read my blog for a while you will know that I sew bra’s very regularly, and this time the wire chanelling was driving me nuts. I topstitched 4 times (!!!) and had to unpick because the wire couldn’t pass through. This happens sometimes, it will look perfect on the outside, but on the inside the chanelling has shifted and is too narrow. But as far as I can remember I have never done it four times. A little miracle I did not make a hole in the lycra using my seam ripper. My eyes did not like it, that’s for sure. Unpicking black in the evening :(

The result is very satisfactory and fits well. A very wearable muslin.

Monday, December 16, 2013

Muslins - continued

First I”d like to thank those who commented on my previous posts for all their thoughts on the fitting of my jacket, suggestions and willingness to look things up for me. It’s so nice of you. I do have a few fitting books and will consider buying the Craftsy course mentioned, but will first finish watching the two classes I have on fitting for the bust and back area.

Carmen, I definitely would like to do the experiment and after Christmas suits me fine, it’s quite busy with me as well now.

For the next muslin I looked for a Burda pattern with a high neckline, as I thought that would give me a better idea of the fit in the neck/shoulder area.

image

It’s from an old issue, December 2006, no 116.

I did not sew the sleeve cuffs or waist band, which makes both the sleeves and body a bit short. That’s not important for the issue I’m working on though.

The real issue: what sizes did I use and what other changes did I make. My measurements are all over the size chart of Burda, no consistency there. I used a size 42 for the front, 36 for the back (thinking 34 would be very small) and used 36 in the neckline/shoulder area too. There I see a huge improvement, the neckline fits well.

For the front I tapered from 36 at the shoulder down to 42 at the side AND did an FBA of 1.5 cm. In this Marianne was right to observe that if the average size is 42 and the back is a small 34/36, the front needs more room. For the sleeves I traced 36 at the back and did the same tapering to size 42 at the front of the sleeve.

I lenghtened the body with 3 centimeters above the waist and the sleeves with 2 centimeter. These are changes that I already did with Burda patterns. The back is not perfect yet but gets closer to being a good fit. It all feels a bit snug. 

What I see is that I need a bit more length in the back. I’m afraid that if I take out more from the back width I can’t move my arms any more.

Next step? Tracing the moto jacket from January’s Burda that I bought last Saturday. I’m a little tired of making muslins but think it’s the only way to learn and tackle this fitting issue. This jacket will be sewn too I think, it’s nice as well and now I’ve muslined it already, it will/should be easier?

Tuesday, December 10, 2013

Food for thought

My experience with the two jacket muslins and the reactions in the comments have given me some food for thought on what I want to make and on the sizing issue. Carmen gave some in depth reaction about the fit in the back. She gave constructive criticism in a kind way, which I highly appreciated. Thank you Carmen.
About the style: I like the general style of the KwikSew pattern better, but agree fully that it is too boxy for me. A more fitted style will be better. The lines in the back of the second muslin are better, because they can be changed more easily than the KwikSew pattern, which only has a center back seam. Also I think that the classic motorcycle collar is to be preferred, though I like the collar in the second muslin too. Not for the fabric I plan to use though.
It will mean some mix and match.

And I’ve spent a lot of thoughts on the fit. Carmen said that if there was a problem with fit in my garments, usually the back is too large. I do remember having had a similar comment earlier and I had some issues in the back fitting department with the grey jacket I made this summer. There is a problem in the back more often now I look at it with different eyes. Tonight I compared my measurements taken a few months ago (and not changed significantly I think) with Burda’s size chart. In the past years I learned to look at the bust measurement that corresponds with my high bust measurement and do an fba. Often not giving the result I want. Burda gives a lot of other measurements too that other companies do not provide. The back width is one of them.

Now I checked my back width with the charts and to my great surprise my back width corresponds with a Burda size 34 (US 8), my full bust measurement is between 42 and 44!! In all my sewing life I simply never registered these measurements as being so different. Of course I know my back is narrow and I don’t have the average cup size. Just never thought of having a size 34 anywhere in my body (I'm tall and not skinny). I mostly use a size 40 for tops/jackets.  Which explains why the back of my garments is too large. The big question now is how to proceed if I want to make the back fitting better. Is it starting with a smaller size and doing a larger fba. Or is it using the size I’ve done till now and making it smaller in the back? I'm not (yet) ready for starting pattern drafting from scratch.

A few muslins to go, that’s for sure…

Saturday, December 7, 2013

Can’t decide

I find it very difficult to decide what pattern to use. The Kwik Sew jacket is very boxy and the size I used definitely is too large in some areas. Linda a special thanks for your comment on their sizing and your experience with KS patterns.

Therefor I decided to try another pattern, this time a Knip Mode pattern from the January 2013 issue. With its princess seams both in the front and the back this pattern is easier to change than the KS pattern.

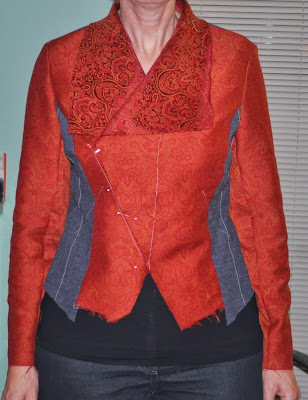
The fit in the back is better than the first one, the style less boxy which is good for me. But a pattern fitting right away…. no, of course not ;)

On the front a bit more ease is needed at bust height. The back might be ok in the firmer fabric that I plan to use, just a little extra at the hem line. The center front pattern pieced were cut without hem allowances. I prefer the longer length of the side and back part, so will have to add length to the pattern pieces.


As you can see clearly the sleeves need improvement. I can’t lift my arm properly and the pleat too tells that changes are needed. I changed the one piece sleeve from the pattern to a two piece sleeve from another Knip Mode jacket’. I kept the circumference of the sleeve and the line of the top of the sleeve. Will check the fitting books on how to solve this.

Apart from the issue with the sleeve I can’t decide whether I prefer this collar to the more classic motorcycle jacket collar. Any thoughts to share?

Monday, December 2, 2013

Inspiration Monday

I used to have a slideshow in my sidebar with photos from rtw that I found inspirational. In one of the blog layout changes that was lost and I never set it up again. Thought it might be nice to occassionally share a “find”  with you. It’s not intended as a “to do” list for me, it’s inspiration and more like a virtual bulletin/moodboard.
Here’s a coat from Mural that I saw on Nordstrom’s website.I recently saw a coat like this in a shop and remember having seen one on a blog quite a while ago, only no idea where. Thanks to Lin3arossa I now know where: Tany!
I like the angle of the zipper on this variation.
Van Inspiratie General


Sunday, December 1, 2013

Jackets

Excuse the face,not the most favorable photo, but the best one of the jacket. Also the photo’s of ponte  material show every little thing. which makes me (again) not so happy about the result in the photo, while the real life jacket is quite nice.  I don’t like the combination with the skirt as it accentuates my waist/hip difference too much. I will probably wear it more with a pair of jeans or trousers.


On the inside I used Liberty bias tape that I bought in Paris last year. I never finished a jacket in this way before. It’s a nice detail.

In the meantime I started working on a muslin for a motorcycle jacket for which I plan to use this fabric I bought in New York recently.


When browsing the internet for inspiration on motorcycle jackets I found this one (throughs Shams Pinterest board). Only saw it after I bought the fabric, and it confirms my idea that it’s an interesting combination this fabric and a motorcycle style.

image

image 

I started with a size Medium for the KwikSew pattern, which is too large in the back. Also the shoulders look a bit wide, Before I sew the sleeves on this muslin I will change the shoulder line and the upper part of the sleeve to a size small. I don’t have a lot experiences with KwikSew patterns so I was quite unsure about the size to choose.

I think I need a little more space at the hip and much less in the wais area. There is a bit of tweaking to be done on this pattern for me as I would like the more fitted look of the jacket above.

And then I hear that January Burda will have a pattern for a motorcycle jacket (thanks Clare), A preview of the issue is published on a Russian blog.I think the second zipper is only decoration, but it looks great. If my changes don’t work I can always wait for this issue (will have to wait till the end of December then).


image 

Perhaps I should use another pattern for a jacket (with a more fitte shape) and incorporate the motorcycle collar in it. What would you do? I love to hear your thoughts on it.

Wednesday, November 20, 2013

This pattern has 200 reviews

Simplicity 4076 needs no introduction. As stated in the title the pattern has 200 reviews on Pattern Review, so I certainly won’t add one. There is nothing more to be said. I’ve had the pattern in my pattern stash for a long time and have made it for the first time. I narrowed the sleeve hem, as the pattern has wide sleeves. A quick project that only took me a (short) evening.

The fabric is not bought by me. I got it this weekend in an ‘ugly fabric swap’. This is the third time a group of European ladies came together to sew. Most of us first met in Brussels a few years ago in a PR weekend, some of us prior to that in Paris and some came through the group a bit later, but it feels like we’ve all know each other for a long time now. It’s such fun!
When we meet we usually have this ugly fabric swap and sometimes it’s really ugly and you will not use the fabric for something other then muslin. This time I thought the fabric I ended up with was not too bad at all. I would probably not have chosen it myself but I like the result.
We also said we should make something from the fabric before our next meet-up, think I’m fast enough for that ;-).

I finished the purple jacket during the weekend. Not much else done because of a cold that held me down a bit. Photos of the jacket will have to wait till an opportunity to take photos in daylight.

Saturday, November 2, 2013

A second time

I don’t often make patterns with special details twice for the obvious reason that when it’s that special, one item is enough in the closet. I’m making an exception for this jacket that I made this summer.

I like the style very much and have worn it regularly. Recently I bought a deep purple ponte with the intention to make a jacket, but I didn’t exactly know which pattern I wanted to use. I came around this pattern and thought that as I had invested so much time in making the pattern and liking the result so much, it was worth another one in a winter color. So that’s what I started with. I’ll share a few photos of the process.

The back has a ‘back stay’ from silk organza. As all seams are shaped it wasn’t easy to make a stay in one piece and instead of making a stay with seams I used the silk organza as extra layer in the back pieces. Perhaps not the right way to do it, hope it works.

All front pieces are interfaced. I don’t interface the seam allowances for two reasons: reducing bulk is the main reason, the other that it costs a lot of extra fabric to cut with seam allowances.

The front, the picture is made a bit lighter to show the details. It really is a very dark purple that looks almost black in the photos.

This was good progress the last two days. It will take a few more days with sewing time to complete and I’m hopeful that I’ll have enough time to complete it within a week.

Wednesday, October 30, 2013

Cups with padding and lace

In the past months I’ve done a few workshops at Kantje Boord, working with cups with padding. My initial thought was that I didn’t want a padded bra, thinking a bra like this would make me look even more full. I do have enough fullness of my own ;) I found out though, that the preformed or cups with padding didn’t necessarily make me look more busty, they provided good support and nice shaping without adding to the fullness. A new area of bra making to be explored…
Below the description of how I constructed the cups for my last bra. I have gone up one size in this pattern. Instead of 75DD I now made a 75F. I had to take away a bit under the arm (bottom right of picture below), which in my case was just comparing with bra’s that I like and have sewn before.
Because I wanted to use the scallop of the lace, I had to straighten the cup pattern pieces. In the picture you can see the (pink) lines I used.


The bra strap is too long for my liking, I changed it like this and added a seam allowance. The MakeBra instructions use foldover elastic everywhere and I wanted to use ‘normal’ lingerie elastic on most of the bra. Thus I needed a seam allowance here.

A rectangular piece of padding is cut, enought for all the cup pieces. Remember you have to cut a mirror image as well!


The padding is covered with lycra (you could also use cotton, but I wanted the same color as for the side/back part because of the mesh lace that covers all. If you have padding in a matching color, you can omit this step, though it also gives more stability to the padding, which I like).
To cover the padding with lycra I used Vliesofix (or bondaweb). This has an adhesive layer on both sides and you iron it to the padding (think steam-a-seam but then on a roll)
In this picture the vliesofix is on the bottom of the padding, but it should be on top of the padding when ironing, with the adhesive layer to the padding and the paper on top.

Iron it with an iron on medium setting without steam.
When it has cooled down, remove the paper layer. The second adhesive layer is now visible.

Put the lycra on top and iron it to the padding using a pressing cloth!! It took a bit longer for the lycra to adhere to the padding.
The padding and lycra are now one layer to be worked as one.

The cup parts are cut.

Sew them together with a wide zigzag stitch, making sure that the beginning and end of each seam are well stitched.
All edges are thinned to remove bulk and to make applying foldover elastic at the top of the cup easier. Just put a sharp pointed scissor between the layers and cut, be careful not to cut through the fabric of the padding or lycra.


Fold over elastic is sewn to the top.


And the mesh lace cup is sewn. This is a very think layer that is then put over the cup of padding.I used a small zigzag stitch to attach it.

Then I pressed shape in the cup, using a styropor foam ball, a press cloth and a bit of ironing spray. The press cloth is important, risking melting the fabric is no good!

I made a stable side to my styropor ball.

The difference before and after pressing. It’s even more clear after the cup is attached to the band and the wires are in.


Construction of side/back and closing was nothing new. Here are pictures of the result.


And just for fun: the mesh fabric on two different colors, a huge difference!

Hope this was helpful.