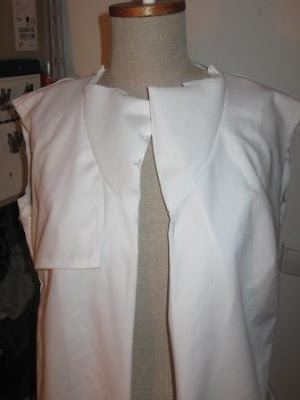
Not going as fast as I had hoped, but making progress. As you can see in the picture on the left the collar is constructed different from a usual notched collar (not pressed yet). In most notched collars there is no seamline from the center front and the facing is a separate pattern piece.
This is not the case in this pattern. The facing is cut with the front pattern part, and the lower part of the notched collar is a separate pattern piece. BWOF instructions are different from the way I constructed this, as I wanted to make the notched collar in the same way as I did in the red jacket.
The 2,5 dot that is given as level of difficulty is a bit optimistic.
This is what I did:
 | Stitched exactly from bottom corner to point wherer upper collar will be attached (this point is marked on the pattern) |
 | Clip the foldline of the front facing to the seamline. In the picture you can see the markings of the tracing paper I used to mark the fabric. |
 | Pin the lower part of the collar to the front and facing. Stitch from the upper notch on the pattern on the front, pivot at the clipped corner and stitch to the upper notch on the facing. |
 | |
 | Corner after stitching. |
 | Trim and turn. I did not yet press the collar |
 | Ready to insert the upper part of the collar. |
I am looking forward to seeing this finished. Thanks for the great instructions.
ReplyDeleteLooks like it's coming along nicely, Can't wait to see the finished blouse!
ReplyDeleteThanks for the detailed photos! I made mine a la Burda and hate the way it turned out. When I feel patient, I think I'll pick it apart and redo the collar and lapels using your instructions. Mine does not meet the front fold correctly...not sure why. I love the style and the fabric I'm using, so it is worth redoing at least once!
ReplyDeleteYours looks like it will be perfect!
Lynda
Nice to see progress!
ReplyDeleteThanks for the great instructions&pictures!
ReplyDelete