Showing posts with label BurdaStyle. Show all posts

Wednesday, November 30, 2022

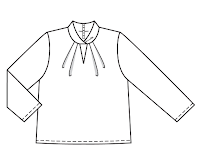
Blouse from October Burda

Thank you for the nice comments on my posts! I'm having trouble commenting on blogger, even on my own blog at the moment, so therefor a general thank you and no reaction in the comment section itself. Hope I can find the problem and solve this, as apart from posting myself again, I also started to read other blogs again and would like to be able to comment. 

My most recent make is this Burda blouse from the October 2022 issue. Being a lover of special necklines, this immediately got my attention and ended high on my "to sew" list. 


The fabric is a viscose from Atelier Brunette, with good drape and easy to sew. I bought it last year in a fabric shop in Denmark, it's a holiday souvenir. 
I didn't like the sleeves had no cuffs, so I added those. 
If you made Burdastyle magazine patterns, you know that the instructions are not very detailed and more an order of construction (unless it's the pattern of the month, which this wasn't). As the neckline is not your everyday neckline, I did read the instructions! They  have you put on the collar first, attach it to the inside and only then add the zipper at center back. Which is not very neat in my opinion. Or I have understood it wrong ;).

I followed the first steps: sew the center of the collar, clip and turn and sew one side of the collar to the body. As the next step I inserted the zipper, so that when turning the collar, the top of the zipper is wrapped neatly inside. As last step the inside of the collar was handstitched to the neckline.


When there is no band to be attached above the zipper, I don't sew the start of the zipper tape, where there are no zipper teeth. In that way you can more easily fold the end out of the way and the fold of the fabric is more smooth.


Thursday, December 5, 2019

A pair of trousers, Burdastyle September 2019

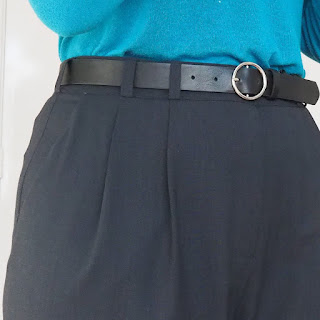
This is my second pair of trousers made from the BurdaStyle September 2019 issue. The first pair was made during the sewing week I enjoyed with my friends in October and as the fit was so good, I decided to make another pair.


A few notes on the pattern and the changes I did:

  • the pattern is for tall people and while I'm not 1.76 (the lenght the tall patterns are drafted for) I'm closer to that than to the average length of 1.68 of their regular patterns. I chose the size by waist circumference, hoping the pleats would give the extra room at hip height. Without any other changes, it was a miraculously good fit.
  • in the magazine 2 variations are shown, one with the pleats folded to the center front, one with the pleats folding to the sides.
    On my first pair, I hadn't noticed this, nor read the instructions and had folded the pleats to the side because that's more common. Sewing on auto-pilot. Though fine, I preferred the pleats to be a bit more away from the center, so I moved the pleats 1.5 cm to the side on my second pair. The photos are of the pair with this change.
  • Earlier this year I made a pair of trousers from the March issue, which had a slightly curved pocket opening which didn't gape. So I used that slight curve here too.
    When sewing the pocket, I used a strip of silk organza to take out any stretch.
  • I made the legs a normal length and didn't add cuffs.
  • Almost forgot: changed the straight waistband to a curved one. Straight waistbands don’t suit me. It’s not difficult to draft a new one, but I made my life easy when I was amongst my sewing friends. One of the ladies had just traced a pattern with a curved waistband. I made a copy, adjusted a bit on the length for my pattern and that was it. The happiness of sewing friends!


In my opinion a little basting helps to get a better result.


I know there are still pleats in the back, it's different with every move. I think I can't get it much better than this.


Sunday, November 3, 2019

Jacket finished


The jacket is fnished. As so often there is a bit room for improvement on fit (the back mostly), in general I'm pretty satisfied though. I have to think about styling this. Because of the fabric I used it's more formal. A nice scarf would loosen the look a bit. Any thoughts?
And I love a special lining!
 I'll let the photo's do the talking:


Tuesday, October 29, 2019

Constructions - part 2

Some further construction details for the jacket. I think a lot of how a jacket looks when it's finished depends on the details on the inside. Bulk reduction, mentioned in my previous post too, is part of that.
Most of the corners of seams are therefor cut at an angle.


The seam of the facing is graded. The facing is cut shorter than the front pattern piece. In general the seam allowance that is closest to the outside of the garment is longer.
For the corner at the hem I cut back as in the following picture.

I folded the corner in the direction of the facing and gave the point a good press (only the point!). After that press I unfold the corner, cut away the facing at an angle, fold again and turn. While turning I keep hold of the folded edge.


The armhole seam is trimmed to 1 cm at the upper part, only half a centimeter at the lower part. Mostly this is 2/3 and 1/3 of the height. In this case I cut the side panels to a smaller seam allowance.

For the sleeves I use a sleevehead and shoulderpads. The smallest shoulderpads that I can find (in height), as they are not used for getting height or width (the 80's are a long time ago), but just to give the shoulder area and the top of the sleeve a bit more support.
Sleeveheads are never mentioned in Burda instructions, nor were the shoulderpads part of the construction for this jacket. I just prefer to use them anyway.


The sleeve head is attached on the inside of the sleeve. I use basting thread, very close to the seam. On a tailoring course I once took I learned that basting thread was often used on the inside, because it's not slippery.

I'm close to finishing. Hemming still to be done and of course the lining. Hopefully sometime this week.

Saturday, October 26, 2019

Construction - part 1

The closure for the jacket is in the waist seam line. This means you define the width of the buttonhole at a very early stage of construction, so it's important to know which button you use.
Though my button stash is limited (I don't stash buttons, most of what I have are taken from garments that were at the end of their life cycle) I still have four options. The good think about them is that they are all the same size.

The picture doesn't show the fabric too well, it has black, brown and dark blue in it.
Burda magazine did use a smaller button. I measured with one of my buttons and the green line in the second picture defines the new buttonhole length. The red marks are the original pattern marks.
Another thing to check when using a larger button is to make sure the button will not go over the edge when finished. That was ok with my buttons.


Reducing bulk

The pleat in the front is sewn and folded down. Burda gives no instruction how to handle the bulk that as a consequence is in the waist seam line. the inner part of the pleat is in the way of the buttonhole. 
My solution was to cut away part of the fold and zigzag the edge. After sewing the waistline seam I held it in place by a catch stitch. Not the most beautiful hand stitching, but it works and will never be seen. 

After this I sewed the shoulder and side seams and could put it on to see the fit. I think it's promising to be good. Too dark to take photos, especially as the fabric is rather dark.

Friday, October 25, 2019

A jacket - Burda August 2019

Change of plan, instead of showing recent makes, I'm documenting the making of a jacket, to share and for my own future reference.
The pattern is jacket number 113 from August Burda. A lovely design that I planned to make since I saw it. It's been quite a long time ago that I made a jacket and I really felt an urge to make one.


Pattern tracing and changes

  • I traced a size 40 at the upper body, grading out to size 44 at hip height.
  • Added 3 cm to the upper body pattern pieces (default change for me).
  • Sleeve length looks fine, no initial change. Decision will be taken later.
  • Did an FBA to the front and side panel.
  • Compared the pattern pieces to my sloper. Looks fine but a bit more ease might be better, so I cut with wider side seams.

Preparing the pattern pieces

As always, I'm not following Burda instructions and doing things my way. That is, the way I learned from several real life or online teachers and books over the years. 
  • The front pattern pieces were interfaced with a heavier fusible interfacing. The area for the pleat was cut out. I think it will make the pleat less stiff, but it's a "call of judgement" that I'm not sure of.
  • The side panel has an extra layer at the top.
  • The back pattern pieces have a light weight interfacing. Both the center back pattern as the side have extra interfacing at the top.
  • On the front I've added a shoulder shield, to prevent a dip of fabric in that area

You may notice there are pencil lines on all pattern pieces. Those are the seam lines and notches. In this fabric and with the interfacing on top these lines won't be visible on the outside. So I didn't bother with tracing paper or wash-away pens.  As always I prefer to work with actual seam lines over default seam allowances.


Shoulder shield

This article in Threads magazine discusses the (inner) construction of an Armani jacket. It might have been the first time I read about a shoulder shield. Later I saw it used in a Craftsy (now Bluprint) class by Alison Smith. I've used it in many jackets since. 
The canvas is cut without seam allowance and 2-3 mm inside the seam at the front/neckline in this case. A fusible interfacing is cut that is slightly larger at the shoulder seam, the armhole seam and front, but does not cover the whole canvas at the bottom. Fusing this over the canvas makes the canvas stay put.


This preparation took quite some time. I hope construction will go smoothly.