Saturday, January 11, 2014

StyleArc – Marni jacket

Next up is another StyleArc jacket: the Marni jacket. also a pattern that I bought last year and hadn’t sewn up. I had made a muslin for the bodice, that I remembered but that was as far as I got. Pleasant surprise when I took out the pattern from my stash: I had already altered the pattern and did an fba on the front, which I had completely forgotten. It made life easier now, as I could directly start and cut the fabric.

It’s drafted very good, I made only one change: I added a back neck facing. In hindsight I should have added that to the Marie jacket too which is also a variation on a shawl collar. It was a long time since I made a shawl collar and with the Marie jacket I felt that it was difficult to finish neatly in the back neck area. Starting this jacket I took out the Vogue sewing book to lookup the instructions for a shawl collar and immediately saw that the problem was not having a back facing. Easy to add:

Mark the depth of the facing and mark the facing of the front in the shoulder seam. At the center back make the line a short line in a 90 degree angle to the center back.

Draft a smooth line from shoulder to center back seam.

Sew the shawl collar using this facing piece. Instructions can be found in most sewing books or google “sewing shawl collar”.

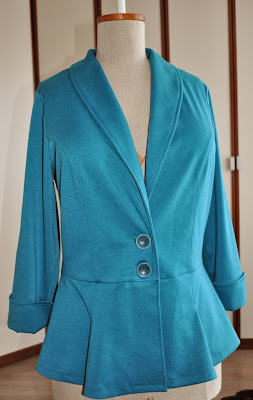
The result, I also played with the alphabet of my new (!) machine. More on that machine when I know it better.

During construction I understitched most of the collar.

Trimmed the corners of the cuff to prevent bulk.

And made it a bit smaller in the waist after the first fitting. Contrary to the instructions I interfaced half of the cuffs too. That’s the only minor detail that didn’t work so well: the cuff has a split and has to be turned up to get the effect of the line drawings 3/4 length sleeve.  That made the split stand out strangely. I solved it with tacking it together with a few hand stitches. no big deal. Do you think the cuffs were intended to turned up when you see the line drawing?

For now only dressform photos, I added bra cups but on the left side it’s sticking out a bit weird, of course I only saw the when I opened them on the computer.

I’ll show the jacket when I finished the skirt, this is the fabric for it. Will be a very simple pencil skirt. It has a bit of the color of the jacket in it.

Friday, January 3, 2014

StyleArc – Marie jacket

The first finished project for 2014 is a StyleArc pattern. I bought the pattern months ago and never got to making it. After my muslins and deciding to wait for the Ziggi motocycle jacket pattern I thought it was time to make this one up. Especially when I found this fabric in my stash (when looking for something else). I had totally forgotten about this fabric, think I bought it in New York in my 2010 trip, but not very sure.

The burn test showed me it is wool, it has mechanical stretch (the way it’s woven, the yarn has no stretch). I was fed up making muslins and took my chances (I did measure the pattern pieces). The yardage I had was not enough. After a little disappointment in that, I decided to continue and cut the upper side part off-grain. I also copied the front pattern and made it into two separate pieces. One part I cut from the fashion fabric, the other from lining. I also cut the back on the fold and the yoke with a seam. It was the only way to make this work with the amount of fabric I had.

I’m very happy with the result. It was greeted most enthousiastically by DD, who would like it for herself as well. Pity StyleArc patterns come in one size only.

Quite a windy afternoon, by now it’s pitch dark here and a thunderstorm is passing by.

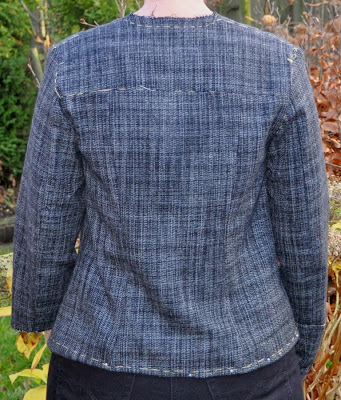
In this photo you can see that the side seam is much more slanted than the line drawing suggests. I like it this time, but have been disappointed with the difference in line drawing and reality with this pattern company in another pattern.

The inside with the lining. Originally this should be one pattern piece, no lining involved.

The back is more flared than I thought it was. Perfect for my shape. I did add a few centimeters to the front side seam, but that’s all I changed in that area. The only other change I made was adding 2 cm to the sleeve length. No changes to the length, its style is quite long.

Tuesday, December 31, 2013

Last post of 2013

I can’t join the ‘sewing top 5’ meme that’s going around in blogland as I haven’t sewn much more than 5 garments this year (not counting the many muslins!). My blogging was very irregular and commenting on other blogs even more lacking. Somehow it just didn’t work this year. Which may sound as a negative, but it was not a bad year for me personally, after a very difficult 2012 I can say I am looking at life much more positive now and I feel more balanced mentally. 

The work/free time balance is not good yet and I do hope to improve that in 2014, with more time for sewing as well, my closet shows a few gaps. I have bought a lot of new patterns and fabric in the past year which are waiting to be tried and sewn. I’d also like to sew a few exercise garments, as I’ve started running. I’m doing this “couch to 5K” program and have reached the 5th week. I was going to the gym regularly, but never was into running. I must say it’s quite a different way to start your day. I do like it! Mellissa’s new pattern for leggings got my attention. Love the lines of it and it gets positive reviews from the testers. I saw StyleArc having a few nice patterns too.

Talking about StyleArc: I think I will order their motocycle jacket pattern. After seeing Dilliander’s review I think that the lines of this jacket might suit my needs/wants better. So the jacket is postponed for now. After 3 muslins I still wasn’t happy with the result. To me that meant a stop and thinking about what to do next.

For now I thank you all for reading and writing comments on my blog and is wish you all


A VERY HAPPY 2014

Monday, December 30, 2013

Intrigueing pattern design video’s

Not claiming to have found this, I just saw a link to these video’s on Pattern Review and thought it worthwhile to share:

http://www.youtube.com/user/trpattern?feature=watch

image


image image

Lots of techniques for (special) pattern drafting. Some look similar to Pattern Magic patterns I have seen. I won’t be making anything like this soon, but think I can learn quite a bit watching a couple of these video’s.

Sunday, December 22, 2013

Jacket muslin no 3

Let’s just say I’m getting somewhere. Not perfect yet but better? To compare the photos of my first muslin (not completely fair comparison without sleeves) with the last one. Nancy was right in her comment that shoulderpads would help too, I couldn’t find any, they’re hiding and I will find them probably the moment I bought new ones. I’m sure I have them somewhere.
This last muslin is not the January Burda jacket but a pattern form the September 2004 issue. It has the same collar style as the KwikSew one. I did not cut it yet as I was hoping that this might end up in a wearable jacket and wanted to save the fabric.
I did the same as in the previous muslin: size 36 in the back, 42 in the front with an added fba. After trying it on with one sleeve attached I noticed the sleeve was too narrow to my liking and for the next one I gave some extra width. Felt much better. On the left sleeve I took an extra centimeter of the shoulder width, not very visible in the photo.
On the sides and back I let out the hems.
Should I:
  • do a bit more fitting in the waist? Not too much as that is not what the style needs? Now it still seems a bit too boxy for me, especially in the front
  • do a sway back adjustment?
  • a new one: a forward shoulder adjustment?
  • any other suggestions?


Friday, December 20, 2013

Another testgarment, wearable

Working on the muslins is good as it will hopefully result in one or more patterns that I can make to well fitting jackets.This week I was game for sewing something that I could actually wear. Not another jacket muslin.

When I sewed the MakeBra DL01 last October (bra with foam cups covered with lace) I wondered whether the pattern would work too without the foam but with non-stretch lace. As I made sure the foam did not stretch any more, it was logical  that this might be a good possibility. Foam doesn’t take that much space in the cup. So here’s my wearable testgarment from a remnant piece of lace and firm lycra that was a gift from my sewing friend Hilde (thank you again!).

BTW, there is a lovely bra from this pattern on the MakeBra site now in white: here.

The lace I used was not symmetrical and I tried matching the center piece of the flowers. What I did not see until after construction of the cups is that I should have matched the scallops of the lace better. Now the left side has less scallop points because of the way the seam intersects. The center front has one side with point of the scallop, one side without. It’s the sort of things that bug me a little, it won’t keep me from wearing it. I’m the only one to notice it anyway.

If you have read my blog for a while you will know that I sew bra’s very regularly, and this time the wire chanelling was driving me nuts. I topstitched 4 times (!!!) and had to unpick because the wire couldn’t pass through. This happens sometimes, it will look perfect on the outside, but on the inside the chanelling has shifted and is too narrow. But as far as I can remember I have never done it four times. A little miracle I did not make a hole in the lycra using my seam ripper. My eyes did not like it, that’s for sure. Unpicking black in the evening :(

The result is very satisfactory and fits well. A very wearable muslin.

Monday, December 16, 2013

Muslins - continued

First I”d like to thank those who commented on my previous posts for all their thoughts on the fitting of my jacket, suggestions and willingness to look things up for me. It’s so nice of you. I do have a few fitting books and will consider buying the Craftsy course mentioned, but will first finish watching the two classes I have on fitting for the bust and back area.

Carmen, I definitely would like to do the experiment and after Christmas suits me fine, it’s quite busy with me as well now.

For the next muslin I looked for a Burda pattern with a high neckline, as I thought that would give me a better idea of the fit in the neck/shoulder area.

image

It’s from an old issue, December 2006, no 116.

I did not sew the sleeve cuffs or waist band, which makes both the sleeves and body a bit short. That’s not important for the issue I’m working on though.

The real issue: what sizes did I use and what other changes did I make. My measurements are all over the size chart of Burda, no consistency there. I used a size 42 for the front, 36 for the back (thinking 34 would be very small) and used 36 in the neckline/shoulder area too. There I see a huge improvement, the neckline fits well.

For the front I tapered from 36 at the shoulder down to 42 at the side AND did an FBA of 1.5 cm. In this Marianne was right to observe that if the average size is 42 and the back is a small 34/36, the front needs more room. For the sleeves I traced 36 at the back and did the same tapering to size 42 at the front of the sleeve.

I lenghtened the body with 3 centimeters above the waist and the sleeves with 2 centimeter. These are changes that I already did with Burda patterns. The back is not perfect yet but gets closer to being a good fit. It all feels a bit snug. 

What I see is that I need a bit more length in the back. I’m afraid that if I take out more from the back width I can’t move my arms any more.

Next step? Tracing the moto jacket from January’s Burda that I bought last Saturday. I’m a little tired of making muslins but think it’s the only way to learn and tackle this fitting issue. This jacket will be sewn too I think, it’s nice as well and now I’ve muslined it already, it will/should be easier?