Sunday, August 11, 2013

The carefree fly-front coat – Craftsy course

I followed another Craftsy class. This time the “Carefree fly-front coat” by Kenneth D. King. Need I say more? It is a great class with a wonderful teacher. He explains clearly what he is doing and why.  He shows the result of a part of the jacket (the collar, the way the sleeve hangs for example) and then shows you how to get there. The camera work is excellent.

It’s more than only a step by step guide how to make the coat/jacket: it is an introduction in tailoring. It’s not a beginners class and even though I’ve made a lot of jackets, have done my share of tailoring techniques  (though I admit to using fusibles, not the way mr. King does it of course!) I have learned a lot. I will re-watch this class again and make notes, which I didn’t do this first time round. I was hooked to my computer screen for the chapter of inserting a sleeve/sleeveheads/shoulder pads. He has his own method of defining the notches where the sleeve easing should begin and end. That sort of tips makes the course extra valuable.

A Vogue pattern is part of the course and at the start of the course some changes are made to the pattern to make the pattern for the coat Kenneth King is making. The original jacket only closes with a belt and mr. King adds a  hidden button closure to the pattern as well as a princess seam in the front with pockets in the seamline. The changes are easy to follow. The little trick of shaping the collar so that inserting it later is easier was for me in the category “how clever, why didn’t I think of this”.  But he does think of these sort of details. He said that the sharp corner is often found in European patterns and yes, that is what I have always known. I will adapt my pattern next time in the way he showed it.

The course has the following topics:


image

I truly loved this course and hope to sew a coat this fall using these techniques.


After yet another praise for a Craftsy course I want to stress again that this is a personal opinion. I bought this class in a regular sale and did not receive it for free.

I’m not as positive on all classes I have bought and even have written a negative review a while ago on one class on the Craftsy site (not a sewing class). You will not see that review on their site as  they show you only the 5 star reviews as long as you have not enrolled to a class.  I would like to read the less positive reviews as well prior to buying a class. I do understand why they don’t do that, but still.   Also: when Craftsy started (or at least when I discovered it) you could preview a few minutes of the class. That way you could hear the voice of the instructor and the way he or she instructs. It was a good way to decide whether or not to buy a class. This preview exists no longer and is replaced by a little introduction by the instructor or by a general introduction, more a commercial, not by the instructor (as far as I have seen).

In general I would like to read more reviews on the classes, either on blogs or on Pattern Review (which has a section for reviewing classes as well) . It would be nice if we all could be a bit better informed about the contents and details of a class and why someone liked it or not. We all have different interests and levels of sewing and with more reviews we can decide for ourselves whether or not we want to take a class, based not only on Craftsy’s own advertising.

That said: if you are interested in tailoring: take mr King’s class!

Friday, August 2, 2013

Using preformed cups – cut to size and covering

I was surprised that some of you were interested in my rant. It was about Burda asking for input so that they could make their product better, but in fact they wanted information to be able to please their advertisers more. Questions about what I do for a living, what I earn, what I spend on clothes, accessories, beauty products ….None of their business and not information to improve their magazine or site. The mood to rant is over and I’m looking forward to a fun season of sewing.
It’s been a very hot week here in which not a lot of sewing happened. We are not used to this weather and I am glad it will get back to more normal (agreeable warm) temperatures next week.

There was one thing done however: covering the next pair of cups for my daughter. Preformed cups are not always available in the right shape or color. The colors available (when you are lucky) are off-white, black or brown. When you want to use lace to cover, it might be necessary to cover the cups with lycra in a matching color first.
My daughter liked the bra I made, but found the center front a bit high and asked for a lower center front in the next one. I thought the best way to achieve what she wants was to copy the shape of her favorite rtw bra as much as possible.  Below how I did that. The cups are once again from Kantje Boord in another shape this time. I wanted to try both versions so that my daughter can decide which she likes best.

I pinned the cup int the rtw bra and traced the line of the cups


For future reference I noted the cup size on the part I will take off and keep. If this bra is ok I can use the top part as pattern to mark the next pair of cups.


After cutting the cup at the traced line the top was a bit thick. The cups are pressed very flat at the edges, but that part is now removed.


My solution: use a narrow zigzag stitch to thin it. Below you see the difference on one of the top pieces (only for the photo, no need to do this on the part you cut off of course)


The result on the cup.

A piece of lycra a bit bigger than the cup is used to cover it. Pin from the center and pull the fabric a little. Not too much, the shape of the cup should remain. Use a lot of pins where necessary. I found this easier to do on the smaller cup for my daughter than on my own larger cups. Less round makes a difference ;)

A little trick at the edge. I used a glue stick I found recently at a notions store. It’s my gadget find of the year, I have used it often already. It will wash out.
I glued the edges and pulled the lycra over it and pressed firmly with my fingers. If you don’t have a glue for this you can use pins, but this makes this step so easy.


The next step is to cut off the fabric at the edge and cover with fold over elastic.
I pin just the first part with one or two pins and then stitch and pull it over the edge with a zigzag stitch. The trick is sew a little bit, pull the elastic a bit and place it around the edge, sew a few centimeters…. Apart from the first pin(s) no pins are used any more. Slow and sewing short distances at a time are what is important here.

Whether you cut off the lycra from the other seams depends on the style of bra you’re making.  I trimmed all lycra to the shape of the cup apart from the armhole. I’m not sure yet what I will do with the band and cutting off can always be done.

Artificial light makes the color champagne instead of grey all of a sudden.


Tuesday, July 30, 2013

A few random topics

Ýesterday's empty post was about an e-mail I got from BurdaStyle with a survey link which irritated me enormously and I wanted to vent. An hour after publishing I thought it wasn't worth your time reading my venting and removed the text of  the post. In Google Reader (how I still miss it) that was the way to delete the text of a post, as deleting the post made the original still show up in the reader. I was not aware of people reading through RSS feeds still getting the original post and ending up on my blog with an empty post.
That's the reason behind the empty post.

Further I've been sewing the second undie for my daughter, decreased the foot pressure, put something under the end of the foot making the foot not tilt backward at the beginning of a seam and it seemed to help. The fabric didn't get stuck that badly any more. Thank you for all suggestions. It did help a lot. She has worn the set and is very happy with it. Bonnie D: the preformed cups are from Kantje Boord.

What's next? I'm not sure yet. I've been working on lingerie (again, it might get boring) and want to make plans for early fall. Very hot weather is predicted again for the end of the week, so sewing will be on the backburner for a few days, as there is also quite a bit of work to be done.

Till next time, a post with photos probably.

Friday, July 26, 2013

All lace bra


Thank you for your suggestions on my sewing machine problem. This weekend I will make another undie for my daughter and will try the solutions. I think it must have something to do with pressure and/or feed dogs, possibly in combination with a hump in the fabric. The lycra I used is very slippery as well, perhaps that has to do with it too. I’ll let you know how it goes. Lilian even had problems solved with changing a light bulb, that is quite special (btw Lilian, I’m missing your blog, hope you do get some sewing done and just don’t feel like blogging, I know that happens).

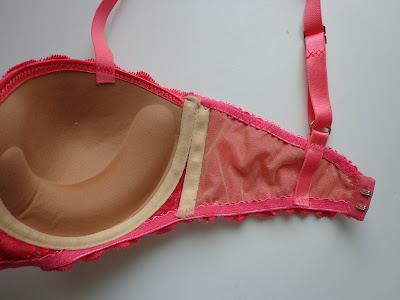
This is the bra I made for my daughter. It has preformed cups in a rather dark color. The lace is a bit open, I covered the cups with the lycra that you saw in the thong and then covered the lycra with lace.

Pinning it on the dressform gave a little dent in the right (left in the photo) cup, it’s really smooth over the whole cup.

While I need a strong support in the band, that’s not the case for my daughter, so a regular, rather straight band is ok for her.

The inside. I used some thin, stretch interfacing under the band because of the open structure of the lace. It will also give a bit of extra support. I find the lace on itself not stable enough for a band.

DD preferred rtw for a while, but now said she would like me to make a few more sets. Good we bought some more fabric and notions Knipogende emoticon.

Thursday, July 25, 2013

Sewing machine problem


I’m working on a set for my daughter. Yesterday we went to Kantje Boord to buy fabric and notions to her taste and yesterday evening I made this thong for her. It’s Melissa’s free pattern (check the downloads) which is really easy to work with. Thank you Melissa for making this available. It’s the first thong I ever made, as I do not like them myself. My daughter likes them, and this one especially.

Topstitching gave me problems and I’m asking you whether you know what could be the cause. My machine misbehaves sometimes and makes a number of short stitches and then continues correctly. It looks like the fabric is caught at the back of the sewing foot. It’s been to the dealer where of course nothing happens like this and he said my transparant foot with some damage on it might be the cause. I agreed the foot needed replacement so I bought a new foot. But when I was working on this it happened again on several places and I used the regular foot (metal) and the walking foot. Two different feet, same problem. So annoying. It’s a Bernina Aurora 430 machine.
Any ideas of the cause or a way to avoid this?

PS thank you all for your lovely comments on my jacket. It’s in the closet right now because we have very high temperatures here since about a week. No way I’m wearing anything with long sleeves.
And those of you who bought the Craftsy course after my recommendation: I do hope you enjoy it as much as I do. I’ve been a bit reluctant of doing these reviews as they are only my perspective. The same is true for pattern reviews though, so I hope you all make a decision to buy something not only because I recommend it.
Right now I’m following Kenneth D. Kings’s class for a jacket. I’ll write more about that in a later post.

Monday, July 22, 2013

A Craftsy class review

In the past year I’ve bought quite a few Craftsy classes and have enjoyed some more than others. Past week a sale was on which you will not have missed, I saw quite a lot of links in blogland to them.  Today I entered my first review for a class on Pattern Review. I plan to add more on my experiences with the classes I’ve followed, but there are still a few I have to finish watching. I was rather disappointed in what I saw from Sandra Betzina’s class on pants fitting for example but still want to see the rest before I am too negative about it. The couture dress by Susan Khalje  was a wonderful course. I wrote about that course on my blog last year, though through various circumstances never got round to making the dress. Last week I bought Sewing on the edge by Lynda Maynard. I followed all lessons within 2 days and HIGHLY recommend this class which is about finishing the edges of your garments: necklines, armholes (tanktop, sleeveless top) and hems.
These are the subjects covered:

A few extra decorative ideas are added to the class, but the main focus is on clean, beautiful finishes. I tried one of the finishings for a knit based on the book (blogpost here ) and that was a success, but till now I never tried others.
Because I have the book I was a bit reluctant buying this class. As I had positive feellings about Lynda Maynards class on fitting (still not completely finished those lessons) I thought it might be worth to buy the video class and I am happy I did.
Lynda Maynard is a great teacher and she shows the steps of construction very clearly and is well prepared. She made sure that it is very clear which side is the right side of the fabric and what is the wrong side.
I learned quite a few tips and trics and it's easier to see her doing it then reading it all in the book. Though I'm sure happy to have the book too, which covers more than only these edge finishes.
Below a few screenshots from the class and the blouse I finished this weekend to fill the missing gap of white summer tops in my wardrobe. I used the double fold binding on the armholes. With Lynda’s method it’s more precise then what I did before (and honestly I mostly avoided them). 

ETA: just to be clear: the first 3 photos are from the class, not my work. Only the white blouse is mine.