Sunday, March 15, 2009

A white blouse

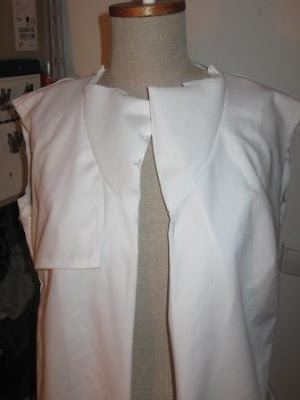
These were the only reasonable pictures from the series DH made.  But you'll get the idea. There seems to be a little extra space in the right collar, which I didn't see in the mirror. Perhaps a few handstitches to take out and do again. For the rest it's OK, though I think that next time I'll start with 38 for the back, it still has a bit too much space?

The skirt is a Knip mode pattern that I made a year ago.

I did not make pictures for the construction of the rest of the collar. Next time. This time I was just busy finishing the blouse and the white is difficult to make pictures of anyway.

Basically I follow the method that is described by Claire B. Shaeffer in her book "High fashion sewing secrets". For the upper collar I sewed the upper and under collar (cut on the bias) together till the point where it meets the lower part of the collar. Then the under collar is sewn to the front and back, the upper collar to the facing. A little handstitches to keep the two layers neetly together is what I did for the upper part of the notched collar.

The full review is on Pattern Review.

Thursday, March 12, 2009

A little progress

Not going as fast as I had hoped, but making progress. As you can see in the picture on the left the collar is constructed different from a usual notched collar (not pressed yet). In most notched collars there is no seamline from the center front and the facing is a separate pattern piece.

This is not the case in this pattern. The facing is cut with the front pattern part, and the lower part of the notched collar is a separate pattern piece. BWOF instructions are different from the way I constructed this, as I wanted to make the notched collar in the same way as I did in the red jacket.


The 2,5 dot that is given as level of difficulty is a bit optimistic.

This is what I did:

Stitched exactly from bottom corner to point wherer upper collar will be attached (this point is marked on the pattern)
Clip the foldline of the front facing to the seamline.
In the picture you can see the markings of the tracing paper I used to mark the fabric.
Pin the lower part of the collar to the front and facing. Stitch from the upper notch on the pattern on the front, pivot at the clipped corner and stitch to the upper notch on the facing.
 
Corner after stitching.
Trim and turn. I did not yet press the collar
Ready to insert the upper part of the collar.

Monday, March 9, 2009

Sleeve plackets done

I'm going to make blouse #104 from the BWOF February issue. After a week of many working hours I felt like making the t-shirt of the last post first, as an instant gratification project. Now it's time for the blouse.  I long debated with myself whether or not to make the "blind flap" as it is described, which is also in the back with a pleat, and in the end decided to make it as designed with flap.

And of course I "had to" do something different then the instructions tell you.Tonight I made the plackets and cuffs of the sleeves (strange working order, I know). I used the drawing from David P. Coffin's book for the placket, but used the instructions from Mary Beth, which are very helpful. I do like Coffin's book for all the information that's in it, but find his instructions and drawings difficult to follow.

Some of you shared my views on the low neckline of the BWOF patterns. And Kat, you made me laugh with your comment, I must make an appointment with the hairdresser soon ;)

Saturday, March 7, 2009

02-2009-108


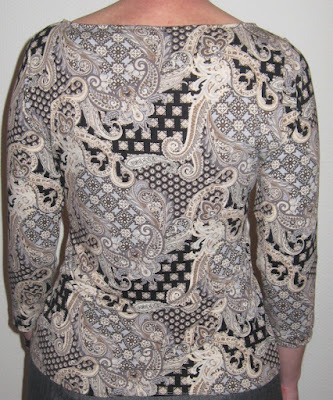
I don't know what to think of this print on me, but it will certainly be ok with a black cardigan. I was in the mood for something simple this afternoon, and thought I might as well make this top, of which the neckline is the appealing part. But, as you can see, it's the problem right away, as it slides a bit to my left in the picture.

Reading the reviews I saw that the neckline gave problems, and the sleeves are set-in sleeves, with a higher cap. I changed the top of the sleeve and the armholes using the Jalie 2449 pattern, which is perfect for me.

For the neckline I made a facing like this:

In this way there is no extra bulk at the shoulder seams, as the seam of the facing is on center back. I understitched the facing.  There is no stretch left this way, but with the width of the neckline, that's no big deal.


Wednesday, March 4, 2009

Sisterhood award

image

Lori (Girls in the garden) gave me this award. She said this about the award: "I feel it is so appropriate for blogland, many other sewers and crafters with blogs and are always so willing to help."

And I can only agree, I love the name of this award.


The rules of this award are:
1. Put the logo on your blog or post

2. Nominate at least 10 blogs which show great Attitude and/or Gratitude!

The difficult part: how to choose from a list of more than 140 blogfeeds? But this time I won't break the rules like I did last time, and share a couple of favorites and inspiring blogs. Some of them will have been mentioned, I'm not taking time to check.

  1. Tany - Couture et tricot, always the most inspiring high end garments, and sharing with us with so many pictures also of the details of construction.
  2. Melissa - Fehr trade, going through a difficult time, but cheerful blog posts and a lot of great garments.
  3. Lindsay T sews, sewing the most gorgeous jackets and coats lately, that I immediately want to steal from her!
  4. Allison C Sewing gallery - one of the BWOF addicts (?) making great garments with a lot of style
  5. Brigitte - Bubblegum for breakfast - on the couture road, very inspiring and I'm still in awe of the Chanel-style jacket she made a few months ago.
  6. Deepika - not writing too often on her blog, but she deserves this award for starting Pattern Review and maintaining this wonderful site
  7. Carolyn - Diary of a Sewing fanatic - one of the ladies with a clear opinion and not shy to share it with us. I like her style of writing and the way she works with tnt patterns and coordinating wardrobe pieces
  8. Summerset - Pins and needles - sewing the most wonderful art garments and beautiful clothes for herself and her family, sharing the process of all she does with so much detail
    and finally two Dutch sewing sisters, at least as addicted to sewing lingerie as I am:
  9. SimoneAnnemore - initiator of a Dutch lingerie-forum
  10. Jos - creaBH, inspiring lingerie too and taking the lead in a sew-along here "The red camisole" which will start end of March.

and .... and .... and ...


3. Be sure to link to your nominees within your post.

4. Let them know that they have received this award by commenting on their blog.
5. Share the love and link to the person from whom you received your award.

Monday, March 2, 2009

My hair is too short (or how to hide a too low neckline)

My next project (part of a mini wardrobe, more on that later, still planning) is a white blouse, no. 104 of the February BWOF issue. I have traced the pattern two weeks ago, did a FBA. But I had not checked the depth of the neckline. Before cutting the fabric, and based on my experience with the jacket I did check. Guess what: it's too low.

I could have known, based on the pictures in the magazine. Now I checked, and see what they did to the pictures. The red dot on the white version marks the top button, which is not so clear in the screenshot. The collar is folded higher than the roll line, which in this pattern is actually a seam. I don't often wear a scarf in that way, but it would help to cover up.

In pattern 103, which is basically the same pattern, the models hair covers the neckline! Conclusion: my hair is too short!

Though I love BWOF very, very much, I would like it if they made their necklines a tiny bit higher. If even their photographer needs to cover up, we (= the actual women who wear the garments that are made from the patterns) mostly will have to adapt the pattern, which is what I'm going to do (my hair won't grow fast enough :).

Sunday, March 1, 2009

Bagging a lining, where the front facing meets the lining

For the jacket I used the "bagging the lining" technique I used before. This time I changed the way of working in the corner where the front facing meets the lining. I used the book Jackets for real people for this, but have seen it described somewhere else too. Because I wanted to do it once again to remember the steps I did it again tonight and made pictures to share it with you. It's not the full description of bagging a lining, just this corner, illustrated with pictures and in my own words.


Step 1: Mark the corner where front and facing meet. In my example it's easy to see on the facing part, as I in general don't interface the seam allowances. the hem allowance is 5 cm (2 inch). As this is only a sample, the "front" is not completely marked for seam lines.

Sew the front facing  to the front exactly till the marked point.


Step 2: The lining is exactly the length of the jacket, no hem allowance needed with the 5 cm hem allowance at the front.

Sew the lining to the front facing untill approximately 5 cm above the hem (marked point)


Step 3: sew the lining to the hem with a 1 cm seam (3/8 inch), the stitchline starts a little after the vertical stitchline and stops little before that on the other side.(the book suggests a longer length to be left open, but this is enough). The picture shows the hem at the top!


Step 4: Clip to the marked point ONLY on the front of the jacket.


Step 5: Fold up the hem of the jacket, right sides together.


The lining is folded in between the layers.


Step 6: Sew from the marked point to the first stitching of front facing to lining (as described in step 2)


This is how it looks  now.

Step 7: Trim the facing/hem where needed, when turned the inside looks like this, the lining has a "jumped hem", which means there is a bit of lining hanging down, which provides extra ease. I know there is another method for this, which does not have a jumped hem, but that's an experiment for another time.


Finished front.