Showing posts with label StyleArc Christia. Show all posts

Wednesday, May 3, 2017

Christia pants

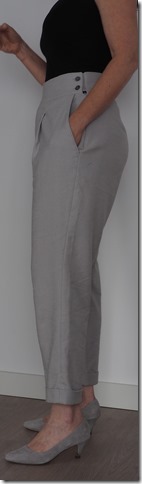
Last week I showed you how I did the cuff on the pair of pants I was making and today I can show the finished result. It’s made in a linen with some stretch. It may not be the best style on me but I don’t think it’s that bad either. I like it for summer.


P5030224   P5030228

P5030227    P5030226

It even has pockets that work well. Often this style of pockets stands away from my body because of the curve in my figure but these are more narrow, a straighter angle if you know what I mean.

This is how I did the pocket edge. This is a pattern piece that is not mentioned in the overview of included pattern  pieces but it’s there and if I understand StyleArc correctly it has to be cut from fusible interfacing and applied to the pocket edge (the instructions talk about pocket edge, pocket bearer and pocket bag. Not intuitive to me and I’m glad I know how to construct a pocket without instructions). As I prefer the pocket lining of a thin fabric (lining or cotton) I cut the pocket edge of the garment fabric and from a piece of silk organza. The edge of the pocket was on the straight of grain of the organza. This way I make sure there is no stretch in the pocket opening. I placed it on top of the pocket lining and treated it as one layer during construction. This way there is no lining fabric visible if the pocket is open a bit.

pocket edge

I did not make the side zipper all the way up to the waistband. I could not find a long enough zipper in the right colour and decided to make buttons in the waistband. Improvising a little here as the waistband had already been cut and I could not re-cut. A little hole is visible above the zipper but it’s not bothering me too much.Will probably wear it with a top over the waistband anyhow.

To conclude: a nice pattern that I only had to tweak a little. I had to heighten 2 cm and take in a bit at center back plus I made a contour/shaped waistband to get a good fitting waistband.

Thursday, April 27, 2017

Cuff on pants

Thank you for all your nice comments and congratulations on my 10 years of blogging. It’s so nice to know that you appreciate my posts and even are inspired to try something by it.

Today I’ll do a post of the kind I like very much, a tutorial (or my way of doing things). This is about a cuff on pants. It’s been a while since I made a tutorial and I can’t even remember the last time I made cuffs on a pair of pants.

The pattern I’m using is the StyleArc Christia pant. Their description is: A trendy crop pant with all the new style features you have been waiting for. Wide waist band, side pockets, pleats and cuffs that sit just above the ankle gives this casual pant loads of style!

To be very hones I’m in doubt of this style on me, but nothing ventured, nothing gained. I made a pair of trousers last year which were very narrow at ankle height and I confess to not wearing them. These are a little wider and I just wanted to try them.

image

Instructions are sparse and there’s even a pattern piece that’s never mentioned in the instructions. More on that when I’ve completely finished it. So this is my take on doing it, not StyleArcs’ instructions.

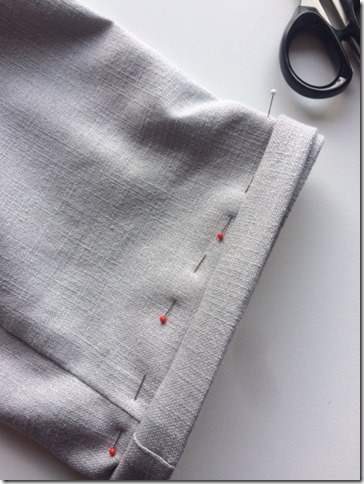
For the cuffs I marked the fold lines completely and basted them. On the pattern there’s only a mark at the edge but it’s so much easier to work with the whole line marked on both sides of the fabric. Belief me, it’s worth the extra 10 minutes of doing this.

Then I clipped on the fold lines to the stitch line of the seams (of course not through the stitching). The seam is folded on top of each other and if your fabric is a bit substantial, this will cause a lot of bulk. By clipping and alternating folding to each side of the seam this is more evenly distributed.

IMG_5024

The cuff is folded (right sides together) on the top line (furthest from the hem), pressed and then stitched. This stitchline won’t be visible and helps in keeping shape.

Tip: fold your cuff first without pressing so that you know how it’s supposed to go together.

IMG_5025IMG_5026

The next step is folding over the lowest foldline to the inside and press! Then fold the middle foldline (which is the top of the cuff) over. This is how the inside looks.

IMG_5033

My “trick” to keep the cuff in shape and easer to press after laundering is stitch again behind the cuff. The cuff is folded down and then I stitch through all layers. The last step is a stitch in the ditch in the seams to tack it.

IMG_5031IMG_5032

The resulting cuff:

IMG_5027

The pants are not finished yet. I’ve made a waistband from muslin. The waistband is wide, 7.5 cm (3 inch). The pattern provides a rectangle pattern piece. This is not working on me when the waistband is a normal height, let alone on a waistband twice as high.

Making the waistband from muslin first gives me the opportunity to pin it to my shape. In this picture you can see there’s quite a bit of shaping involved.

IMG_5034

Also I cut the back waist with a very generous seam allowance as I know that’s where I often need to change. I needed an extra 1.5-2 cm. My next step is to make a pattern piece of the waistband.

IMG_5035

It’s King’s day today in The Netherlands, which means it’s a national holiday and lots of flags with an orange banner in the streets. Orange being the name and colour of our royal family.

P4270132