Saturday, August 27, 2011

Vogue 1257 – muslin

I had no idea what I would sew next after finishing my trousers. Tonight I traced the Vogue 1257 dress that I ordered recently. I liked the pattern when it was published ordered it, and decided to make a muslin. There is one not so positive review on PR and I was cautioned to be aware of the length of the bodice, the reviewer warns for a short bodice (high waist) while the picture and line drawing don’t show that.

Measuring the back it really appeared short. I added 5 cm (2 inches) to the bodice. It was a bit of a puzzle how to do that on the front. This is what I did, it will be easier to understand if you have the pattern yourself.

I drew a line about the pleats and made an angle at the center front line to the side seam. Then I shifted the part with the pleats down and for the left part I made sure that the waistline remained the same. With the blue line I made a correction on the space needed. The new center front line made me wonder whether there would be enough space at bust height. And the only way to find out was making a muslin.


The muslin is made of a remnant of an earlier project. I had just enough for the bodicee part and had to cut the sleeves a bit shorter.


You can see I need the 5 cm extra in the waist. The sleeves are very snug, the front is kept in place with a pin, but I didn’t use the elastic as described in the instructions. That will make a difference, but it certainly is rather low now. Think I could use a bit of extra space in the bust area, not sure however how to do that.


I’m on the fence of making this dress or not. If I do it will certainly be from a plain knit like the pattern envelope. You can see that the print on the sleeves has a different direction than the front, this is because the sleeve is part of the front bodice pattern. Now I made the muslin I also know how I would have to change the pattern to make separate sleeves, which I consider doing. They have to be a bit wider (and I don’t have full biceps!), which is an easier change when the sleeves are separate.

To be continued…. or not.

Friday, August 26, 2011

Burda trousers

I’m blogging for more than 4 years, and I’ve already quite a few posts with new trousers and fitting issues. And I don’t even mention all my fitting failures here. Sometimes I got very near, sometimes I didn’t succeed at all. It’s sort of looking for the holy grail, coming close but never finding it. Every time I think I’m there, then there are unwanted wrinkles when I use another fabric with more/less drape.

I think this pair is not perfect, but pretty good. What I learned in these 4 yours of making pictures, also from the back of my clothes, is that there always will be a wrinkle here or there, depending on the way I stand. This pair is comfortable, is made of a thin wool which makes it suitable for every season and is very, very basic.

SewDarnLucky asked for a tutorial on the waistband. I don’t know of one (perhaps I should make one), but perhaps the pictures in this post make it clear.

On to the next project…..

Tuesday, August 23, 2011

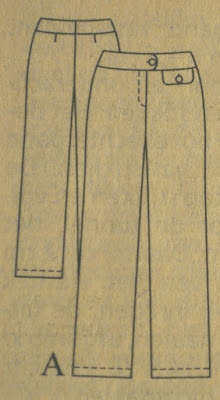
Trousers - almost finished

What a lot of (long) comments on my Burda post. Thank you, it was so nice to read all your opinions about it. I keep hoping Burda will publish something fashionable and interesting again soon. I've been working on a pair of trousers, inspired by a rtw linen pair I bought this summer and was happy with . It was a bit lower style than I usually wear/make and the fit was good. But it shrunk a bit when washing and I couldn't really copy it. So I browsed my Burda (!) magazines and found a similar style in the May 2006 issue.


I made a muslin and to my great surprise it almost fitted as it was. I only had to let out the side seams at hip height a bit extra.  I don’t have pictures of muslin or trousers yet, but I am very happy wiith how it looks in general and especially on the inside. I like a good inside finish.

The fabric is a very beautiful, thin wool and I interfaced till the knee. It will be my first “fall” project.


Like I did before I changed the pattern for the waistband so that the center seam is transferred to the inside.

The zipper has a fly shield.

Hope to show finished pictures later this week.

Sunday, August 21, 2011

Burda magazine

I haven’t written about Burda Style magazine for a very long time. If you have been reading my blog for a while you know that I was very disappointed in the way the magazine developed and ended my subscription last year. I browse it in the shop every month and never bought an issue in the past 12 months, the patterns were either not attracting me, or variations of what I already have.

Last week I browsed the new September issue, expecting a lot of new fall/winter fashion and of course hoping to find some patterns to like. Not so, and I’m even more surprised to find a large collection of what they call “Country look”. They offer that as “trend” for 2011/2012 in a small catalogue of the new envelope patterns for the next season.

Who wants these patterns? Is there a market to do this kind of patterns so regularly? Just wondering, it must be so because otherwise they wouldn’t make these, but I so much would like a more current look from Burda and patterns I want to make immediately. It used to be like that very often. I am so hoping they will change something soon. I tried, but I can’t really see these pattern changed to something I would want to wear.

New envelope patterns.

image

The September issue, pictures from BurdaStyle website:

image image image image

Thursday, August 18, 2011

Sorbetto (twice)

This top is so easy to make that I made a second one right away. This is a lovely pattern that can be easily worn on its own as a summer top, but will suit me well as a top to go under a jacket as well. Both versions are in silk, the navy is a silk I bought in Brussels during the PR weekend in April, the black has less drape and was in my fabric collection since a year or two.
The differences between the two: on the black one I omitted the center pleat and I made it with facings on the neckline/armholes. You can see perhaps that the shoulders are less wide and the neckline a little deepter than the blue version. That’s because the seam allowances are turned, which is not the case with the bias tape finishing. I like the lines of the black version better, even though the difference is not very large.
Because of my long torso I cut 3 cm extra on the hem just to be sure.

For the black one I traced the facings as shown in the next picture.
UPDATE: this is the back. If you do this don't include the pleat in the front!
 
\
Construction is a bit different then, this is how I did it:
- sew the side seams of the top
- sew the side seams of the facings
- with right sides together, sew armhole and necklines, but STOP THE STITCHLINE 1.5 cm (5/8”) BEFORE THE END of the shoulder seam
- sew the shoulders right sides together, folding the facing away
- stitch the shoulders of the facing by hand (or stitch in the line of the shoulderseams of the top), folding one end over the other on the inside)


This pattern defnitely is a keeper, I’m sure there will be more Sorbetto tops in my future. A big thanks to Colette patterns for making this available!

The pattern for the Sorbetto you can find here:http://www.colettepatterns.com/files/free-patterns/colette-patterns-0003-sorbetto.pdf and on the blog SewWeekly a pattern for a short sleeve is published. Also in a “7 day of Sorbetto challenge” you’ll find a lot of inspiration for variations on this pattern.

Tuesday, August 16, 2011

Sorbetto

The feedback on my Patrones top is one of the reasons I like the sewing community on the internet! Thank you for your comments and inspiring me to try the Sorbetto pattern. The Patrones top  indeed needed too much alterations and was not basic enough to give it another try. (Mici, your suggestion of a TNT pattern and changing that is very true, only I just don’t have a TNT top pattern).

I had seen the Sorbetto pattern being made very often by other bloggers and reviewers, but discarded it because I just don’t like the printing, putting together of all the sheets and tracing again. So I just didn’t think of it as a possibility any more. Wrong! Today I downloaded the pattern, printed the page with the test square first (no scaling should be on in the printer settings) and when that was the correct size right away, I printed and taped the pattern together.

Certainly not something I like and won’t do for a pattern that I have to pay for. Then I want a magazine sheet to trace or an envelope with the complete pattern in it. But this pattern is FREE! No complaints then on the download format.

After reading some of the reviews on Pattern Review, I traced size 10 by bust measurement (size 10? I’m a size 14/16 for Vogue patterns!), tapering to 12 at hip height, which I later removed again. 
Also I made the dart shorter, which I think is better, as it would have gone far too much to the front if I had kept it the way it was.

This is the result of my muslin, with a seam center front because of lack of muslin fabric.

As you can see in the side view, I’ve pinned some gaping away. That’s all I changed and this is how I transfered the change to the pattern:

Marked the fold with lines over it

Folded it out, now you can see how much fabric must be taken in. This method of marking I saw in a Threads issue in an article by Kenneth King.

Then marked it to the pattern piece.

Cut the upper dart line and the line of the new dart (left line in the picture) and shift the pattern piece so that the dart at the armhole is removed and the side dart enlarged.

True the armhole line.

This is a quick alteration. I even finished my top in black silk tonight! With some changes in the finishing, more about that in the next post with pictures. As it’s black and it is already dark here, no good light any more to make pictures.

From muslin to finished top was only a short 2 hours.

Monday, August 15, 2011

Back to sewing

Hello again, it’s been a while since I did some sewing and blogging. Haven’t been on holiday all that time (of course) but my sewing mojo was completely gone and is only just returning. Yesterday evening I was suddenly triggered to sew a muslin of a Patrones top. It turned out to be too small and I did sew a second muslin.

I’m looking for a pattern for a top that I can use for woven fabrics and can be worn on its own or under a jacket. This pattern had my attention from the start.

This is the line drawing

The picture from the magazine (Patrones Joven number 5). Does really show the pattern don’t you think?

This is my muslin, the armhole had a little gaping which I pinned out.

Side view

The back.

To me it’s clear that this is not fitting as I would like. The front would need a little fba, but I don’t like the position of the darts. The back is not very good either, my bra straps (which are always on this position) show and would need some extra space as well.

All in all: not sure whether I’ll continue with this pattern, think I’m going to browse my Burda issues for a pattern for a non woven top to prevent another wadder. I have 1 meter of black silk I want to make a top of, and I’ve had enough wadders this year already.