I'm sharing this method with the regular disclaimer that this is what works for me. I'm not claiming this is the perfect method. In the steps below I refer to the facing, because that is what you see in my photos. It would be no problem if the lining was attached to the facing or if you use lining only. It's a lot of steps in the way I describe it here, but it's not overly complicated. Give it a try and let me know how it worked!
Step 1
Sew the dress without sewing the shoulder seams
Step 2
Sew the facing without sewing the shoulder seams. Usually this will mean sewing the side seams of the front and back facing. My dress has a center back zipper, which was installed first and there are 2 back facing parts. If the dress has no center back seam, the facing for the back can be one part.
Step 3
Baste/pin the facing to the dress.
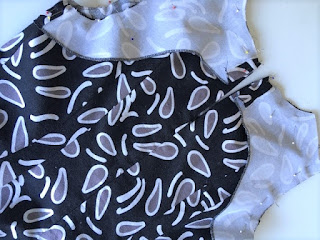
Step 4
Sew the facing to the dress, do not stitch to the end of the seam, leave about 3cm/1.5 inch open.
Trim and clip the seams where necessary. Again not to the end of the seam.


Step 5
Turn, press and edgestitch on the facing. How far you can do the edgestitching depends on the width of the shoulder, but do not stitch till the point where you stopped the seamstitch. Stop a little before that point.

Step 6
Fold away the facing and pin and sew the shoulder seams of the garment.

Step 7
Pull the shoulder seam inside out.


Step 8
This is the most fiddly step, pin and sew the shoulder seams of the facing.

Step 9
Pull on the seams and match the shoulder seams from the garment and the facing.
Pin the neckline and armhole side. Sew and make sure you start and end at the previous stitching lines. This is easier to sew when the seam is still wider, therefor it was not trimmed in the earlier step.

Step 10
Trim the seam, I trim the corners too to remove as much bulk as possible.

Step 11
Turn back the facing by pulling on it. Press the shoulder seam and you're done!


Beautifull. Ik do the same. Good pictures did you take. I will show them to my students
ReplyDeleteIt's a wonderful method, isn't it? Glad you like the pictures, it was difficult to show it properly.
DeleteWhat a clean, beautiful finish!
ReplyDeleteThank you, glad you like it.
DeleteNice technique and with your clear description and photos look very doable. Thanks, Sigrid.
ReplyDeleteIt isn't difficult at all, just a lot of steps. But once you're doing it, it's logical.
DeleteThanks for your comment.
Thank you! I’m going to try this next time I make a sleeveless top/dress.
ReplyDeleteI won't be making anything sleeveless any time soon as we are heading into winter but will pin for later. Thanks for the tutorial. :)
ReplyDeleteThis comment has been removed by a blog administrator.
ReplyDeleteThis comment has been removed by a blog administrator.
ReplyDeleteThank you so much for this tip. It has proved so useful, three baby dresses finished so nicely, today it is my summer dress. I hope you and your family are well and happy in these strange times. Here in Turkey we have been fine till now, but the incoming tourists are a worry. Stay safe, Angela
ReplyDeleteThis comment has been removed by a blog administrator.
ReplyDeleteThis comment has been removed by a blog administrator.
ReplyDelete