Wednesday, October 31, 2012

Travelling

I’ve been away on quite a few trips lately and the past few days I spent in Paris with a friend who is staying there for a month. We walked a lot and as we both have been to Paris more than once before, we didn’t do the regular tourist visit, except for the visit to the Musée d’Orsay, a beautiful building itself. It’s an old train station. We visited the temporary exhibition “Impressionism and fashion”. The two pictures here are from the website of the museum. Taking photos at the exhibition was not allowed. I loved the way exhibit was organized with a general introduction and separate rooms for “women at home”, “artists and men of the world”, “enjoying the open air”.  There was one display of a pattern. Unfortunately it figured in the background of other items and it couldn’t be seen completely. I would have liked a copy of that pattern to see what it really was and how it went together. Some construction indications (letters) were given so that you could see which parts had to be sewn together. Like the numbers on BurdaStyle magazine patterns nowadays.

It was so nice to see the painting on the right again. I remember vividly seeing that painting for the first time on my first visit to Paris, back in 1981! Then it was in the Jeu de Paume, a small museum where the impressionist paintings were exhibited before the collection went to musée d’Orsay. It brought back some memories. As did some other paintings as well.

It’s strange though, that now the focus was on fashion, you also look at the paintings with a different eye, you see different things.


We didn’t do other sewing related things, my friend is not sewing at all. But she knows I do and knew about this store (La Droguerie) with buttons and thought I would like it. I did. The store has buttons, a lot of beads, yarn for knitting and trim. To my surprise they sold liberty fabric bias tape. I’ve never seen that before and didn’t know it existed. They have quite a collection and other trims as well. I do like liberty fabric but most prints are not “me”. I saw possibilities in this bias tape as accent on a plain blouse and bought 3 varieties. I bought a few buttons too. There will be a blouse with some liberty accents in my near future.


Hope to have my sewing mojo back soon.

Saturday, October 20, 2012

Twist top–Knip mode

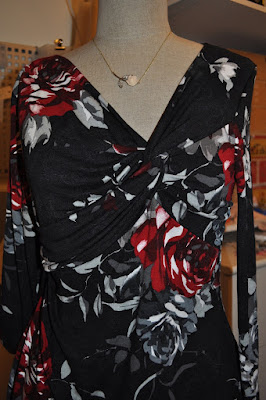
The twist top is regularly seen since (I think) the famous Burda twist top from 2004. Some don’t like a twist top anymore, but October Knip mode issue showed an asymmetrical version that I quite liked. This time a few clear pictures in the magazine as well Glimlach. And I needed them to get my head round the construction. It was not the twist itself that gave me problems, but the way the upper part was folded to the right side of the top.

It will have been me, but it took me several times pinning the side seam till it was right and I could sew it. I changed the order of construction a bit so that I could insert the sleeves flat  and sew the sleeve and side seam in one pass. Sometimes the easy things prove to be more difficult than you think.


On the Knip mode site there are instructions for making this and there are some good and some bad points:

There are actual photos, using (partially) different colored fabrics (positive). One of the fabrics used was a black polka dot fabric, and we all know that black doesn’t show well in photos (negative). The top and bottom part were both from the same black fabric, which made it difficult to see (negative). There are 9 pages of instructions, making it a step by step series (positive), but each page is a separate file to download and each file (1 page!) is 20MB, which is extremely large. Knip mode obviously didn’t compress the size of the photos.

The shirt still needs hemming, for now two pictures on the dressform.


Monday, October 15, 2012

UK weekend

This weekend I was together with 9 sewing friends in the UK. It was such a WONDERFUL weekend. I can’t say it in the way Pauline has done it, but her post says it all. So I’ll share some photos, mostly nice to see for those who were there probably. If you’ve never done something like this: do it, organize a weekend with sewing friends and fun is guaranteed.


View from the cottage we were in:

Lots of fabric/magazines everywhere and even machines in window sills waiting to be used.


  Vivien and Pauline fitting muslin


  Clare

Sheila


 Hilde

 Marta and Pauline with one of the shirts Pauline made

  Joana

Samira, not happy with her ugly fabric (she “stole” mine and graciously gave me a part of it afterwards)


Aliisa


Monday, October 8, 2012

Knip mode dress

Can someone explain why photos in magazines often seem to hide the main feature of a pattern? This dress for example, from the March 2012 issue of Knip mode. The main feature is the crossover at center front and it’s completely hidden by the necklace and hands of the model.

Look at the line drawing. Quite a nice pattern.
 
It was the line drawing that convinced me to try this pattern. I used fabric that I bought in the UK on my last trip visiting Pauline. Who already made other outfits of the same kind of fabric in different prints.  It’s a very nice knit, good drape, easy to wear.
This print was used in another color scheme in rtw dresses for prices up to 100 uk pounds. Nice to know my dress only costs 15.


A quick and easy dress. I’m wearing it today and it feels very good. It would have been a tiny bit better with two back darts, I might add them.

Thursday, October 4, 2012

Jacket construction–part 5–Finished

In my last post I showed pictures of the body of the jacket without sleeves.  Inserting the sleeves with this fabric was no problem. The extra ease in the sleevecap was easy to distribute in the armscyce. The first picture shows the extra fabric that is eased. In the next picture I have cut little pieces out of the seam allowance to smooth the sleevecap.


The lower part is sewn twice between the notches with a little space in between, then the seam allowance is trimmed only between the notches on the lower part of the armscyce.


The sleevehead is made of a 5 cm wide (2 inch) strip of fabric. Time to clean out my sewing room properly, as there must be some special fabric I use for this, but I couldn’t find it, and I looked hard. This works well though.


Now the main jacket was ready. Time for the lining. I used an off-white silk fabric that I bought in New York two years ago during a lovely meeting with Nancy K, Robin and Meg. The outer fabric has silk in it as well, so thought this was a good combination.

I used the bagging technique as described in the book Power Sewing by Sandra Betzina. In the first picture you see the opening in the back of the lining


Of course some photos of the finished jacket. The light is difficult, some photos are with flash, some without, making the color different. Even though I lenghtened the sleeve I would have preferred it a bit longer. It’s fine, but my preference is longer.

I’m not going to make a big deal of that, I like the jacket very much. It’s a lot of work making it like this, but I know it will last longer. A jacket that I made with similar techniques in July 2008 still looks good and I’ve worn that one quite a few times.


Time for a a little less time consuming project. Not sure yet what it will be.