Showing posts with label shirt. Show all posts

Sunday, August 5, 2018

A muslin in silk

Well, not a true muslin of course, I definitely hoped this would result in a wearable garment and decided to use this silk that’s cheaper than the linen I planned to use for this shirt. Still wanting to do that, but didn’t want to take a risk with that specific fabric.

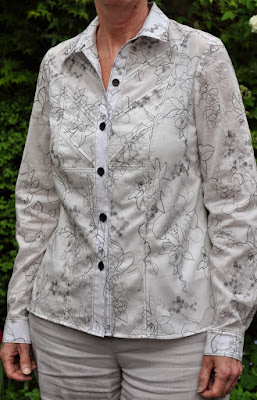
I think this is quite a good fit on me. I did not change the length of the body, nor of the sleeves. I did measue the sleeves, as in most companies they are too short for me. Not necessary here, which means that if you’re shorter (my length is 1.74 and my arms are a bit longer than average) you even might want to shorten them.

One thing I forgot to mention on the pdf is that it has the actual seam lines in it too, not just the 1cm seam allowances without indication of the actual seam line. I really like that as it helps with the tricky parts like the collar and stand. I mark the actual seamlines on those pieces.

P8051786

Not my usual colour scheme, but definitely a “me” print. P8051783

The slit is a bit long. I’ll make it shorter next time

P8051769P8051767P8051776

I could have added a bit more to the hip area and will in my next version. I used a size smaller than I should have used based on the size chart and am quite happy with the fit. As said in my previous post, there’s no waist/hip shaping which for the blouse might be an issue for more women with a pear shaped figure.

As to the instructions: I’m not a good judge of those, as I’m too experienced to really need them. But in one illustration a pattern piece was very different from the actual pattern piece and I thought that very confusing. There’s also quite a bit of information in the instructions that imho belong to your basic sewing knowledge or can be looked up in a general reference book or online (what is basting, what is clipping, that sort of instructions).

All in all I quite like the pattern and will sew it again when this heatwave is over. It’s just too hot to do much these days. Not my kind of wheather.

Monday, July 23, 2018

A new to me pattern company

If you’ve been reading my blog for a long time you know I’m not too much into Indie designers. After the initial hype a few names/brands have survived that offer more than just a simple pencil skirt at a ridiculous price. I still haven’t tried many but this time I was intrigued enough to buy the Wenona shirt pattern from Named Clothing.

image

I saw a review on this shirt that made me look further. Must have lived under the proverbial rock because I’ve never seen or noticed it before and it has some nice details and there are some nice variations to be found (here and here for example). Though I’m certainly not the first one to try this pattern, I’ll post my experiences with it in this and upcoming posts.

The pattern is a pdf pattern. I’m not fond of them, but have grown accustomed to the idea that it’s the way it is now. Sometimes it is instant gratification if you want the pattern fast or don’t want to pay high shipping costs.

Notes on the pdf file

  • Available in English and Finnish
  • Lots of instructions (haven’t read it all yet)
  • You receive a pdf with instructions, pattern layout etc and 3 files that each contain 2 sizes of the pattern.
  • 1 cm seam allowance included
  • Overlapped pattern layout: this is a tricky one that is stated on the website, but I did not realise fully what it meant until I traced it. Usually pdf patterns can be cut and taped together right from the printed pages (or traced, like I often do). With this pattern that is not possible as the pattern pieces for the skirt and the sleeves are on top of each other. Which means that even if you don’t want to trace, you’ll have to do that for the sleeves (and skirt if using the dress variation).
  • The page numbers are printed in a small size at the edge, no markings on the lines where to match (like StyleArc for those who know their patterns)
  • In the instruction pdf the page numbers are not indicated in the overview of pages. It would have been helpful to have that.
  • No indication of the pattern size on the printed pages. See below, if you keep two sizes of the pattern, there’s no way of telling to which size a single sheet belongs.

First impression of the sizing

I read that this pattern runs very large, so despite the size chart indicating that I would need a size 40 or 42, I started out tracing the front and back for size 38, which I then compared to my sloper. This is not a close fitting shirt (or I think it shouldn’t be) and decided that size was too small. Which meant I had to print it again, as size 40/42 are in one file together. I can keep it for my daughter, who likes the style too, but otherwise it would have been a complete waste of paper. Based on the finished measurements at bust level I’ve now traced a size 40.

The line drawing suggests waist/hip shaping. There is none! I will have to add it, as I need a bit more room in the hip area. 

I’ve yet to decide whether I cut it from the white linen I have in mind or whether to test it first in another fabric.

Monday, November 14, 2016

Burda 6874–Shirt for my son

It’s taken longer then I intended as the coat project came in between. It’s done though and I finished my first men’s shirt. It wasn’t complicated, just a bit different on some places. I’m not completely satisfied with the collar with stand, even after I took off the first stand and re-did it. It’s not visible in the pictures but it could be better.

The pattern is wonderful, everything matches perfectly and the size (taken from neckline measurement) is quite good. It’s what I expect from Burda and they do not disappoint.

I don’t have pictures of my son wearing the shirt. In the meantime he has found a job and having photos taken with his mother’s shirt is not a priority (which I understand).
There is some work to be done on the fit in the shoulder area. Something in the line of forward shoulder adjustment. But my son is satisfied with this first one and there will be more to follow.

I highly recommend Pam Erny’s tutorial for the sleeve placket, she explains it so clearly: Shirt sleeve placket. Her way makes it easy to use another fabric for the under placket and is beautifully finished on the inside too.
For chevron stripes this one is superb.

DSC_1204DSC_1203

Definitely oversized on my dressform:

DSC_1202DSC_1201DSC_1200DSC_1198DSC_1197


DSC_2161

I had to use white as accent colour. The original fabric yardage would have suited for a shirt for me, but was not enough for this shirt.

To finish this blog post: my coat sewing is continuing. I was so inspired I started another one last week. A sneak peak…

DSC_2167

Saturday, October 8, 2016

Unselfish sewing

Could also have the title “venturing into new territory”.

Recently my son was looking for a shirt to wear to an interview, he has a few but more often he takes one of my husband/his father. The fit is not perfect, as my son has broad shoulders and is taller but in general my husbands’ shirts are nicer quality. In a weak moment SmileI offered him to make a shirt. Perhaps I’ll regret the offer later on. I’ve never sewn for my husband, he’s very satisfied with the fit of rtw and always said not to bother. To be honest, I was happy with that. Now I like the idea to venture into new sewing territory. For the moment I’ve decided on a pattern and found suitable fabric in my collection.

The pattern will be Burda 6874, an envelope pattern. The fabric a good quality cotton, in my collection for I guess 10 years or more.

DSC_2137DSC_2136DSC_2135

I washed the fabric, traced the pattern and am almost ready to start sewing. I’ve been reading parts of David Page Coffin’s book (lots of information but so difficult to read) and want to read a bit more on construction as I want to make it a real classic shirt.

Tips and information links very welcome!

Sunday, April 27, 2014

Comparing fit in the back


The shirt I was working in my sewing/fitting class is finished. The initial fit was quite good, only the sleeves gave a bit of trouble. Too much fabric in the back part. Must be my figure, as it’s the same problem I often have with Burda sleeves.

I compared the shirt with the back of a few shirts I made in the past years. I can see quite an improvement, even when I was quite happy with those earlier shirts too when I made them. 

This shirt was not a lot of work making the pattern for based on the sloper. Once I’ve finalized the sleeve I might not need another shirt pattern and use this sloper as the base.

Thursday, November 15, 2007

BWOF 01-2006-111 shirt finished

As some of you have seen already, I finished my shirt and published a review on PR. I really was happy about my third attempt at the collar, it was sewn by machine on one side (the inside collarband to the inside of the shirt) and handstitched on the outside of the collarband. Then there were only the cuffs to make and buttonholes and that went smoothly.


On looking at the picture I think that the front might need a bit extra width in the fba, but in wearing this shirt it doesn't bother me. A few more pictures you can find here.


Now I will sew a few easy shirts. The first one was already made yesterday evening. A simple Jalie shirt with collar. Sewn in an hour, not special at all, no pictures to share yet.

Tonight I wanted to cut a black top with draped collar. But after fussing with the pattern of Butterick 4606 and combining it with the Jalie t-shirt, found that the fabric didn't have as much drape as I thought. The reason for using the Jalie pattern as basis was that I wanted to make a collar stay, as described in Claire Shaeffers book. I made the Butterick top last winter, but it was not completely right. I wore it a few times, but it could have better fit and drape. I found it too difficult to make a stay based on the Butterick pattern (did not know how to fold the pattern back in the right shape to use), so chose a pattern which I know fits me well as starting point and convert that.
The Jalie pattern without alterations can now be used for drafting the stay.

(the black line is traced with a mouse in a picture editing program, not very stable line)