Showing posts with label blouse. Show all posts

Wednesday, May 7, 2025

Rosie shirt

Tonight I played pattern tetris to get a jacket and trousers out of my fabric. The fabric is narrower than usual but I think it works. Pinned all the pieces to the fabric and as it’s getting late here I decided to wait with cutting. Better check tomorrow whether I have every piece and cut with a clear head.

In the meantime let me show you a blouse I finished only very recently. It’s the Rosie shirt from Bella loves patterns. The first time I use a pattern from her and it doesn’t disappoint. Well drafted and good, thorough instructions with a lot of photos. I wouldn’t be me if I would have followed them all as written ;).

The instructions make the collar as if it were a coat. Way too complicated imho, so I made sure the upper collar has a bit more fabric to adjust for turn of cloth and sewed the collar in between the front and the facing. At the back I used a bias binding for the edge, a cute detail that’s just for my own pleasure. 

The linen is a bit too stiff probably, I hope it gets a bit more drape over time.


Tuesday, March 28, 2023

Burda blouse, April 2021

It's been again quite a long time since I posted. I won't bother you with the details, I'm well but illness and mourning has been part of the past months. 

Now it's time to get back to some sewing. A relatively easy blouse from Burda April 2021. 

A good preparation for when spring will finally arrive, it's been cold, raining and storming most of March here. I look forward to wearing this blouse.


I made this blouse before, in March last year and loved to wear it. So when I was looking for something to make from this fabric I remembered this pattern and as it was already traced and ready to use an easy choice. I had only about 1.20 meter as I bought it with the intention of making a short sleeved blouse. The facing has a seam as it couldn't be cut twice from that length in that amount of fabric. The little tricks we use to make a fabric work!
Below my first version of this blouse.


Wednesday, November 30, 2022

Blouse from October Burda

Thank you for the nice comments on my posts! I'm having trouble commenting on blogger, even on my own blog at the moment, so therefor a general thank you and no reaction in the comment section itself. Hope I can find the problem and solve this, as apart from posting myself again, I also started to read other blogs again and would like to be able to comment. 

My most recent make is this Burda blouse from the October 2022 issue. Being a lover of special necklines, this immediately got my attention and ended high on my "to sew" list. 


The fabric is a viscose from Atelier Brunette, with good drape and easy to sew. I bought it last year in a fabric shop in Denmark, it's a holiday souvenir. 
I didn't like the sleeves had no cuffs, so I added those. 
If you made Burdastyle magazine patterns, you know that the instructions are not very detailed and more an order of construction (unless it's the pattern of the month, which this wasn't). As the neckline is not your everyday neckline, I did read the instructions! They  have you put on the collar first, attach it to the inside and only then add the zipper at center back. Which is not very neat in my opinion. Or I have understood it wrong ;).

I followed the first steps: sew the center of the collar, clip and turn and sew one side of the collar to the body. As the next step I inserted the zipper, so that when turning the collar, the top of the zipper is wrapped neatly inside. As last step the inside of the collar was handstitched to the neckline.


When there is no band to be attached above the zipper, I don't sew the start of the zipper tape, where there are no zipper teeth. In that way you can more easily fold the end out of the way and the fold of the fabric is more smooth.


Friday, November 20, 2020

A top by my daughter

 It's been so nice to hear some of you just like to read my posts. I do realise I've been here before in the past years, which is probably something that happens occassionally when you have been doing something (in my case blogging) for so long. Sorry to have bothered you with my uncertainty and indecisiveness. 

There are a few things I will change in the near future but I'll come to that when I do it. Let's start with showing you a project that has been made recently. Partly by me, partly by my daughter.

My daughter is one of my "students". Of course she's not a paying student and it's not a weekly thing but she really likes to learn to sew. My son's girlfriend too, lucky me! I like to pass the sewing bug along and we've been sewing together a bit lately. 

She selected this top from an older Patrones magazine.


It was labeled "Couture facil", which means it should be an easy sew. Really? With this button placket in the back? This kind of button placket even makes me a little nervous. It's about very precise sewing and cutting and if you do it wrong, you really can see it or worse, even be so bad you want to throw the pattern piece in the bin. There was no fabric left, it had to be right first time round.

Perhaps needless to say that I did sew the placket. My daughter watched the process clearly and said she could not (yet) have done it. But the rest, from tracing to cutting the fabric pieces and finishing the neckline was done by my daughter (with a bit of guidance). She's ever so pleased with the result and has worn it with pleasure. Receiving compliments for it too!

The placket before finishing the neckline and completely sewing with buttons

.   

The sleeve with pleats

Sleeve with pleats
My daughter wearing the top


The fabric is from Atelier Brunette and bought in a shop in The Hague. What's nice about this brand is that they have notions matching their fabric. In this case the buttons!


Tuesday, January 9, 2018

First project of 2018

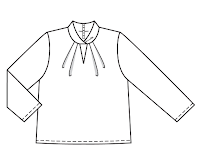
The first project of 2018 is a blouse from Burda magazine, issue November 2017. Line drawing
A full review is up on Pattern review.
I’ve been tempted to try this style garment for a long time. I bought McCalls’s 1661 years ago but in the end doubted whether the style would suit me, being a non-fitted garment. Plus the fact that for the McCalls’ pattern you need fabric which is the same on both sides, not always an easy requirement.
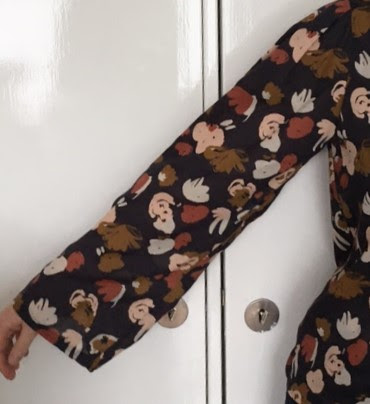
When I saw this pattern in Burda magazine, I knew it was time to finally try it and get out of my comfort zone. I took a fabric that has been lingering in my stash for a long time too. I’m pretty sure I bought it at Walthamstow market in the UK, when I visited my friend Pauline. A visit I can date back to 2012!
The print of the fabric is very much me, and in the past half year I’ve made 3 garments with a combination of black and navy.
Front 2Front 1Inside details
I consider this a pattern that is very well drafted and has been given a lot of thought in the design. It has a lining in the front in camisole style, with darts to shape it. This lining and the construction with pleats at the bottom, make for a neat finish and no need for fabric that has two right sides. A big plus for that.
The instructions on the other hand are aweful, Order of construction as in almost all Burda magazine patterns but they try to tell something about the binding of the neckline (to the mark, tapering…) that I could not really get and I just bound the neckline as I would do for any top.  Next up was the instruction how to attach that lining and the front to the yoke. I could not make sense of it. What I did was fold over the facing of the front and match the armhole of the lining and the front. That made it easy to attach it to the yoke. Which has 2 layers and Burda expects you to hand sew the inside seams. Never heard of the burrito method apparently, which I used and lots of tutorials for it can be found online.
The style is something I’ll have to get used to. It isn’t bad and when the weather gets a bit warmer I’ll certainly give it a try.
It’s a pattern in the tall sizes btw. I didn’t change the length in the body or the sleeves, nice for a change.
If you consider this pattern you might want to make the neckline of the lining a bit higher. I still need to add a snap to prevent unwanted exposure.

Thursday, September 21, 2017

A blouse with dots

I showed pictures of my work in progress last week. All three projects are finished, my daughters dress has already left the house (in the form of her wearing it before I had a chance to take photos).

image

Let’s focus on the blouse for this post. It’s a nice pattern, Burda 6632. To my surprise it was very long and very wide, I took off a bit while normally I have to add length. I didn’t change the length of the sleeves either.

A more major change was made to the placket. The pattern has only buttons as decoration element, they’re not functional and there’s a seam at center front, no overlap. I wanted to have a placket which overlaps and using buttonholes. Not very difficult, but somehow it took me a while to grasp what and where I had to change.

The fabric was, as I said already, very difficult to work with and I used starch to keep it from slipping away continuously. I was asked what I use and it’s a spray starch that’s sold here in the supermarket. On the bottle it says it’s to make ironing easier and giving it a bit more stability (the starch). For me this little amount of starch was enough to help me in construction.

image

The photos of me wearing the blouse. As so often, Burda’s neckline is deep, this blouse requires a camisole.

P9210835P9210836P9210842P9210840

Tuesday, March 14, 2017

A Lekala blouse

As some of you already thought, sewing is a bit low on the priority list at the moment. Which is bad, as I absolutely need new clothes. Yes, I know, there should be enough but I’m missing a few things to get good combinations.

A nice, easy to make pattern is helpful when time is an issue. I didn’t take the time to draft myself but bought a Lekala blouse pattern that I liked.

4619 line drawing

Their prices are low and for me their way of making a pattern seems to work. The winter coat was good (worn it very often) and this blouse is a good basic. Shoulder princess seams, shawl collar, clean lines.

I made it from fabric that was gifted to me by a sewing friend during our annual sewing retreat in Canterbury. She thought it was a “Sigrid” fabric and she was right. Said something along the same lines being “me fabric” in my previous post, think I’m quite predictable in what I like and what I don’t like. Good thing probably, though I’m looking for a bit more colour in my spring clothes.

This fabric has a graphic print with lines that are not continuous. I think it give a very nice effect to the blouse. I’m very pleased with the result.

Samira, thank you again!


4619 frontDSC_0392

4619 back

Tuesday, May 24, 2016

A summer top

I saw this fabric for the first time at a fabric market in April and resisted buying it. When I saw it again at a fabric market two weeks ago I bit the bullet and bought it. Abstract print, summer colors, it was just the right fabric for a summer top. It’s a good quality cotton, though sheer, so a cami underneath is a must.
DSC_0285
Told the story before, an essential box with sewing materials is in storage by accident. In this box are my sloper drafts too. Which meant that for this top I drafted the basic sloper again and relied on it to fit properly. Two things are not quite as they should be: the armhole is a bit too low for a sleeveless top and the width at hip height should have been a bit more. Nevertheless this top will get a lot of wear when summer decides to stop by in our neck of the woods. Not now in any case.

DSC_0288
DSC_0281
All seams were stitched as French seams, which is a beautiful finish for a sheer fabric like this.
My bust dart is very wide and that was sewn using the French seam technique too. It makes for a small dart as you can see in the picture above.
I won’t wear this top with the collar closed, but it gives you an impression of the fit. Quite pleased with that.I drafted it using Suzy Furrer’s technique as she explaines in her Craftsy class Collars and Closures, only less wide than she uses in her demonstration.
DSC_0280

Tuesday, July 14, 2015

Blouse with woven strips of fabric – part 6 / finished

Let me first post a reminder of the original top that I was so inspired by.

image

Followed by my version (looking a bit tired and no make-up after a run earlier). I’ll let the pictures do most of the talking.

finished blouse

  Side blouse Front detail blouse side back

As mentioned earlier I used a water soluble layer under the strips. This is just before I cut most of it away. A little anxious moment as I was unsure how the strips would behave without the stabilizer to hold them together. As you can see in the pictures of the blouse on me, they hold well. A word of caution if you use the water soluble fabric: don’t use steam with your iron. I forgot at some point and immediately the layer started to dissolve (I press a lot during sewing and it irritates me to see the (altered) back dart not pressed well).
How it will be after laundry is another matter.Ironing will probably be a difficult task.

construction detail

Thank you all for the for the nice comments. Carmen, it really is a pity sometimes we all don’t live closer to each other, it would be so nice to be able to (get) help with fitting. Thank you for the link on the shoulder slope and I will definitely study it more closely later.

Laura Arhire asked “your shoulder seems to be a bit forward, but the shoulder seam doesn't point to your shoulder cap. Does that affect fit at all”. Yes, my shoulder is a bit forward, though it’s mostly my arm that tilts forward (or is that the same?) It does affect fit and perhaps I should even set in my sleeves a bit more forward. For the moment I’m satisfied with the sleeve in this blouse, but I do see room for improvement.