Showing posts with label coat. Show all posts

Tuesday, October 4, 2022

Preparing

October again, for me that means that I will travel to the UK for a sewing week with my friends. I'm so excited, as this is the first time since 2019 that we can do this (for the obvious reason that the pandemic prevented us from doing this in 2020 and 2021). We have been doing this since 2012 and I really missed it.

Next week we will be in Kent again. At the moment I'm deciding what to take and make during the week. One thing I want to do is make a coat. Not a very complicated one, using fabric that's been in my stash for a while now. I want to prepare cutting and marking before leaving. 


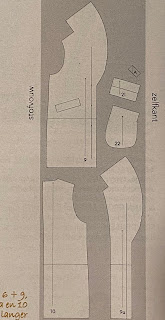
The pattern I have in mind is a relatively short one, from a magazine called Fashion Style, which originally is German and I have a Dutch copy. 


I've never used this magazine before and after tracing the pattern yesterday I am not very enthousiastic about it. First I think that the line drawing doesn't match the actual pattern. In the line drawing it looks like a "swing" coat, with more room at the bottom. The pattern pieces are very straight though. Most photos show the coat worn open, which makes it unclear to see how it's meant to look.

I don't care much for instructions, but I think that the pattern pieces should be clearly shown and indicate what lines are included. The only instruction for the front and back is that you have to "glue them together". Because I'm a pretty advanced dressmaker and have worked with magazine patterns a lot, I can make out that they mean that the front and back are on the sheet in 2 parts. 

Even more important is that there are more lines on the pattern sheet for the pattern pieces than shown in the magazine. Those lines are not mentioned anywhere either but they are very important. If you don't use the correct lines for the fabric and for the lining, you will have a lot of difficulties or mess up completely. Won't write the details down here, as they are not relevant when you're not making this pattern. Needless to say that I don't recommend this magazine. 

In the end I checked the pattern thoroughly, added a bit to the side seam, hoping to get a bit more of the "swing" look. Next time I should draft my own pattern 😉


Wednesday, December 12, 2018

Finished project - coat

Think that I said it already: I have quite a few projects that never have been published on this blog. Sometimes this bothers me, as my blog is also a personal story of my sewing journey. When I see blog posts that I have written, say 8-10 years ago it sometimes strikes me that I have forgotten about a project or see a project that was loved, but worn out in the meantime. I like this keeping track of my projects, so I decided to try to publish more of my projects, even if it's something that it's not very interesting to others.
In this post photos of my coat, of which I published construction photos here and some random photos of a few projects made in the past few months.


Monday, October 29, 2018

2 yards of fabric–a coat!

Many, many years ago I participated in a contest on PatternReview and won a prize. I think it was second or third place, but I can’t remember which contest it was. The prize was fabric from Textile Studio (a company that no longer exists) and I chose a lovely wool fabric. It was 2 yards (which is 1.80 meter). Every year when I examined fabrics in my collection at the beginning of the autumn/winter season, this piece of fabric came out and I always thought “I must make some special jacket from it” and back it went in my closet for that special pattern that I would someday make from it.

This year I realised that my taste in jackets has changed and I no longer wanted a jacket from it, but that it would make a lovely coat. That provided a challenge: only 2 yards of fabric and the desire to make a coat from it. Sounds like mission impossible, doesn’t it? It took some browsing of patterns, pattern magazines and of course the internet and I found it. I checked all my Burda magazines from the August-January range and couldn’t find a suitable pattern. Having decided it should be a coat without a collar (too much fabric needed) and I googled something like “Burda coat without collar), a pattern from the March 2012 issue came up. I hadn’t checked my March issues, as I did not think that a March issue would have a pattern for a coat I was looking for.

image

Luckily I had that issue in my collection and decided that this would be my project to be made in my sewing days with friends. I planned a few changes: bound buttonholes instead of snaps, pockets with flaps instead of inseam pockets. For the pockets I took the position and shape from a Burda magazine from 2007! It is helpful to have a collection of over 100 Burda magazines Smile.

A few in progress pictures to get an idea of how it looks and how the inside is done.

Sample of the buttonhole, which is not done in the official way, but using the “window” method. Bottom right you can see the “window”, which is done with silk organza.

IMG_1259

The welts for the buttonholes, made of faux leather. On the inside is a piping cord, which you can see peeking out on a few.

IMG_1278

Buttonholes and welt for pocket done.

IMG_1280

All pattern pieces were block fused with a middle weight coat interfacing. I did that first (still at home) and after the block fusing marked the seamlines on the pieces.

I thought the  the fabric was not thick enough for winter temperatures, even after the fusible interfacing was applied. All pieces were interlined with a flannel. For this I cut all the pattern pieces without seam allowance and used a catch stitch to attach it (did take some time!). After that the rest was relatively easy.

54321B4A-69D9-4613-8C8C-02747EF7CBDAIMG_1282

Front shield as in most of my jackets applied here too.

IMG_1286

Sleeve head and shoulder pad inserted.

IMG_1291

Almost finished. I still have to insert the lining. As said, I’m still travelling and this last step will be done when I’m back home again.

IMG_1343

To conclude this picture heavy post a photo of the white cliffs, close to the location where I was with my sewing friends. I’ve been at several places along the south coast of the UK this time and wow, what breath-taking views! So different from county to county.

PA182166

Tuesday, October 31, 2017

Slow progress

I was quite busy and my head hasn’t been with writing blog posts in the past two weeks. Also not a lot was done to the coat. I intended to take it to my annual 5-day “weekend” with my sewing friends and complete it there, but changed my plans into sewing easy knit dresses for both me and my daughter and a pants sloper. The event was this past weekend and it was such good fun. Lots of sewing and knitting done by all of us, talked about all subjects you talk about between girls and just had a very good time together.

Another thing that is keeping my mind busy is that I might start giving sewing lessons/workshops next year. An opportunity came across and I’ve been thinking a lot about how to do it, what courses to offer etc. It will be something I will do next to my regular work, though it’s been on my mind for a long time to do this and share and meet with creative people. So much to think about….

Back to the coat. I’ve a few pictures to share of the inside of the front.

PA191000

Floating shoulder piece

PA191001

The facing not sewn yet, this was just to see how it would be with buttons. I will check other options as I’m not completely fond of the button closure.

IMG_5874 (002)

Wednesday, October 18, 2017

Short coat–Lekala 4625 back

It took me some time to find a pattern I wanted and could sew with the fabric I had. As this fabric was bought with the intention of sewing a Chanel style jacket I had only about two meters of fabric. Think it was a remnant piece as there were strange cut offs on both sides, probably for samples.
Having two meters to sew a coat is not much, to say the least. My choice of patterns was very limited and I settled for this Lekala pattern.
image
I will try to find an accent fabric for the belt/closing and if I can’t find it, I might skip that detail and sew buttonholes. I’m also thinking of adding pockets. A coat without pockets isn’t very good, don’t you think?
After roughly cutting the fabric pieces I block-fused them with a thin fusible interfacing. This I bought at the English couture company in the UK. (I used to buy most of my interfacing at Fashion Sewing supply from Pam Erny, but as they don’t ship internationally anymore I had to find another resource and this is certainly a good one. Great quality too).
The interfacing gives more stability to the fabric and keeps it from ravelling.
From that point I treat the fabric as the base fabric, meaning that I still added interfacing as I would for any jacket or coat that I did not block fuse with thin interfacing first.
PA180994
A back stay is added. The darts are pressed in the opposite direction from the darts of the main fabric. It could be better to stitch the seams with a catch stitch to keep them down. Something for another evening.
PA180996
A walking foot is almost a must to keep the lines matching.
PA180999

Wednesday, November 30, 2016

The coat revealed

Without further ado, here is my coat. Awefully difficult to photograph. I made most of the photos lighter to show some details, but still hard to see.

DSC_1218  DSC_1231 

DSC_1228DSC_1222

I’m quite impressed by the fit of this coat. The only thing I changed was to take in a little at the center back seam at waist level, I made no other changes. I indicated that I wanted my sleeves longer and they are the perfect length.

As the instructions are not helpful I would not recommend this pattern if you don’t have a lot of experience in jacket or coat making, but if you have it’s a great pattern. Remember to check the pocket position if you’re not tall (as I said in a previous post they were much too low for my friend’s coat originally).

The extra layer for warmth is wonderful, it started freezing here and I’ve worn it already. Very, very comfortable.

My next project will be a bit less complicated (I think).

Friday, November 25, 2016

Coat progress

At the start of the week I had high hopes of finishing my coat before Friday but it didn’t work out that way. Half of my sewing room was taken over by the stuff builders brought in to work on our new bathroom. My goodness, what a lot of stuff (and space) they need. There is a small corner left for me, and I did sew a bit now and then, but it’s more difficult with such a large project as a coat. The good news is that the lining is finished and waiting to be sewn into the coat (and we will have a nice new bathroom soon).

DSC_1209

Again a very wild print for the lining. In this coat I chose to quilt the lining to add an extra layer of warmth. I used flannel for it.

DSC_1208DSC_1207

DSC_1205

I think I will not sew the hem of the lining to the coat but keep it hanging free. A nice finish for the hem of the coat was called for. I didn’t have any bias tape or fabric to make it around. Then I saw the petersham ribbon that I had used for a skirt for my daughter (she left the house before I had a chance to make a picture) and it was exactly enough to use for the hem. On the inside of the hem there’s extra interfacing, apart from the interfacing you can see in the above picture.

The steps that still have to be done are
- sew in shoulder pads
- finish the bottom part of the front facing
- sew in the lining
- attach buttons
- give it a final press

Definitely want to do that tomorrow.

Sunday, November 20, 2016

Separate button placket – coat

I’m steadily working on my coat. I remembered something to be aware of for those who have ordered this pattern: check the position of the pocket markings in the front pattern pieces. For me they were fine, but my friend is shorter and the position of the pockets was very low (lower than her hands).

The button placket is sewn to the facing separately, creating an invisible button closure. As I mentioned in my post the other day the Lekala instructions are not very good, to say it mildly. This is the way I did them.

In the pattern the placket is cut from lining only. I chose to have one layer of lining, one of the coat fabric.

DSC_2192DSC_2193

From the facing pattern I marked the seamline and the top button hole with tailors chalk.

DSC_2194

Placed the placket on the facing to mark the position. Then folded the zigzagged edge under and pinned it in place.

DSC_2195

Sewed it from the lining side to the facing and pressed towards the front.

DSC_2197

I stitched the long edge and the space between the buttons. Writing this down now I do realise that I still have to stitch a line at the center from the right side of the coat, so that it might have been better not to do that yet. Also I had to undo a bit of the stitching between the buttons when I topstitched the edge of the coat.
For me a lesson to remember for the next time I do it like this: do the stitching between the buttonholes after the facing is inserted and the topstitching is done.

DSC_2198DSC_2199

Friday, November 18, 2016

Another coat

Not having sewn a coat in years, I’m now working on my second in one season. Must have gotten a coat sewing bug. As most of you know, I like sewing jackets and coats are in the same field, just a bit bigger and heavier.

IMG_4122

During the Canterbury get-together with my sewing buddies Vivien was working on a coat from a Lekala pattern. I instantly loved the pattern and its details and her result was stunning too. This is her coat  using this pattern.

IMG_4064  IMG_4063IMG_4062

Not being original (imitation is a form of flattery?) I bought the pattern. I am still to unsure how to draft the collar like this and at 2.99 euro I could hardly go wrong. It took some time to trace the pattern (getting more used to pdf patterns but still not my favorite) and the fit is good.

Seeing Vivien working on it and her photos as a “post-it note” were extremely helpful in construction, as the Lekala instructions are completely useless. She used piping at the seam lines, I’m doing topstitching.

Here’s what it looks like in my dark grey wool. I have more pictures of the construction of pocket and button placket, which I will add to separate posts.

DSC_2202   DSC_2200

Doing more inner works in this coat than in my previous coat. DSC_2191

Monday, October 24, 2016

Coat progress

How wonderful to have had those few days sewing together with friends. I’m back home now and it’s been great. We concluded that at home we all seldom have time to have so much dedicated sewing time in a few days (or even during one day). For me it was great to start on the coat and have it close to finishing. It still needs a couple of hours, but it would have taken me much longer otherwise.

Discussing design options, fitting, techniques is a great aspect of a get together with sewing friends. This collar and inset was something that was not in the original pattern but the result of discussing the muslin. I was not happy with the collar of the original (just a rectangle) and lowered it center front, gave it shape and added the trim. Initially the trim was a different fabric, but after two hours of work and not being able to attach it in a satisfactory way I was considering my options when Viv added another option to the mix and this is the result.

IMG_3983
Added a pocket with zipper:

IMG_3981

And because the fabric was thinner I added interlining as an afterthought. I used an extra layer of cotton fabric giving the coat more weight and an extra layer against the cold. As I did not initially plan for the interlining, I sewed it in to the seam allowanced instead of adding it to the pattern pieces in an earlier stage and  then use it as one layer of fabric. After the coat is finished you will not see this fabric any more. During these get togethers we always do an “ugly fabric swap” and this was what I ended up with(it’s always a hilarious hour when we swap, you don’t know what’s there and you don’t know what you’ll get till the very end because of the rules of the game). It was exactly enough for this and I was happy to use it as I had no fabric with me to use as interlining.

IMG_3979

The pocket placement was marked on both sides using tailors’ chalk. I first marked one side with a thick line.

IMG_3973

Then placed the other side of the coat over it, matching seams, hit it hard with my hand and the marking was on the other side as well.

IMG_3975

As I said, there’s still a bit to be done but hope to finish it very soon.