Showing posts with label trousers. Show all posts

Saturday, November 19, 2022

A burgundy red suit

I realised that I have not published anything of what I've sewn in my sewing week in October. The coat plan was abandoned because I was so unsure of the pattern and didn't want to spend that precious sewing week and ending with a garment that I was not happy about. Well, we can always change our minds😀

So I worked on a suit instead. Burgundy red, quite uncommon for me but I have decided that this winter I would not only sew black ;). My winter wardrobe was getting a bit boring!


Both garments were made with Burda patterns. The trousers are from the March 2019 issue, the jacket from the August 2019 issue. 

As always the inside got some extra interfacing, shoulder placket and sleeve head. 

A special lining is always fun! 


I've worn the suit a few times already. Thought it might be formal, but it doesn't feel that way. 


Thursday, December 5, 2019

A pair of trousers, Burdastyle September 2019

This is my second pair of trousers made from the BurdaStyle September 2019 issue. The first pair was made during the sewing week I enjoyed with my friends in October and as the fit was so good, I decided to make another pair.


A few notes on the pattern and the changes I did:

  • the pattern is for tall people and while I'm not 1.76 (the lenght the tall patterns are drafted for) I'm closer to that than to the average length of 1.68 of their regular patterns. I chose the size by waist circumference, hoping the pleats would give the extra room at hip height. Without any other changes, it was a miraculously good fit.
  • in the magazine 2 variations are shown, one with the pleats folded to the center front, one with the pleats folding to the sides.
    On my first pair, I hadn't noticed this, nor read the instructions and had folded the pleats to the side because that's more common. Sewing on auto-pilot. Though fine, I preferred the pleats to be a bit more away from the center, so I moved the pleats 1.5 cm to the side on my second pair. The photos are of the pair with this change.
  • Earlier this year I made a pair of trousers from the March issue, which had a slightly curved pocket opening which didn't gape. So I used that slight curve here too.
    When sewing the pocket, I used a strip of silk organza to take out any stretch.
  • I made the legs a normal length and didn't add cuffs.
  • Almost forgot: changed the straight waistband to a curved one. Straight waistbands don’t suit me. It’s not difficult to draft a new one, but I made my life easy when I was amongst my sewing friends. One of the ladies had just traced a pattern with a curved waistband. I made a copy, adjusted a bit on the length for my pattern and that was it. The happiness of sewing friends!


In my opinion a little basting helps to get a better result.


I know there are still pleats in the back, it's different with every move. I think I can't get it much better than this.


Thursday, December 13, 2018

Jacket and a pair of pants

Accounting for two other garments from Burda magazine: a pair of pants and a jacket.
The jacket is from the June 2018 issue, number 104.


Thursday, December 6, 2018

Tracing and marking a pair of pants from December Burda

Hmm, could the title be longer? This post is exactly about what the title says. I started making a pair of pants from the Burda december issue and in this post will show you how I use a pattern from the magazine.
A short aside: a comment was made yesterday on my post on the missing cutting layouts that Burda will bring them back in the March issue (see here (text in German), thanks Beate for sharing this information and Burda for listening to their readers!).

This is the pair of pants I'm making, omitting the flap in the waist. It's pattern number 102 from the December 2018 issue and available as pdf from the Burda site: Link to the pattern.

A very easy pattern, 4 pattern pieces and made in a stretch fabric. It's more close fitting/slim fit than I would normally make. I intend to wear it with a longer cardigan,

Tuesday, August 15, 2017

The pair of pants saved

As mentioned in the post about the horrible mistake of sewing the pockets in the back of a pair of pants I did want to finish them after all, because of the promise I made my daughter. She needs a couple of new pants and this was the first pair, more or less a trial version.

I have no photos of her wearing them, she took them home with her and I will hear from her whether they are comfortable in wearing so that I can make more.

This is how the back bacame. The pattern has no seams, I made a more sporty version of it, correcting the mistake. I had no fabric left to cut new back parts.

P8130055

The front is as basic is the front of trousers can be. Here I changed the difficult pocket flaps to regular inseam pockets. I had no interest any more to do the pockets as in the pattern and if there’s a next version it will probably be inseam pockets again.

P8130056

The pockets are the most difficult part of this pattern. Apart from my own mistake in sewing them in the wrong pattern piece I think a “normal” single welt pocket or the “pocket window” construction that I tried would be better. Other then that this is a very straightforward pattern that is easy to sew.

Wednesday, May 3, 2017

Christia pants

Last week I showed you how I did the cuff on the pair of pants I was making and today I can show the finished result. It’s made in a linen with some stretch. It may not be the best style on me but I don’t think it’s that bad either. I like it for summer.


P5030224   P5030228

P5030227    P5030226

It even has pockets that work well. Often this style of pockets stands away from my body because of the curve in my figure but these are more narrow, a straighter angle if you know what I mean.

This is how I did the pocket edge. This is a pattern piece that is not mentioned in the overview of included pattern  pieces but it’s there and if I understand StyleArc correctly it has to be cut from fusible interfacing and applied to the pocket edge (the instructions talk about pocket edge, pocket bearer and pocket bag. Not intuitive to me and I’m glad I know how to construct a pocket without instructions). As I prefer the pocket lining of a thin fabric (lining or cotton) I cut the pocket edge of the garment fabric and from a piece of silk organza. The edge of the pocket was on the straight of grain of the organza. This way I make sure there is no stretch in the pocket opening. I placed it on top of the pocket lining and treated it as one layer during construction. This way there is no lining fabric visible if the pocket is open a bit.

pocket edge

I did not make the side zipper all the way up to the waistband. I could not find a long enough zipper in the right colour and decided to make buttons in the waistband. Improvising a little here as the waistband had already been cut and I could not re-cut. A little hole is visible above the zipper but it’s not bothering me too much.Will probably wear it with a top over the waistband anyhow.

To conclude: a nice pattern that I only had to tweak a little. I had to heighten 2 cm and take in a bit at center back plus I made a contour/shaped waistband to get a good fitting waistband.

Wednesday, May 18, 2016

Knip mode top and Vogue pants

Black is always a very hard color to photograph. Seeing the pictures from yesterday on my blog in daylight, they even are more black than I saw them in artificial light.

Today a photo from me wearing the top, which always gives a better indication about fit and style than a dress-form photo. It helps I have a tripod and remote control now. Still need a bit of practice using that.

DSC_0263 DSC_0272

The colors are very much lightened so you can see the pleats of the neckline. This top has so many layers that I advice a very thin knit for it, otherwise you will have problems sewing the shoulder seams. This consists of 5 layers of fabric (double layer collar with gathers!, front, front facing and back shoulder). Knip mode is a magazine like BurdaStyle with sheets where you trace the pattern from. In this case very difficult as there are many lines for all the sizes included and two pattern pieces were in the same area as well. I think the pdf pattern would be useful in this case, instead of tracing it. Knip mode has extra instructions (in Dutch) on their website. Reading them the first time it seemed clear as mud, but when actually doing it with the pattern pieces it worked fine. For the (Dutch) readers: an asterix * is missing on the pattern that is referred to in the instructions, but if you got that far you’ll probably see how it’s done.

The trousers are Vogue 1417, for which I wrote a blog post on the great draft and instructions for the pockets. This pattern had some great design lines. Not so sure about the style on me, too narrow at ankle height.

DSC_0252  DSC_0247

Tuesday, May 17, 2016

Linen pants

Despite the wrinkles, I love linen pants (trousers) for summer. Absolutely love them, whether their fashionable or not. In the past years I had pairs of white and a beige colored linen as wardrobe staples for summer. Usually after two years I have to replace them, as they are then showing the intensive wearing and washing. Last year I did without white linen ones, as I was so obsessed with fit that I was never satisfied. I’ve been making muslins and drafts but never got to the point that I was really happy with the result. So I made no pants any more….

Fast forward to last week. 6 weeks ago I bought navy blue linen at the fabric market with the intention of making pants and have bought white as well. But, no pattern that I was happy with. All of my magazines and most patterns are in storage. Bought the Burda pattern that was a petite size. Then a “what do I care” moment and I bought a Burda pdf pattern, thinking it will be better than rtw (which I tried in a shop and they were, as usual, not fitting at all).  

image_thumb image_thumb[1]

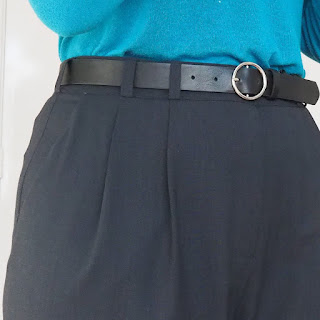
This is a not a difficult pattern, I even consider it easy but that might be my experience with sewing. During construction it looked promising, though the final fit is only to be judged with the waistband attached. When it was finished I was happily surprised. Yes, a bit of space in the back leg, but nothing to worry about. The pockets are not so good, as they gape a bit, should have known better than to use this type on my figure. I used all of the tricks to prevent it, without success. This is almost straight out of the (imaginary) envelope. The waist I traced one size smaller than the rest of the pattern. After the first fitting I added a little to the hip area, but otherwise no changes!. Pretty good in my book.

DSC_0234_thumb[1] DSC_0233_thumb[1]DSC_0231_thumb[1] DSC_0229_thumb[1]

My next pair will be a white pair. I’ll change the shape of the pocket.This blue pair I will wear  a lot after I closed (part) of the pocket.

As you may have noticed I’m an infrequent blogger again. There are a few projects I’ve written about but not completed the story. I’ll try to come back to those too.