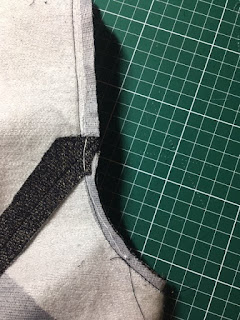
Most of the corners of seams are therefor cut at an angle.

The seam of the facing is graded. The facing is cut shorter than the front pattern piece. In general the seam allowance that is closest to the outside of the garment is longer.
For the corner at the hem I cut back as in the following picture.

The armhole seam is trimmed to 1 cm at the upper part, only half a centimeter at the lower part. Mostly this is 2/3 and 1/3 of the height. In this case I cut the side panels to a smaller seam allowance.
For the sleeves I use a sleevehead and shoulderpads. The smallest shoulderpads that I can find (in height), as they are not used for getting height or width (the 80's are a long time ago), but just to give the shoulder area and the top of the sleeve a bit more support.
Sleeveheads are never mentioned in Burda instructions, nor were the shoulderpads part of the construction for this jacket. I just prefer to use them anyway.
Sleeveheads are never mentioned in Burda instructions, nor were the shoulderpads part of the construction for this jacket. I just prefer to use them anyway.

The sleeve head is attached on the inside of the sleeve. I use basting thread, very close to the seam. On a tailoring course I once took I learned that basting thread was often used on the inside, because it's not slippery.
I'm close to finishing. Hemming still to be done and of course the lining. Hopefully sometime this week.


It's beautiful! The details really matter. You also know how to press, another important part to how it looks.
ReplyDeleteYou are right, pressing is very important and something I do as a natural thing in sewing. I simply forget to mention it.
DeleteBeautiful shoulder!
ReplyDeleteThank you
DeleteThank you for all the detail photos and information. I love to read about that stuff. I have yet to tackle a jacket like this but want to some day. Thanks , very inspiring!
ReplyDeleteNice that you like to read about it. It's a first step to gather information and then take the plunge and do it. Hope some of it will help you.
DeleteBeautiful installation. The pad and sleevehead make such a difference. I wish everyone could see how this works so well and does not have that wide shouldered vibe at all.
ReplyDeleteThank you. Agree that shoulderpads are often regarded as "too much", be it 80's vibe or just too high. With my jacket I think I show it can be different.
DeleteIt's such a pleasure to see the way you sew.
ReplyDeleteThank you, that's very kind!
ReplyDeleteThat sleeve is a beautiful fit.
ReplyDeleteThank you very much for posting the details here. This is very helpful as I consider a couple of jacket projects. Your work is very inspiring!
ReplyDelete