Thank you so much for all the kind comments on my jacket. After this was finished I wanted to make something easy, but I'm just not getting at it. You all know it: life gets in the way. And there is also my coat. The muslin was not finished in time for the coat sewalong timeframe. I'll publish my (2nd and 3rd) muslin in the coming days. The 3rd is yet another BWOF pattern. It seems I simply can't make up my mind. Must still sew in the sleeves, but I already think it's too big.
What I do know is that I got intrigued by my jacket and by the coat project in the technique of sewing sleeve vents. I looked in the sewing books I have and saw different techniques, which I want to try to see what the different results are. Today that results in a tutorial of a method which I think is very good when you work with thick fabrics, as there is a minimum of bulk.
As always, this is my interpretation and not the only way to do it.
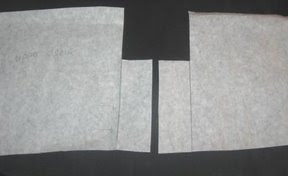 | The pattern pieces: for upper and under sleeve there is an extension.
Look at the hem, it's not quite straight in this pattern. |
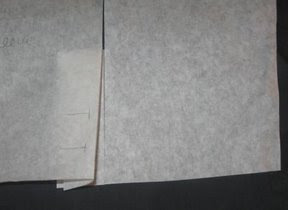 | When you fold the pattern pieces, the hem for the under sleeve must be in the same line as the upper sleeve. |
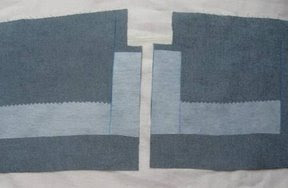 | Interface the hem. The vent parts are cut without seam allowances. I use pinking shears to avoid a line to be seen in the fabric on the right side. |
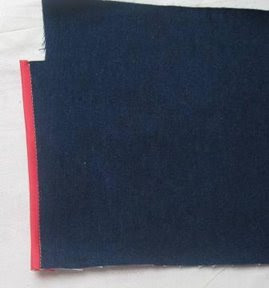 | Make a hongkong finish on the upper sleeve. |
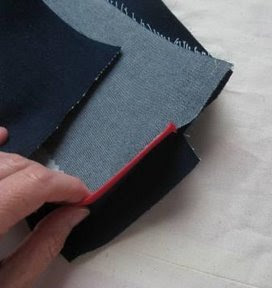 | Stitch the upper and under sleeve till the marking on the vent (do not sew the other seam of the sleeve yet).
In my pictures you will see that I did this step a little later. I didn't want to start the whole process of making this and taking pictures again. |
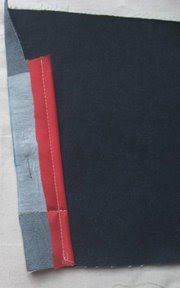 | Fold the vent, right sides of fabric together, stitch the width of the vent at the hemline. |
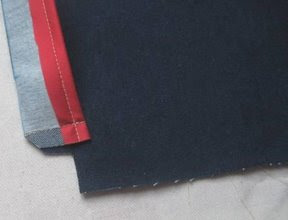 | Cut away excess and grade the seam.
|
 | Upper sleeve vent is finished. |
 | Sew the buttonholes. |
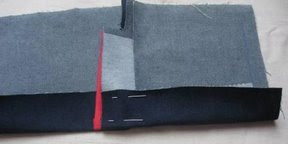 | Turn up the hem allowance of the under sleeve, wrong sides together. |
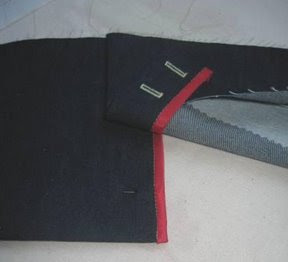 | Finish the under sleeve vent with a hong kong finish.
Make a clean finish on the wrong side of the sleeve too. |
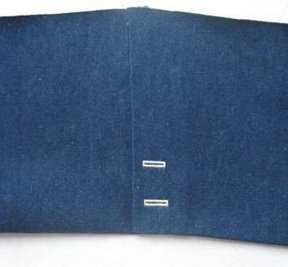 | This is how the vent now looks like. |
 | This is the inside, you can see I made a little seam in the hongkong finish on the inside.
To be able to properly open the seams of the sleeve, make a cut just above the vent. |
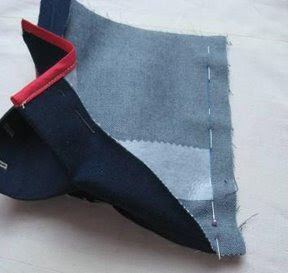 | Stitch the other seam of the sleeve. |
 | This is the way I cut at the hem and grade down to avoid bulk. |
 | Finished sleeve, ready for the buttons to be sewed on.
|
 | The inside of the sleeve. Ready for the lining. |
Hope this is helpful.
And see what arrived in the mail today:

I swapped this with a kind lady in Portugal for a Knip Mode issue. Thank you Tania.
DD and I are very enthusiast about a lot of patterns. DD even traced a pattern tonight for a skirt already and made me promise to make her a pair of pants next week.


Great tutorial. Thank you for taking the time to post it, I struggle with these.
ReplyDeleteSigrid - thank you so much for an excellent tutorial. This obviously takes a lot of time on your part to photograph and explain. Your help is greatly appreciated.
ReplyDeleteSigrid, good tutorial. is a very clean and effective way for the opening of the sleeves with eyelets. thanks. Greetings, Paco
ReplyDeleteOh good, now I don't have to avoid sleeve vents anymore!
ReplyDeleteSigrid - this is such a good tutorial. I have a coat pattern which i would like to try but I have been a little timid. I think I can do it now with the help of your tutorials. That sleeve vent looks very professional! Thanks ;o)
ReplyDeleteThat'a a great tutorial and I love the hongkong finish on the edge!
ReplyDeleteI had never seen this version of a sleeve vent. Looks great, also would be good for an unlined jacket with seams treated the same way. Sleeve vents are one of those satisfying accomplishments and adds that extra something to the jacket. Your machine made buttonholes are really excellent. Jealousy here.
ReplyDeletePerfect, I think I can just change this a bit and use it for my skirt kick pleat. Thanks for the great detail and pictures.
ReplyDeleteJust to let you know that your tutorials are appreciated, even well after they are posted.
ReplyDeleteSue C
Thanks for sharing this tutorial with us... its helpful to me... Like your blog too... thanks to help me...
ReplyDeletemens cufflinks designer
cufflinks for men designer
designer cufflinks
hot water bottles