I love to share my projects. It's mainly sewing projects and a bit of knitting too.
Saturday, June 30, 2007
Burda top
(This does not work for me with jackets or coats btw, those are time consuming projects also in the sewing stage).
After the dress, the top is now almost finished. Black was on my sewing machine and serger, so I continued with the top, as this is also sewn with black.
This is not a pattern I would normally take for myself, but I find that with all the projects I see on Pattern Review and other blogs, that I become a little more experimental.
And with success, I tried it and my daughter immediately was very enthousiast: "you must wear this tomorrow". (having a birthday party to go to). And my husband likes it too. But unfortunately I can't finish it tonight, as I the shop I went to for notions did not have a black or invisible zipper that was long enough. The black band is cotton batist, no stretch: a zipper is needed.
I like it too, and want to finish it soon.
This time I sewed all seams on my sewing machine first, as I want to make the band match exactly in the side seams, which with serging sometimes is a bit difficult. Also used my walking foot on this combination of stretch knit and cotton batist.
AND: my 14 year old Bernina serger is giving problems again!. Arghh. It had a rather expensive repair this winter, so I think I must go back with it this week. And I hate to miss it.
Thursday, June 28, 2007
Wrap dress finished.
And in the end I like it better with a black belt! A full review I have added to Pattern Review.
Wrap dress
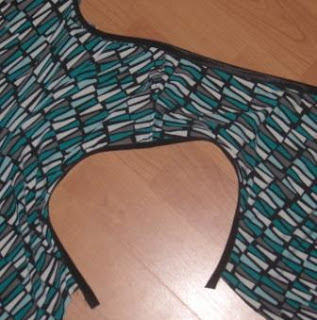
I finished the neckline, armholes and skirt with folding elastic, which I first ironed double, a tip I read on PR, and which makes working with this easier. When pinning neckline and armhole, I stretched the elastic a little bit, to prevent gaping.
Because I didn't want any difficult overlaps with the elastic, I first sewed the shoulders and then attached the elastic to the armholes. Only after this the side seams are closed.
Elastic sewn to armhole, then stitched and serged.
Top of seam handsewn to lay flat, and finished underarm seam.
And this is how the top of the dress looked like after attaching the elastic. You can see that the normal length of the top is too short for me (I alway lengthen patterns 4-5 cm in the waist). I had made the original dress longer, but have added a tie in this dress, so the extra length will be in the tie.
The armhole needed no change, as the pattern is for knits already, the armhole was not wide at all.
Monday, June 25, 2007
All Burda patterns
Thinking about my next projects I realised:
- Summer holidays are approaching fast (we're off to France, looking forward to that)
- I promised myself last year to throw away old shorts that I've worn for ages (only wear those on holidays)
- If I want to throw away shorts, I'll have to make (or buy) two new shorts. Buying is no option, would take long shopping hours to find something that fits, which is frustrating and usually very expensive for a garment that I seldom wear.
- I'd like one easy dress, that needs no ironing and can be worn to go to a restaurant for example. Not too fancy, but I don't like to go into a restaurant in shorts.
Burda 06-2004-111, shorts
These are shorts without waisband, I like the pleats in the front and cut them out of a brown kaki from my stash. The largest size was 42, so I cut 3cm seam allowances at the sides, because I'll probably need a bit more room at the hips.
And I made the length longer, added 20 cm to make them knee length (my legs are not so beautiful as the model in the magazine, plus I'm not 18 any more).
Burda 05-2006-115, wrap dress
I made this dress before, also from a Gorgeous Things fabric. This time I'll make it sleeveless and with a waistband that can be pulled through a hole on the right side, so that wrapping the dress is a bit easier.
Burda 03-2007-113, top
This has been on my "to make" list since a while, I liked the results of others who reviewed this pattern on Pattern Review. And when I received this Gorgeous Things fabric, thought it would suit this pattern. I'm making it with contrasting black cotton batiste.
Saturday, June 23, 2007
Reaction on comment
First: how did I start?
I started with a course on sewing lingerie that was held in the town I live. The woman that minded my children two days a week when they were little was on this course and told me about it, knowing that I sewed too. It was a great course, that thought me all the basics. Then I started reading information on the internet, bought a few commercial patterns, took another workshop with someone else. All this together let to the bra's I make now for myself and my daughter. So, it's a combination of lessons and trying, my first bra's did not fit as well as they do now. From a technical point of view: you must be precise when sewing lingerie, a few millimeters make a big difference in a bra, where in a skirt you won't see the difference.
And on books: I do not have any book on lingerie making. I considered buying the book "the bra-makers manual" last year, but thought it too expensive for my needs, as I read this book is mainly for those who sew for others.
Someone wrote me a mail and told about an Australian book "Making beautiful bra's" that deals with copying an existing bra. But I don't know this book myself.
And if you have an old bra that fits you well, you could just pull it apart and make a pattern of this to start with.
As far as English patterns go, I'm very sorry but I have no experience with those, so I can not recommend.
But I would be glad to help with a translation from Dutch or German for those who would like that. Just mail me.
Friday, June 22, 2007
Empty sewing baskets!
Further I finished my Sewy Linda bra and panty.
For the bra I will write a review on PR sometime this weekend, the panty pattern is drafted from instructions to my own measurements. Made this panty first in white lycra with white lace as a muslin. This muslin is very wearable, so now I made this one to go with the bra. I like the way the two fabrics fit together.
Further I finished the panties for my daughter, the dark blue capri for myself was finished more then a week ago, but I could not make a good picture of this as the fabric is so dark.
So, what's up next? I have so many ideas, too many fabrics and of course lacking time.
I think of making my DKNY dress in a plain fabric, and altering the skirt and make it wide with godets. Want to make shorts, t-shirts etc.
And want to make a dress (yes, another one!) of this fabric from the package I received from Gorgeous Fabrics. It will be a sleeveless version of the Burda wrap dress I made earlier this year.
And I took lessons again, this time I'm going to make a swimsuit! Very anxious to see how this will be.
This is the fabric I'll be using for the swimsuit. And I'm not going to count this one in my sewing baskets!
Wednesday, June 20, 2007
Bra construction
The Sewy pattern called "Linda" has very different cups. That's why I bought it about two years ago. I made it then as a wearable muslin from brown lycra and lace. But though the fit of the cups was right, the overall feeling was not good. On the underside the elastic flipped to the inside and the side cups in lace were not interfaced, which made it not strong enough for my D cup.
I left it at that but the pattern remained on my mind and I decided to make it again, altering the pattern.
The main change to the pattern for the cup so that the wire chanelling was not flipped towards the cups, but outward (as I'm used to do).
Here are three pictures of three different bra's to illustrate the problem.
The Linda pattern is a full band bra, and in that case you sew the chanelling over the elastic. But not in the description of Sewy (and two years ago I had not enough experience to know beforehand that I had to change it). In the picture of the brown bra you see the way the Linda patterns describes it. The wire is above the elastic
In this picture you can see the "normal" construction for a full band bra, this is the bra I'm working on.
And in this last picture you see the wire chanelling on a partial band bra. You sew the chanelling towards the cups, but that is no problem, because there is no elastic on ther underside of the cups (btw: this is the inside of the blue bra I posted early in May).
Sunday, June 17, 2007
Sewing Saturday - 2
The finishing took quite some time, but I love the way it looks inside. It's a pity that no one will see this side of the dress, so let's post a picture here.
A full review of this dress I've written on PatternReview.
I like this dress, and think I should wear dresses more often. This summer is called "the summer of the dress" I think, so what's keeping me?
Saturday, June 16, 2007
Sewing Saturday!
And today my son has a hockey tournament, and my husband went with him, so at 8 o'clock this morning I had the house alone.
After some cleaning I started sewing by the arithmetic of Nancy's comment on Cidell's blog: 15 minutes of cleaning is 1 hour sewing. I cleaned for an hour, so.....
I'm making the DKNY dress I posted on earlier and making it of a linen fabric. Earlier this week I made a muslin. I traced the pattern from a 14 at the top, to a 18 at the hip.
From this I learned:
- some armhole gaposis at the front, very little at the back
- armhole a tadd too low
- neckline in the back a bit too wide
- would like a walking slit at the back
- the sewing order of the front can be easier than described.
After correcting this yesterday evening I cut the fabric and lining.
From a review by Kay Y on Pattern Review this week (very timely indeed!), I thought I might try the method of underlining the dress, instead of sewing the lining as a separate dress. I took her method of sewing the underlining within the dart line first, before sewing the dart.
Never did this underlining before, so I searched and found some information on the Threads website. Further I decided to use a hongkong finish. All in al: a challenging project.
Some pictures of what I did till now (1 pm here).
1. Pinned the underlining to the fabric with a lot of pins.
2. Attached the underlining, using my walking foot to prevent movement of the two layers.
3. Sewed most darts
4. Attached the upper front part to the lower front part, carefully clipping. Then I added a hongkong finish with the lining fabric.
OK, I'm going to leave the project here for there are a few other things I want to do today, but hope this dress is finished this evening (no particular reason, just tomorrow no sewing time).
Thursday, June 14, 2007
Yahoo photo's
But the bra is finished! I'm very lucky to have a shop with lingerie notions in the town I live, so I could buy shoulderstraps at the same time as some daily shopping. The wires make the bra look a bit strange, but on my daughter it's fine.
And below are bra's from the fabrics and notions bought at Kantje Boord, on which I posted earlier. These are made with the Merckwaerdigh pattern I reviewed earlier. It's unbelievable what you can make out of 2 meters of lycra. Now I moved on to a bra for myself combining these fabrics, which I like, but my daugher didn't want that.
Tuesday, June 12, 2007
Some days...
I was at work (from home) and trying to get a job started that has been on my mind for too long. Today I would make a good start. Apparently this was not a good day for this, I had to get a few more stones for workmen changing our drive, dear daughter came home from school 2 hours earlier, a lot of phone calls (both private and work related, sometimes it's easier not to work from home).
Then tonight I tried to make a bra from a new pattern for my daughter. Difficult descriptions, in German too, so in the end I just tried it my own way. After ripping some seams and even cutting a few pieces again (no good day!) it went rather smoothly, but ended up with having no shoulder straps in white to finish. Arghhh. I always have white shoulderstraps somewhere (I thought).
This is a picture of the bra so far on my pressing ham.
It's a Sewy pattern. When it's finished I'll write a review.
Sunday, June 10, 2007
Vintage /OOP patterns
Recently I bought 2 vintage patterns on E-bay. One is the Ralph Lauren top of 1986 that I just completed. The other the Anne Klein dress from the nineties above that will be one of my next projects (view A).
I never bought a vintage pattern before (and the 80’s don’t sound very vintage to me, when do you call a pattern vintage?), but this top appealed to me because it reminded me of the Burda top with similar shoulders that I made a few weeks ago.
The pattern in the envelope was the pants part of Vogue
And I remember too that I was amazed by the detailed descriptions and step by step pictures of the construction. That I had never seen and I learned so much from it, used as I was to Burda or Knip instructions. I saved money to buy one or two other Vogue patterns (one of them another Claude Montana that I still have), and it brought my sewing to a higher, more ambitious plan.
Another memory is the light yellow fabric that I used for the pants, and a special shade of green fabric like silk (certainly not the real thing) for the blouse and the special button that closed the collar. I don’t remember making the jacket. Now I will remake the pants one day.
But the envelope contained only the pants pattern and both my mother and I don’t know where the remaining parts are. We both moved house several times since then, so maybe it got lost forever.
So I looked at e-bay for this specific Vogue pattern, as I would dearly like to make the blouse once more too. And there the pattern was, but alas, in a size
10. No good for me.
Friday, June 8, 2007
Arm hole adaption
It's e very explicit print, that I would not choose normally. I bought it from EmmaOneSock, and there are more swirls then assumed. But for this top it seemed fine, and for me it is. This print does not require a pattern with many design details.
First I completed the adaption of the pattern. The sewing books did not solve the problem how to correct the extra width on my front armhole. But with common sense I came to this method of working:
- Pinned a piece of fabric under my arm and marked the armhole line I wanted
- Cut the fabric at the line of the added dart
- Marked the pinned line on the muslin fabric
- Drafted the lines of the adapted armhole the back and front pattern
- Drafted the "dart" on the front part, and moved the extra width to the side dart
- As last point I redrafted the point of the dart a little higher, as the bust point on the pattern was lower than mine.
The result in my finished top is good.
Thursday, June 7, 2007
A vintage pattern
Good, that meant 1 basket to fill, and this it is:
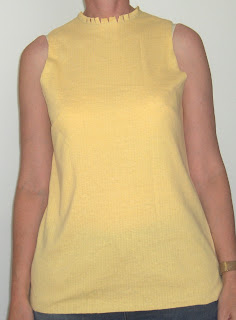
A Ralph Lauren pattern from 1986.
The pattern is a size 12, which is my size if I go by high bust measurement, but have to do an FBA (so glad I found the Pattern Review site last year, I did not know about taking high bust measurement before as starting point for a top).
I traced the pattern two weeks ago, and waited the arrival of the book Fitting Finesse from Nancy Zieman, that I bought on e-bay. I'd like to know more of adjusting pattern, and already have the book Fast Fit of Sandra Betzina. Then Nancy of Encue Creations showed Fitting Finesse on her blog, and I asked her if there was a different way of doing a FBA in this book. She kindly replied that there was a difference and that it was well worthwhile to have this book. Yesterday I received it, and she was right. Thanks Nancy.
So this is the result so far, after adding a dart to make more space in the front part. The pattern has no dart, so I added one.
Above are pictures of the further unadapted top.
Points that are OK:
- Enough space in front after adding dart
- Neckline is fine
- Back armhole is fine
- Length is good, this was with cut with seam allowance, so it will be a bit shorter if I don't increase the length of the pattern. No problem if it is a bit shorter.
- there is too much space on the front armhole
- the seam allowances of 5/8 inch are also added to this muslin, this will mean that you can see my bra too clearly after taking off 5/8 inch.
- I must cut off the seam allowance of the armhole, to know if I want a finished shoulder length as in my pictures, or if the line of the pattern is OK.